> ## Documentation Index
> Fetch the complete documentation index at: https://docs.userpilot.com/llms.txt
> Use this file to discover all available pages before exploring further.
# Mobile Event Auto-Capture
> Automatically capture supported mobile user interactions with the Userpilot SDK without manual event instrumentation.
Mobile event auto-capture allows Userpilot to automatically collect supported user interactions inside your mobile app, without requiring developers to manually instrument every event. Once enabled, Userpilot starts capturing common interactions such as taps, text changes, and screen views, giving your team a foundation of behavioral data from day one.
## Overview
With mobile event auto-capture, the Userpilot SDK listens for supported native interactions and records them automatically as raw events. These raw events can then be labeled in Userpilot to turn them into named, trackable events, ready to use in analytics, reports, segments, and mobile experiences.
This differs from manual event tracking, where developers write a tracking call for each individual event. Auto-capture removes that overhead for common interactions, while labeling gives your team control over which raw events matter and what they should be called.
Auto-capture is enabled at the SDK level using two flags:
```swift theme={null}
// iOS
enableScreenAutoCapture()
enableInteractionAutoCapture()
// Android
enableScreenAutoCapture = true
enableInteractionAutoCapture = true
```
## Use cases
1. **Understand how users interact with key mobile screens:** see which elements users tap, change, or engage with, without pre-defining every event
2. **Build reports based on common mobile interactions:** use auto-captured events as the basis for funnel, trend, or engagement reports
3. **Create segments based on mobile behavior:** group users by the interactions they've completed, such as tapping a specific button or reaching a particular screen
4. **Reduce the need for manual event instrumentation:** cover a broad set of interactions automatically, so engineering effort can focus on more complex or custom tracking needs
5. **Identify drop-offs or friction points in mobile journeys:** spot where users stop interacting or abandon a flow by reviewing which events fire and which don't
## How mobile event auto-capture works
After installing and configuring the Userpilot mobile SDK, auto-capture begins collecting raw interaction data in the background. Here's the general flow:
1. **Install or update the Userpilot mobile SDK** and enable auto-capture using the SDK flags above
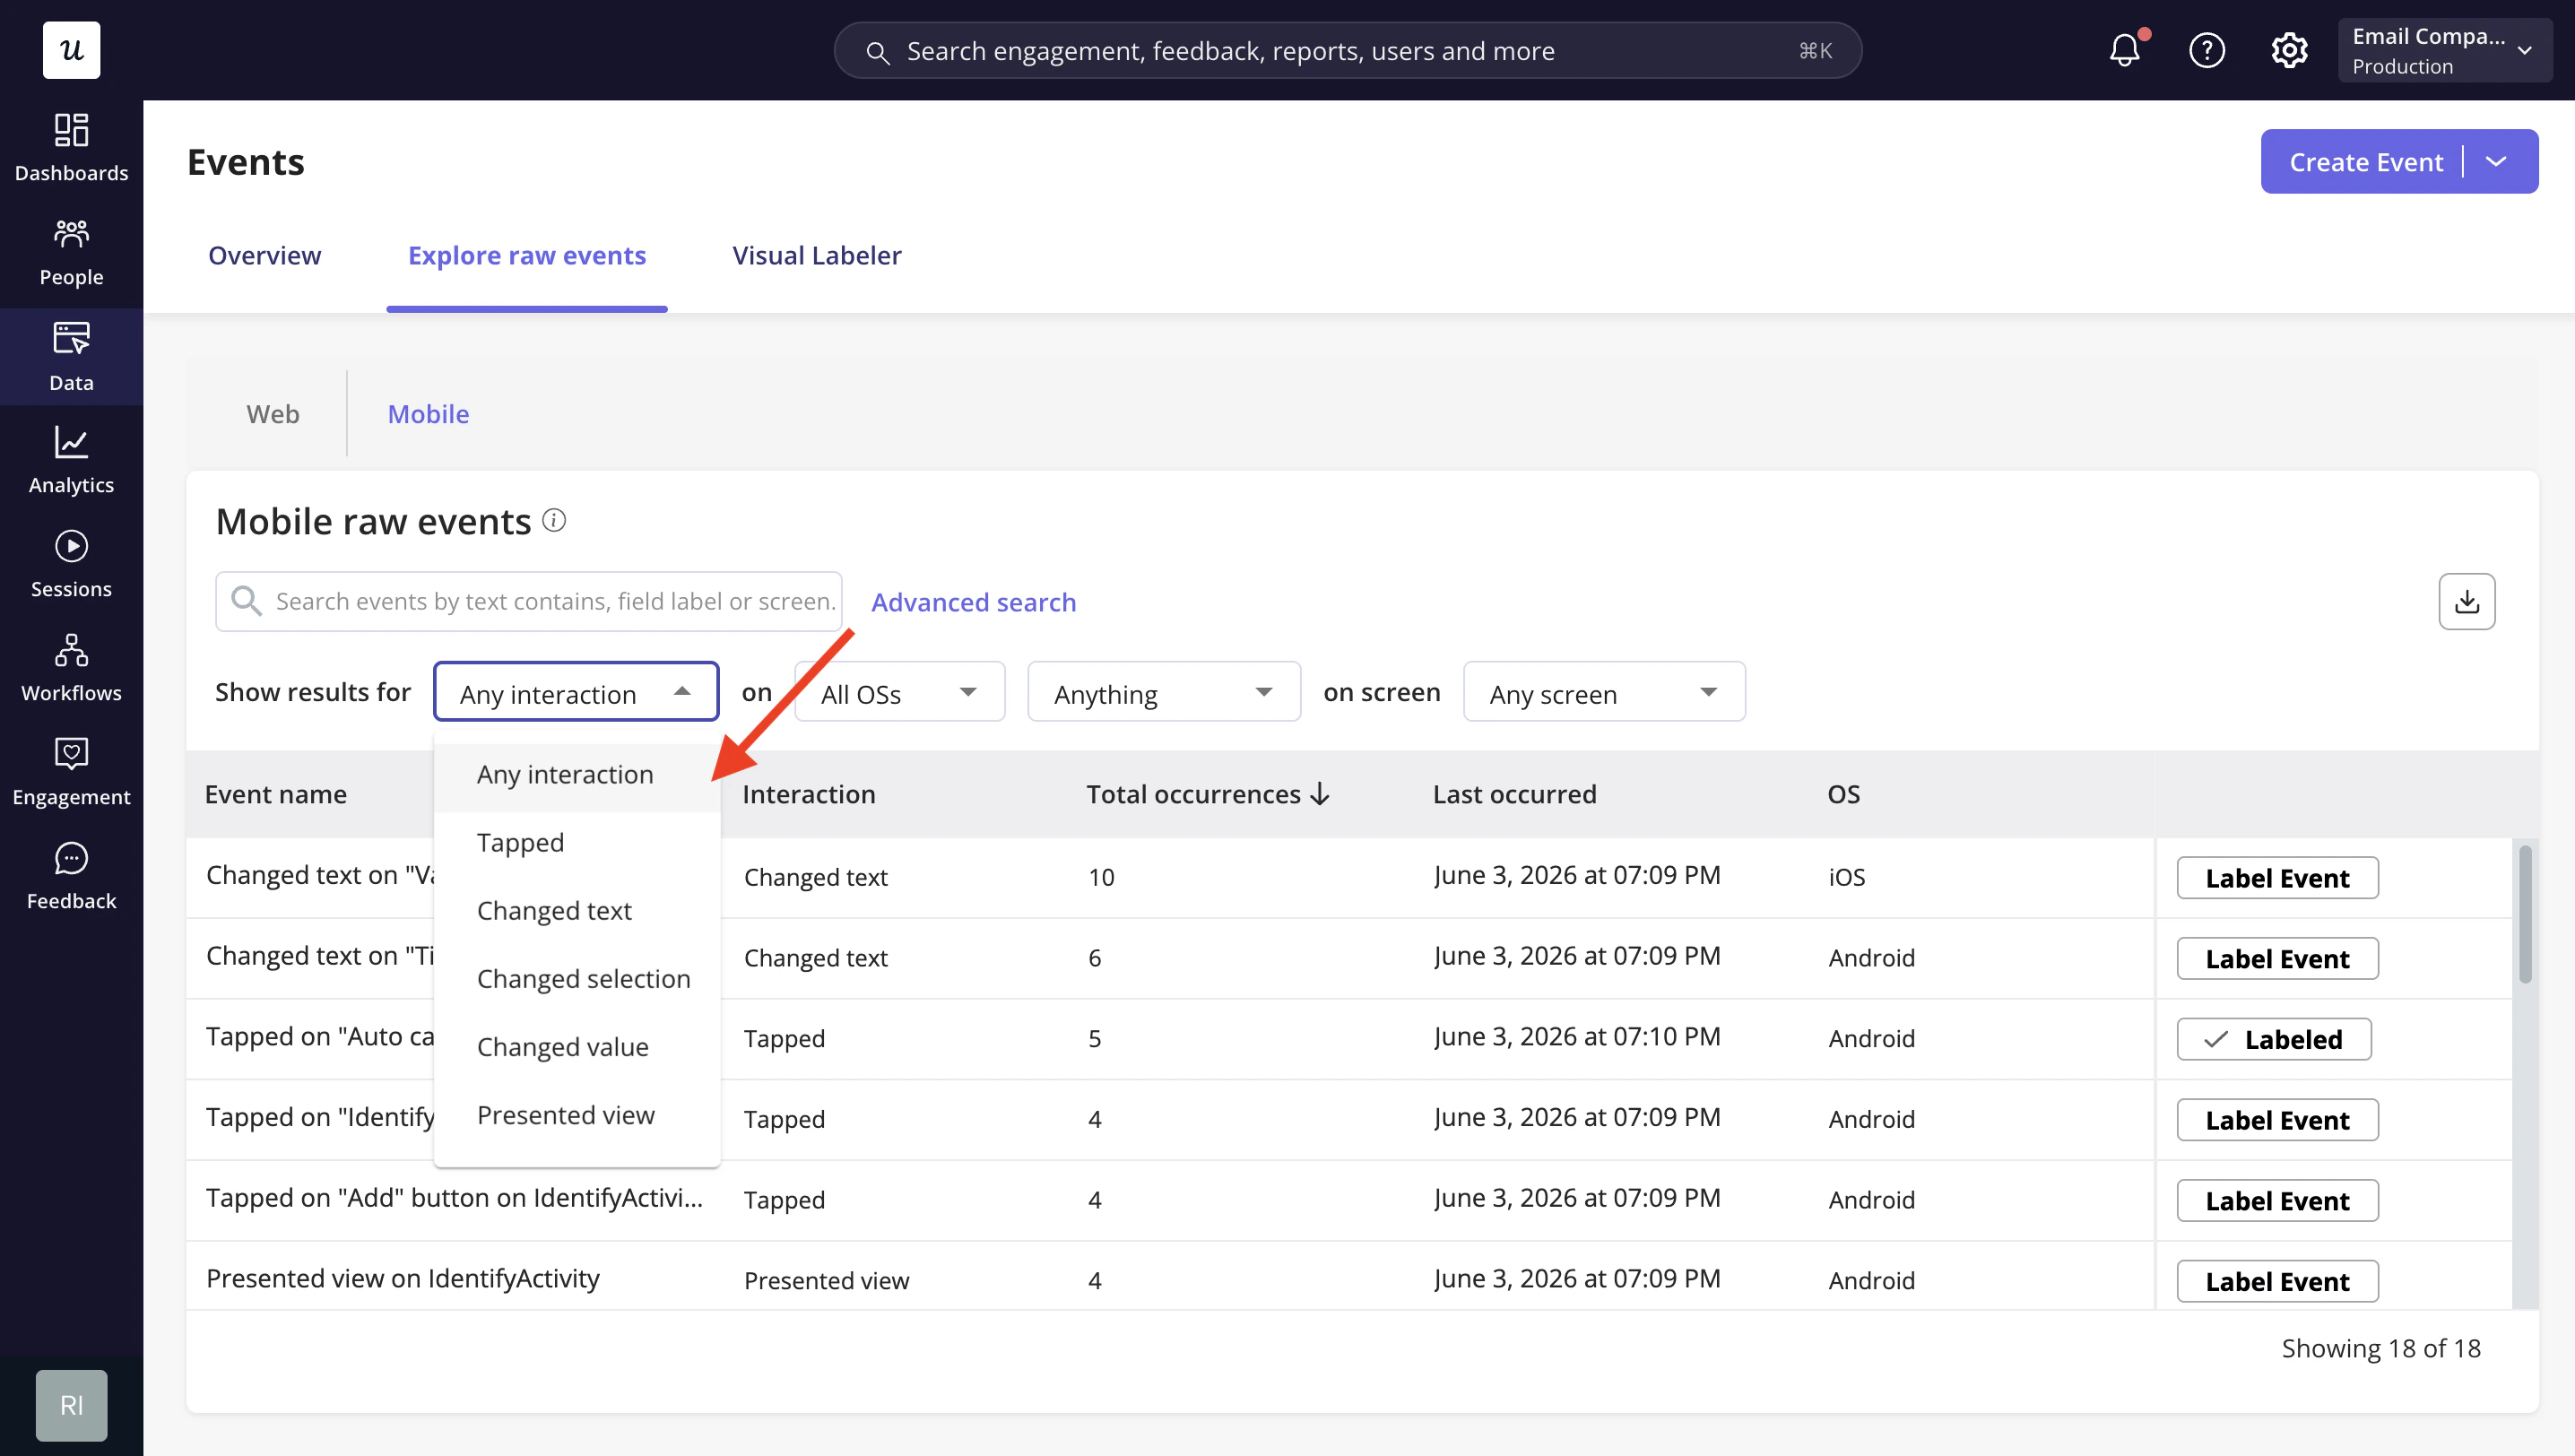
2. **Userpilot starts collecting raw events** - supported interactions across your app are captured automatically
3. **Raw events appear in Userpilot** - navigate to [Data → Explore raw events](https://run.userpilot.io/events/explore-raw-events?tab=mobile) to review what has been captured
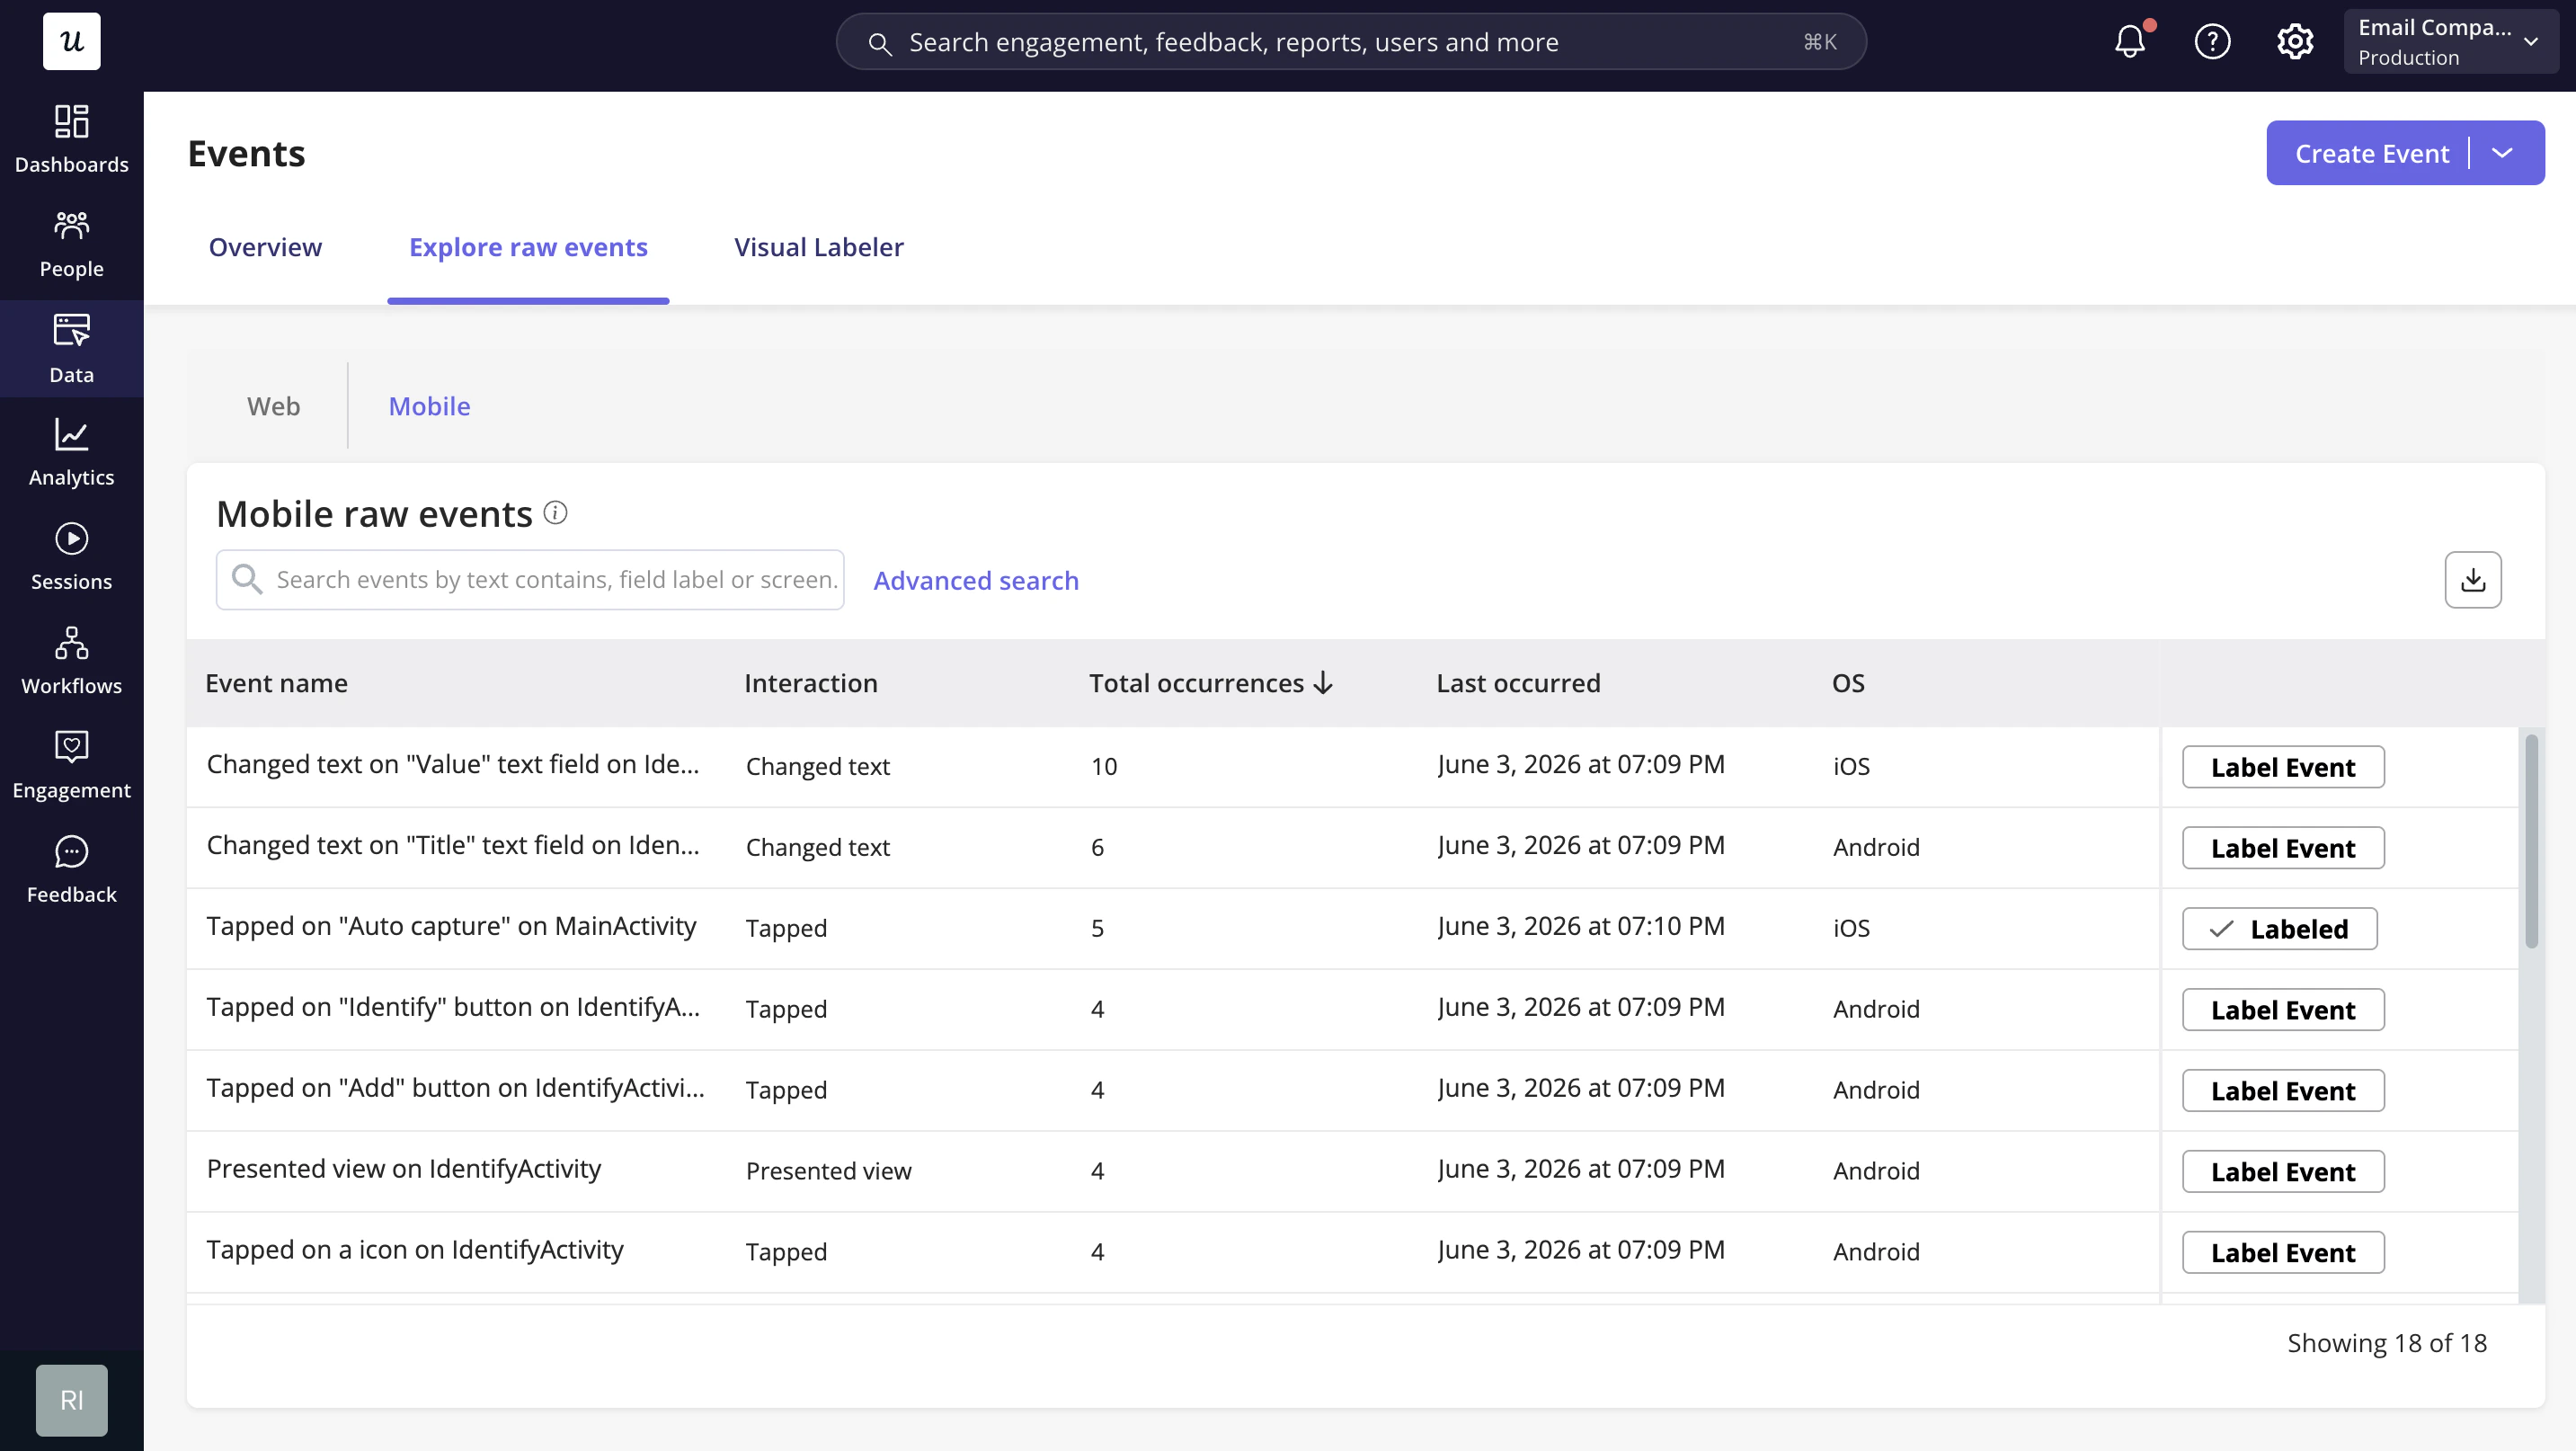 4. **Label raw events**
A **Mobile Labeled Event** turns a raw, auto-captured interaction into a named, trackable event. You define it in a right-hand slideout with two tabs: **Details** and **Targeting**.
**Targeting**
The **Targeting** tab contains two independently toggle-able blocks - **iOS** and **Android**. A single labeled event can target one platform or both. The platform you originally captured the event on is shown first and comes pre-filled.
For each enabled platform, you define three things:
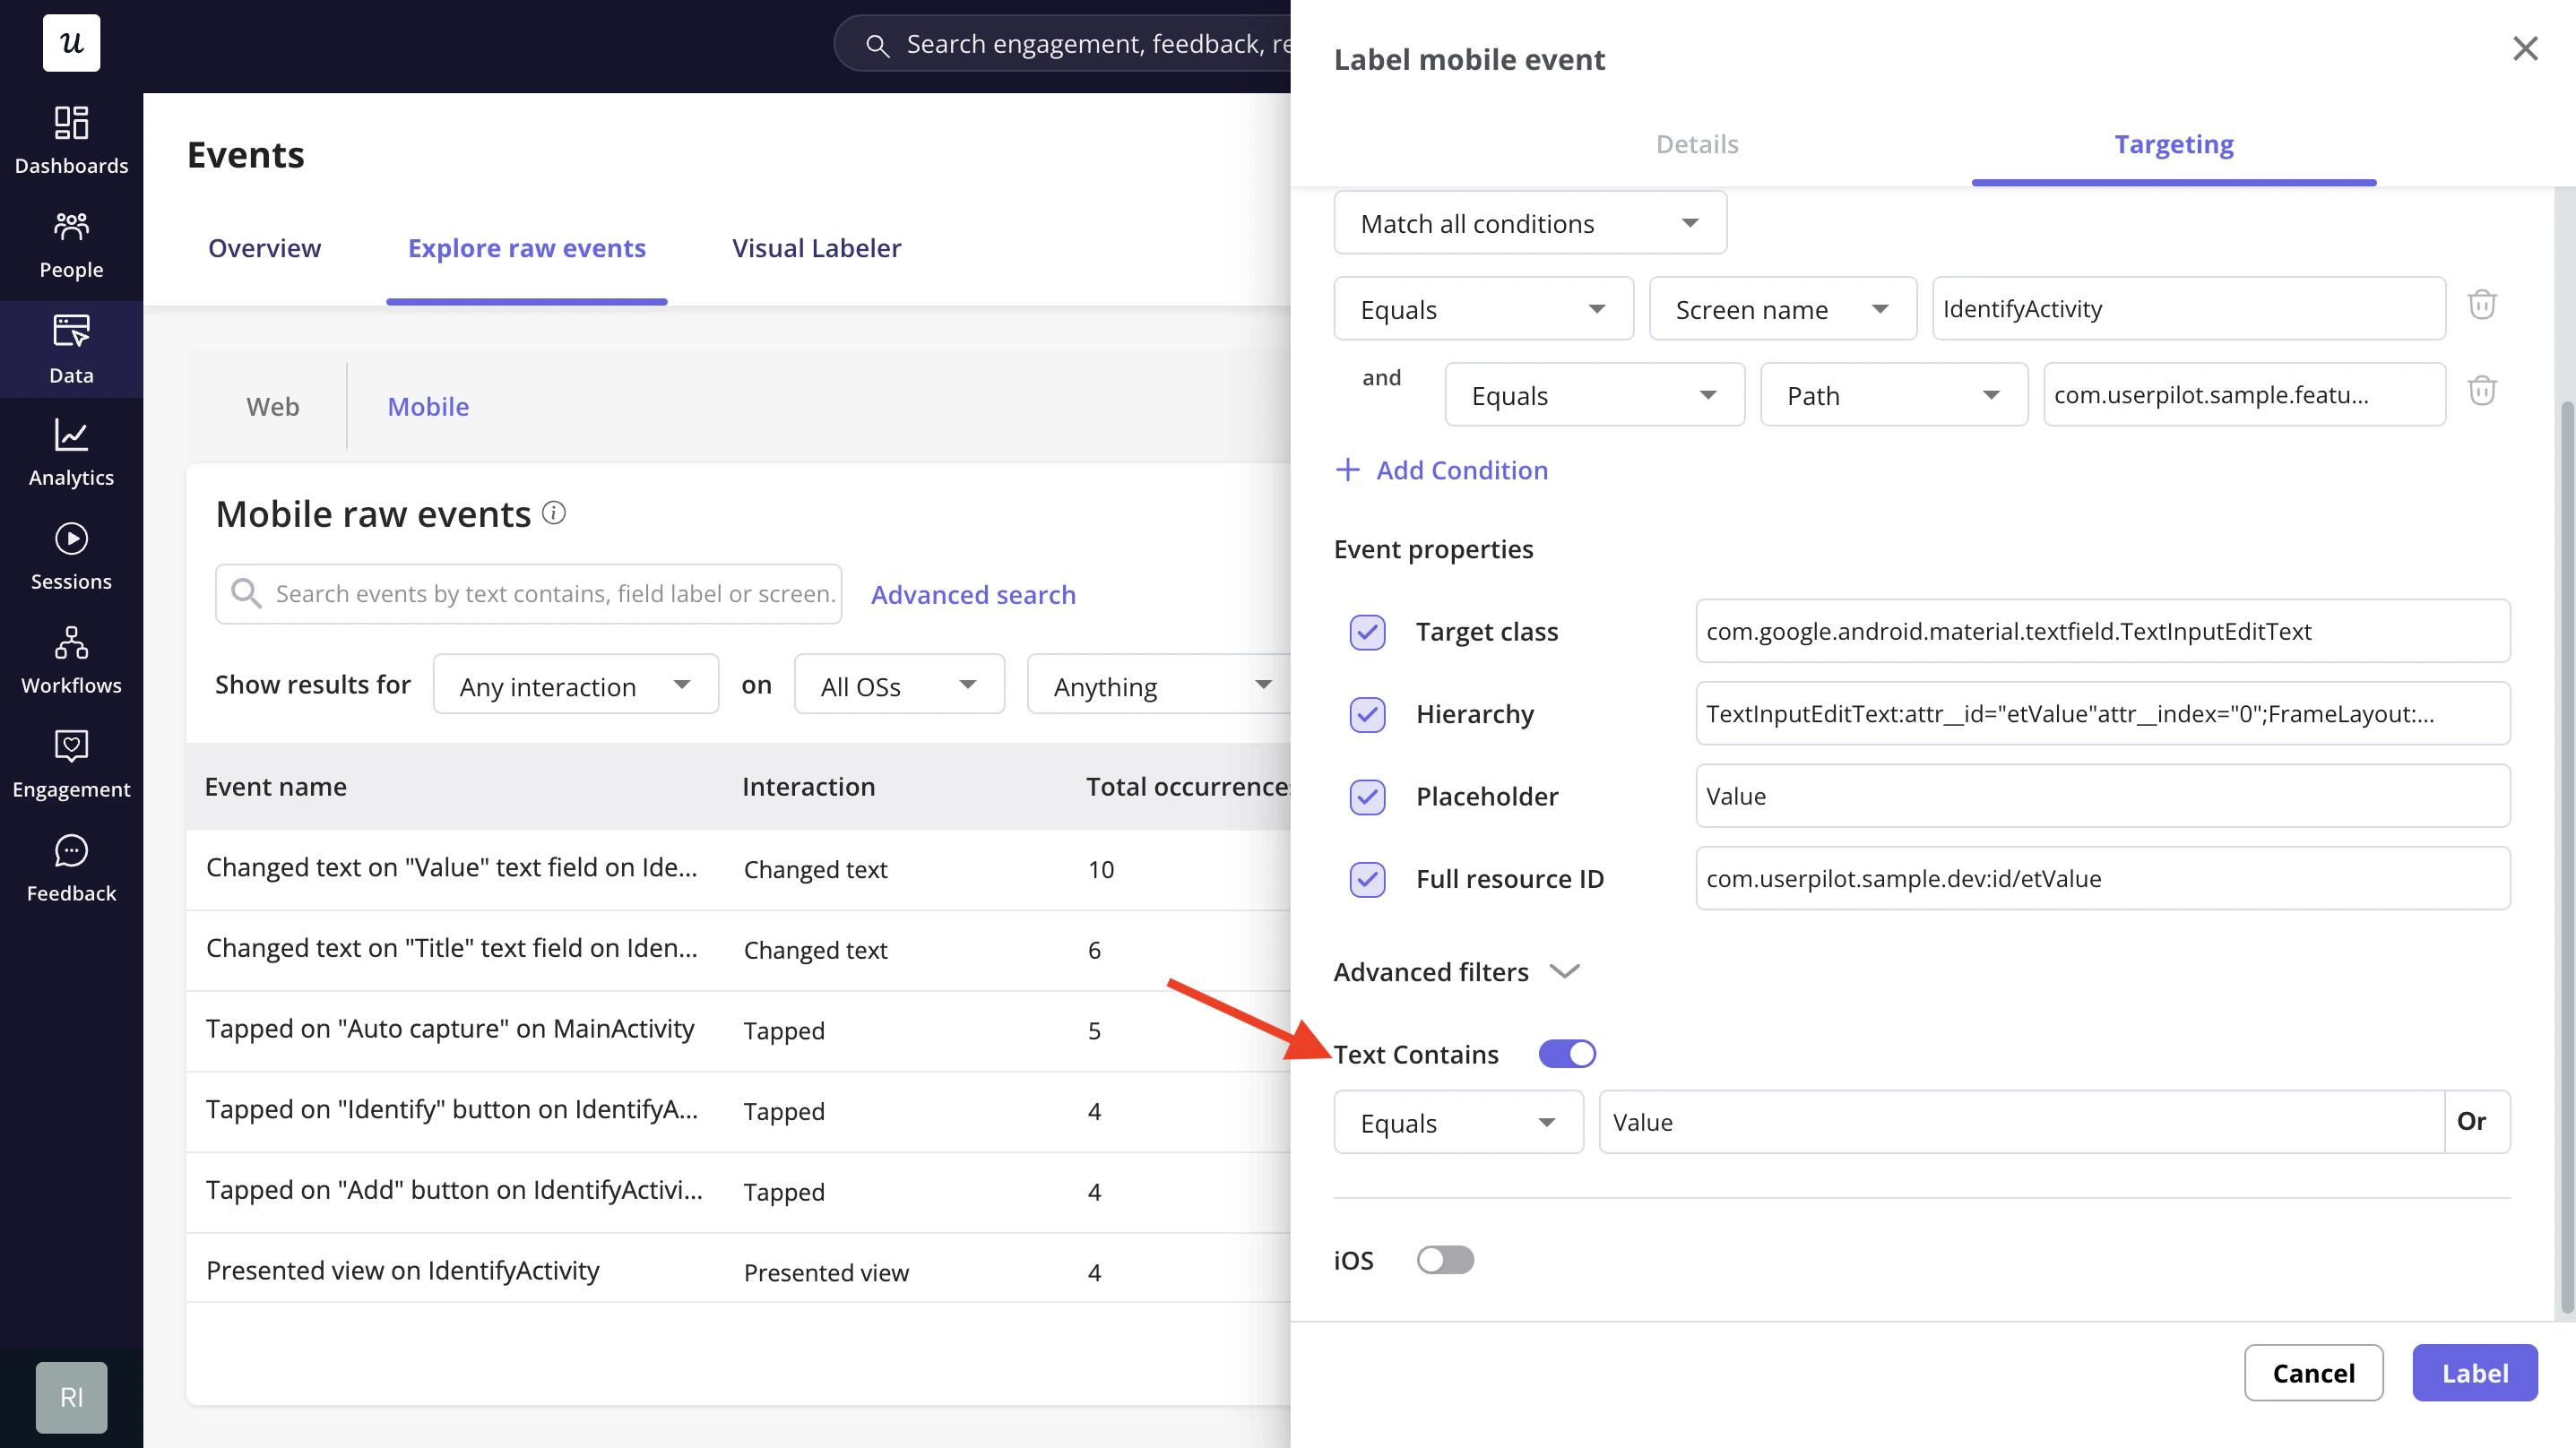
**Screen:** where the event fires. Choose *Any Screen* (anywhere in the app) or *Specific Screen* (constrained by conditions like `screen_name equals "Cart"`).
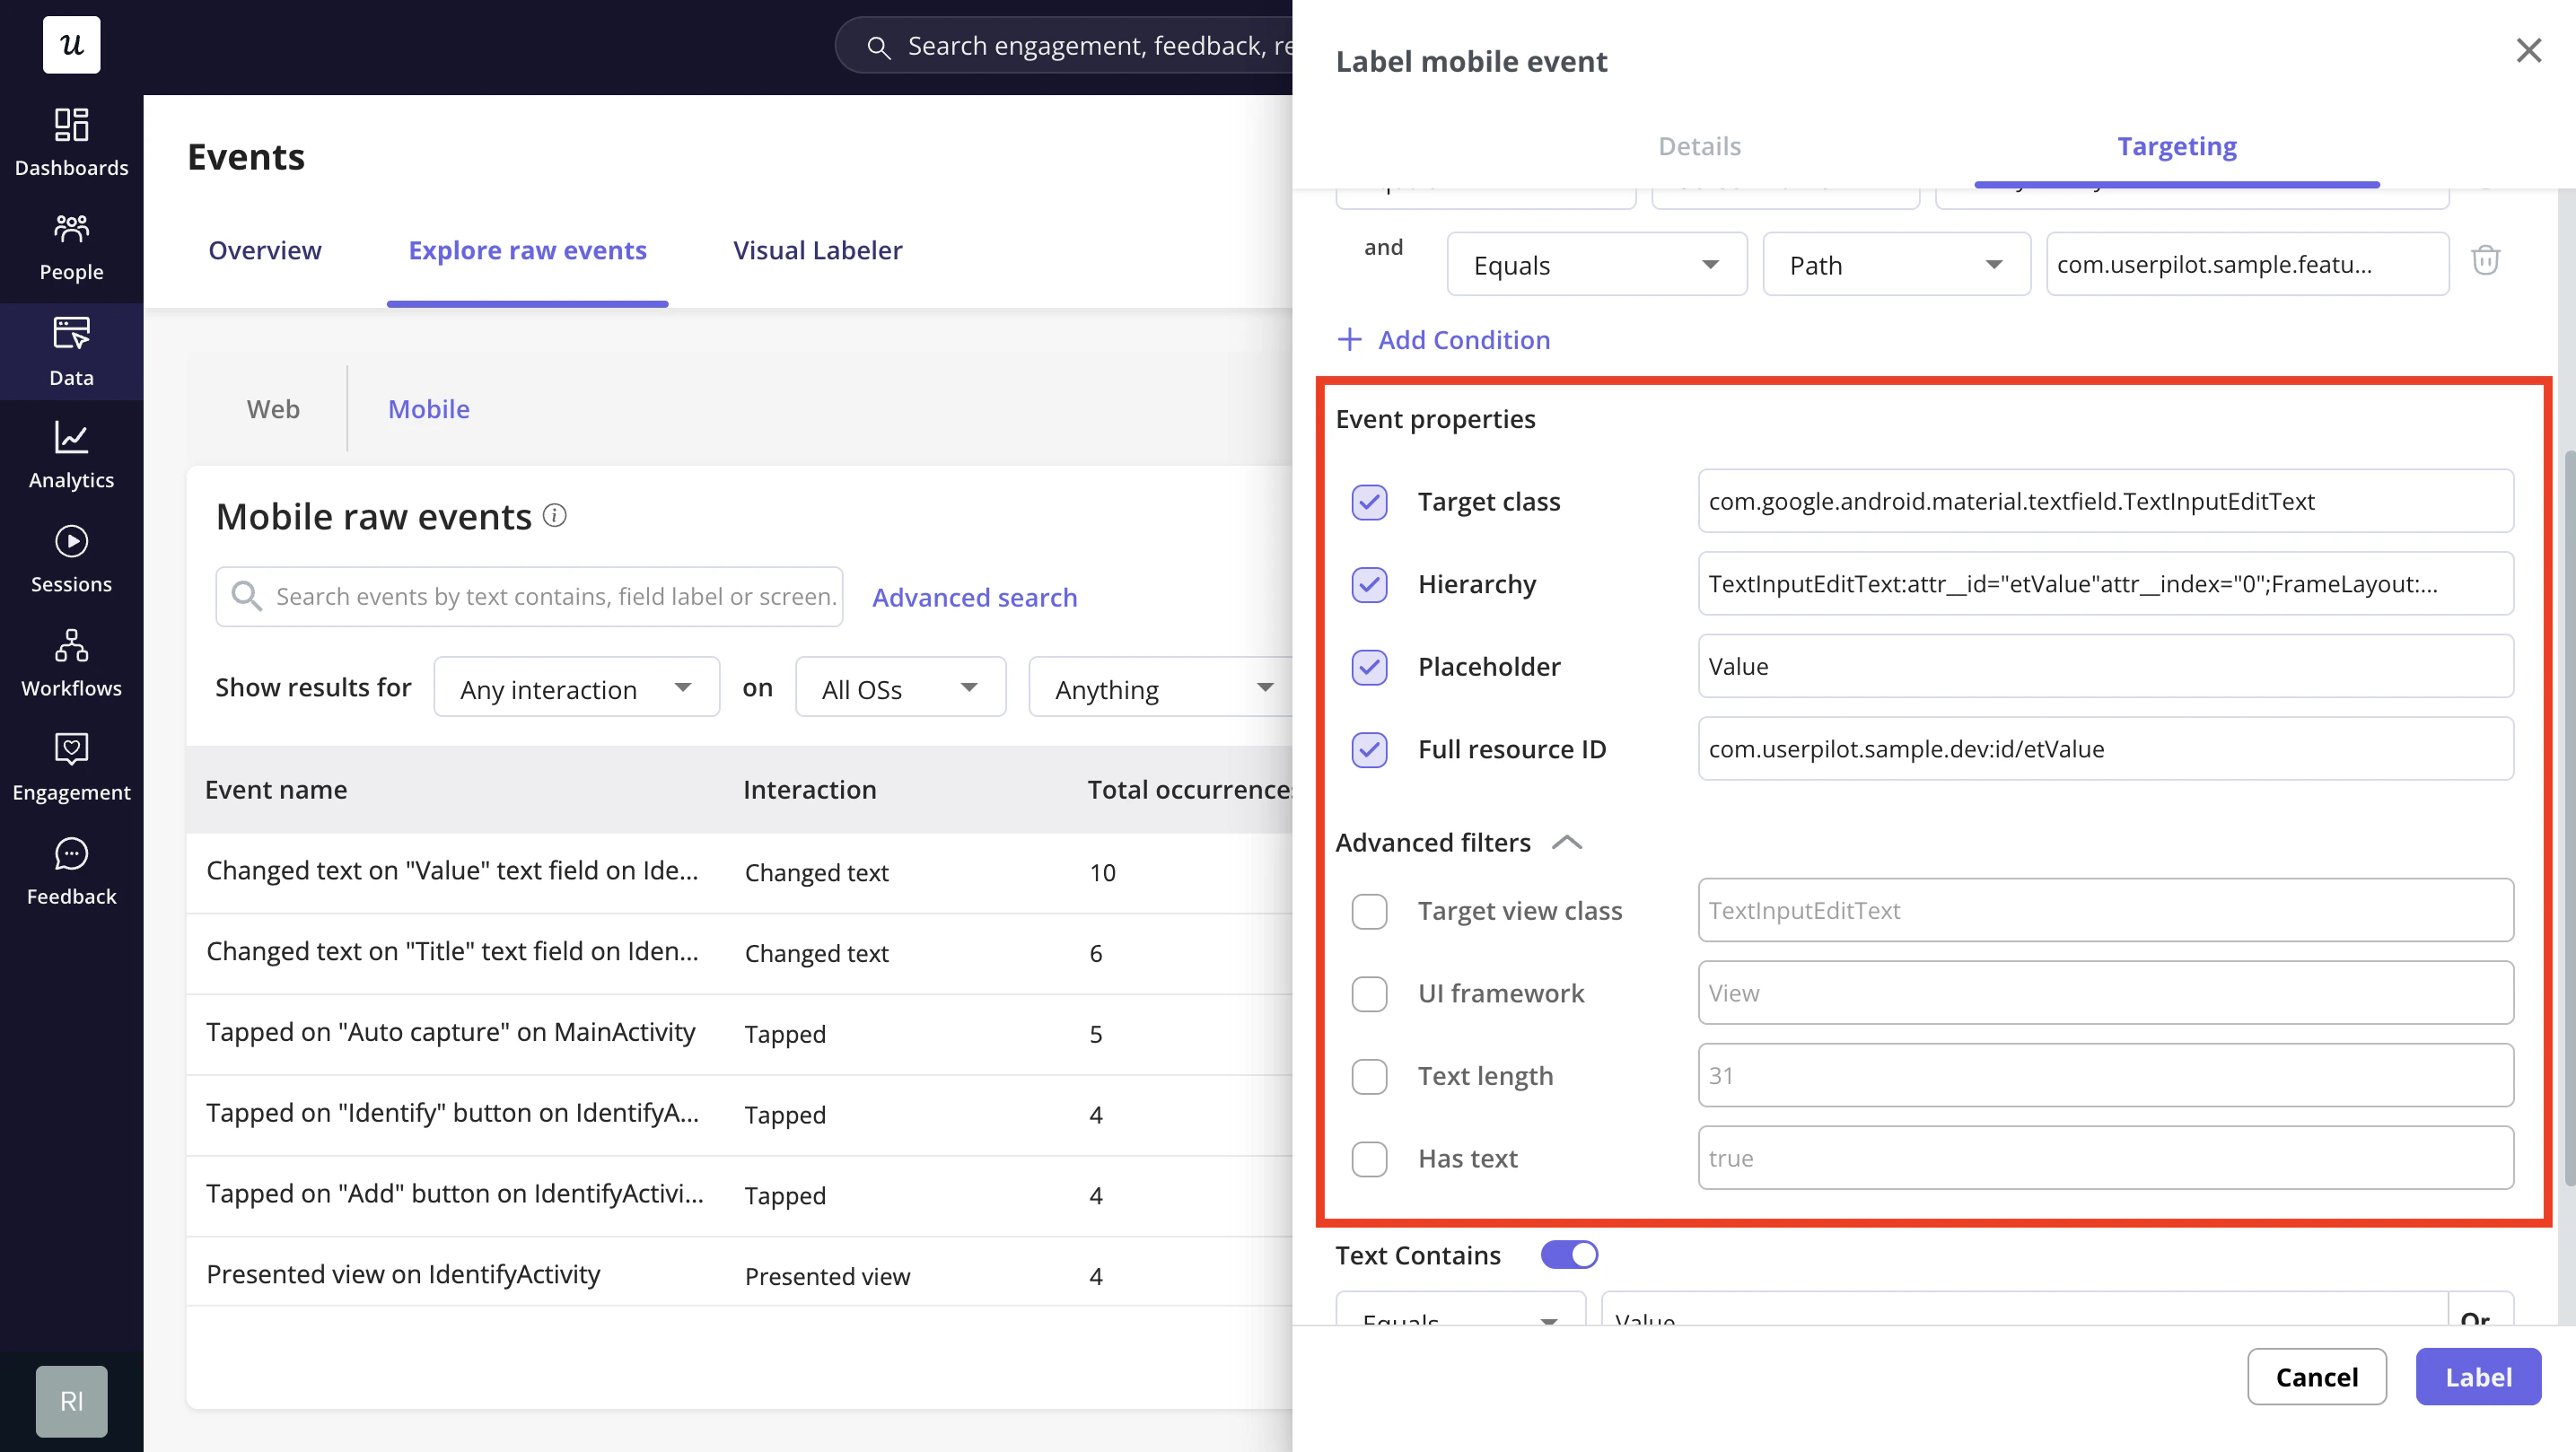
**Event properties:** the element's fingerprint. These identify the specific element and determine whether an interaction matches this event. The available properties differ between iOS and Android, but the strongest identifiers are available on both:
1. **Hierarchy** - the element's structural position on screen; reliable on its own
2. **Target class** - the element's native UI class or type
3. **Element ID** - Accessibility identifier (iOS) or Full resource ID (Android); the most precise match when present
4. **Accessibility label** - the element's accessibility text
Each platform also exposes additional properties - for example, *Owner target class* and *Target view name* on iOS; *View tag* and *Target view class* on Android - plus action-specific properties like *Placeholder* (text changes), *Tab name* (selections), and *Dialog title* (presented views).
You don't need to enable all properties. Hierarchy, Target class, and the platform's ID, when available, are usually enough to identify the element. Additional properties are available under **Advanced filters** and should only be added when you need to disambiguate further, such as for list rows or two controls that differ only by label. Enabling too many properties makes the event too strict and can cause valid interactions to be missed. At least one property is required.
4. **Label raw events**
A **Mobile Labeled Event** turns a raw, auto-captured interaction into a named, trackable event. You define it in a right-hand slideout with two tabs: **Details** and **Targeting**.
**Targeting**
The **Targeting** tab contains two independently toggle-able blocks - **iOS** and **Android**. A single labeled event can target one platform or both. The platform you originally captured the event on is shown first and comes pre-filled.
For each enabled platform, you define three things:
**Screen:** where the event fires. Choose *Any Screen* (anywhere in the app) or *Specific Screen* (constrained by conditions like `screen_name equals "Cart"`).
**Event properties:** the element's fingerprint. These identify the specific element and determine whether an interaction matches this event. The available properties differ between iOS and Android, but the strongest identifiers are available on both:
1. **Hierarchy** - the element's structural position on screen; reliable on its own
2. **Target class** - the element's native UI class or type
3. **Element ID** - Accessibility identifier (iOS) or Full resource ID (Android); the most precise match when present
4. **Accessibility label** - the element's accessibility text
Each platform also exposes additional properties - for example, *Owner target class* and *Target view name* on iOS; *View tag* and *Target view class* on Android - plus action-specific properties like *Placeholder* (text changes), *Tab name* (selections), and *Dialog title* (presented views).
You don't need to enable all properties. Hierarchy, Target class, and the platform's ID, when available, are usually enough to identify the element. Additional properties are available under **Advanced filters** and should only be added when you need to disambiguate further, such as for list rows or two controls that differ only by label. Enabling too many properties makes the event too strict and can cause valid interactions to be missed. At least one property is required.
 **Text Contains (optional):** matches the element's visible text using *Contains* or *Equals* - useful when identical elements differ only by label, for example, *"Add to Cart"* vs *"Remove"*.
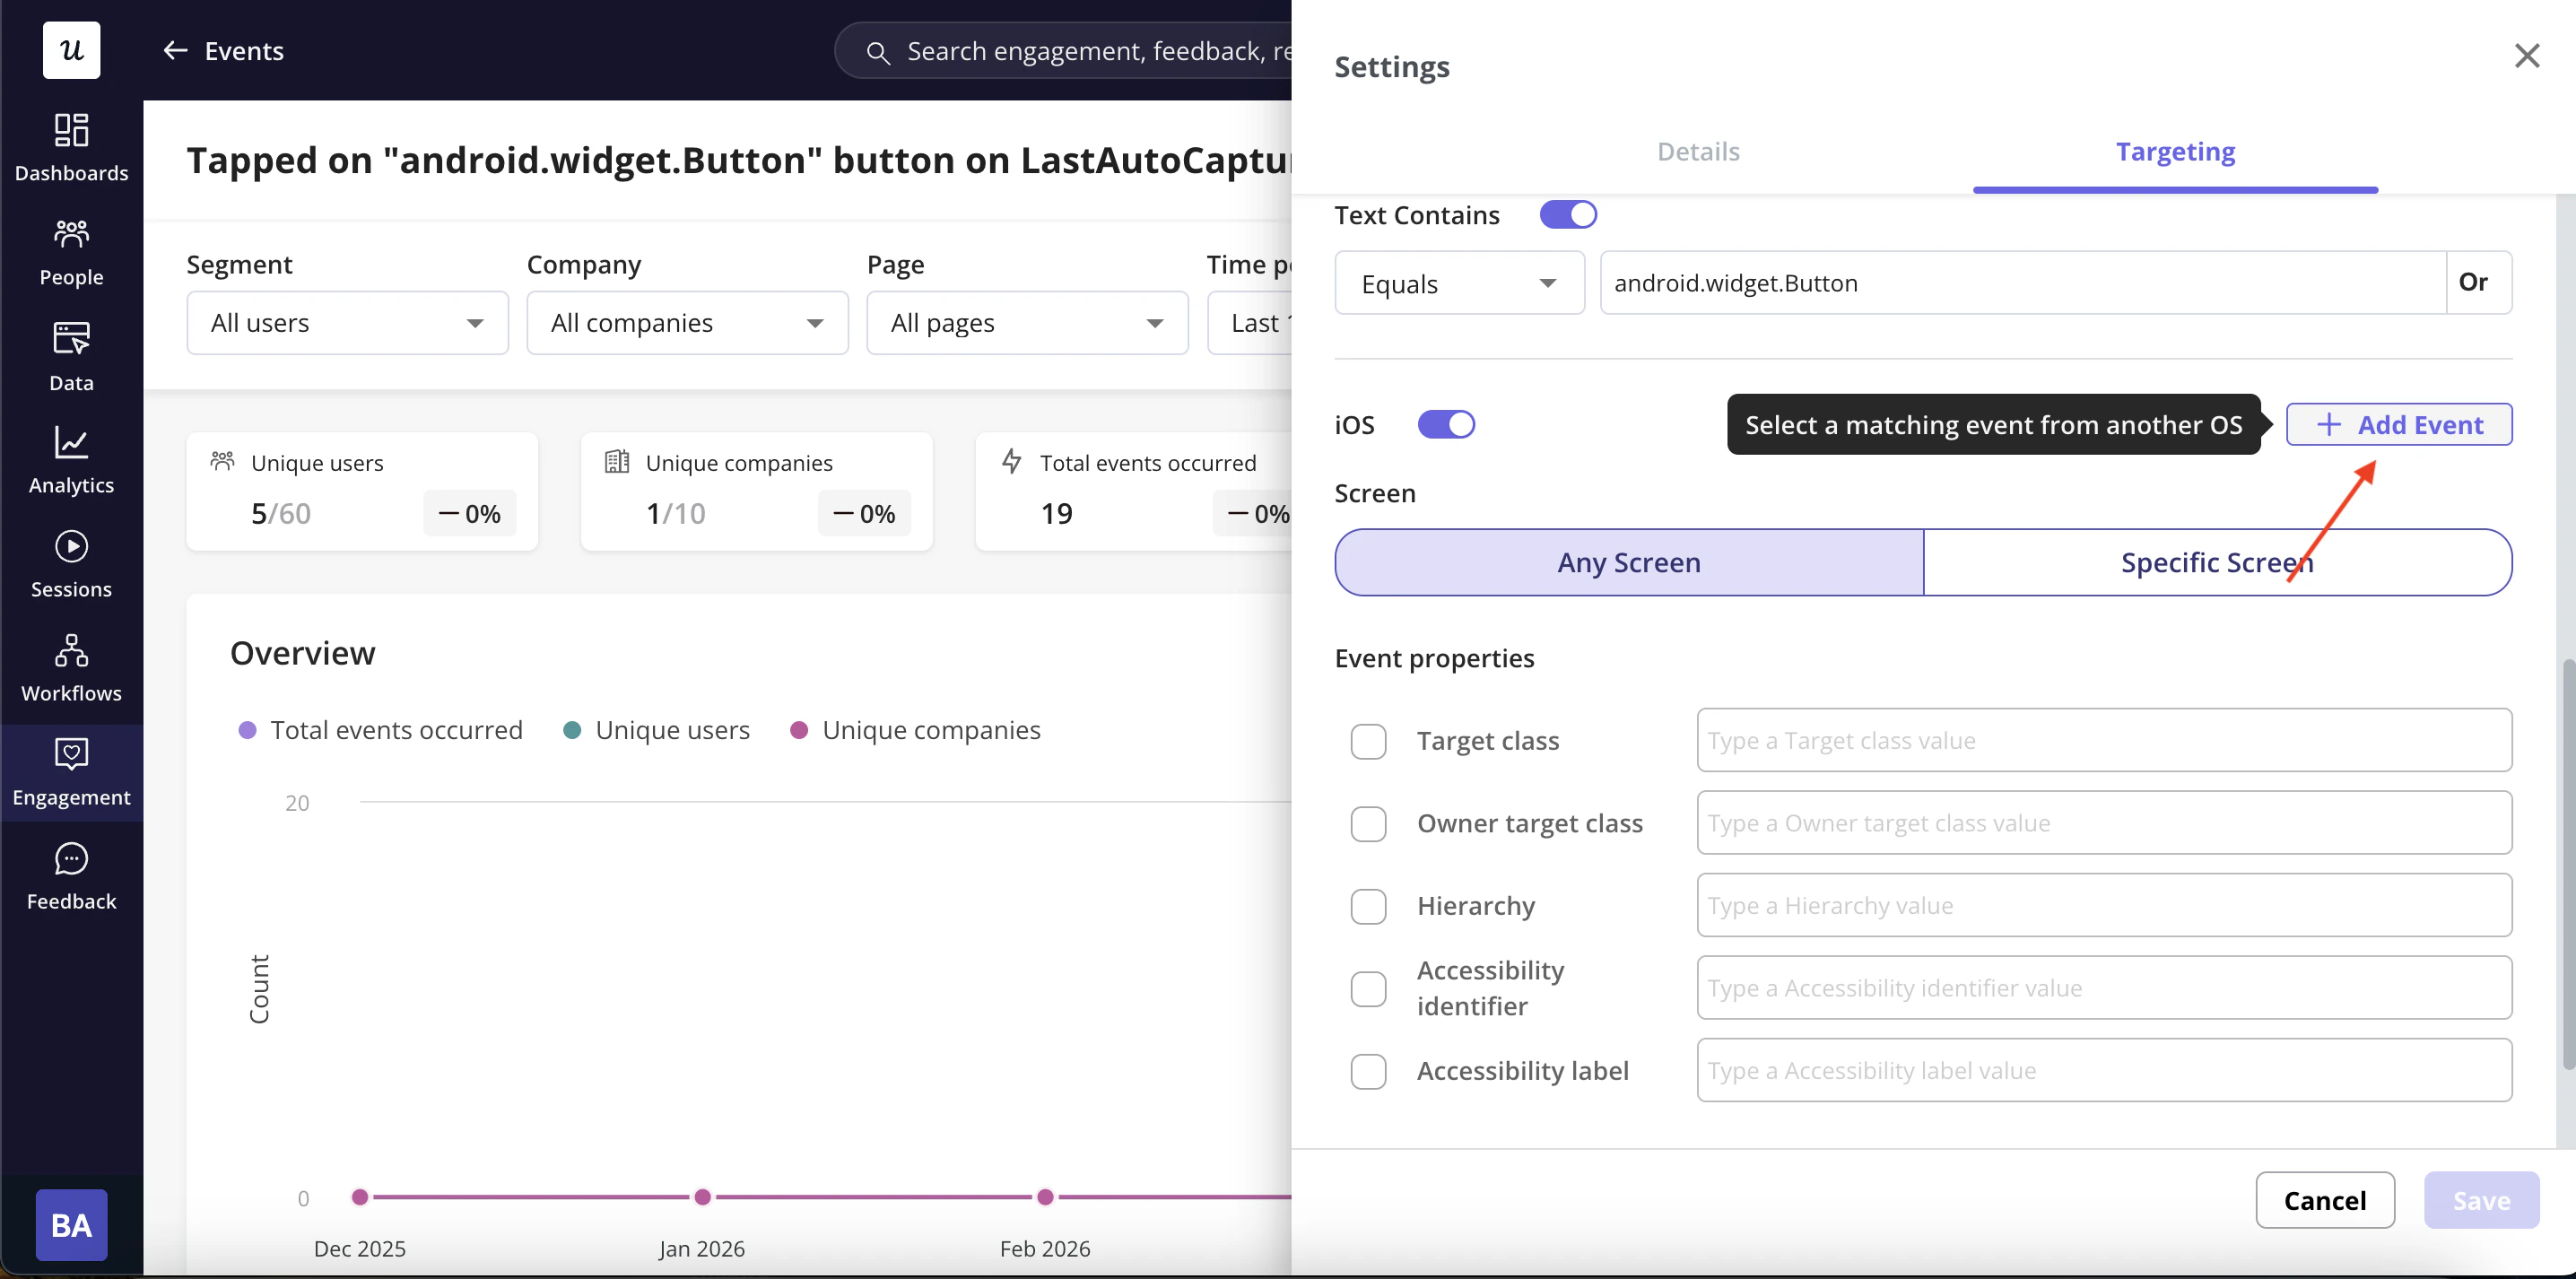
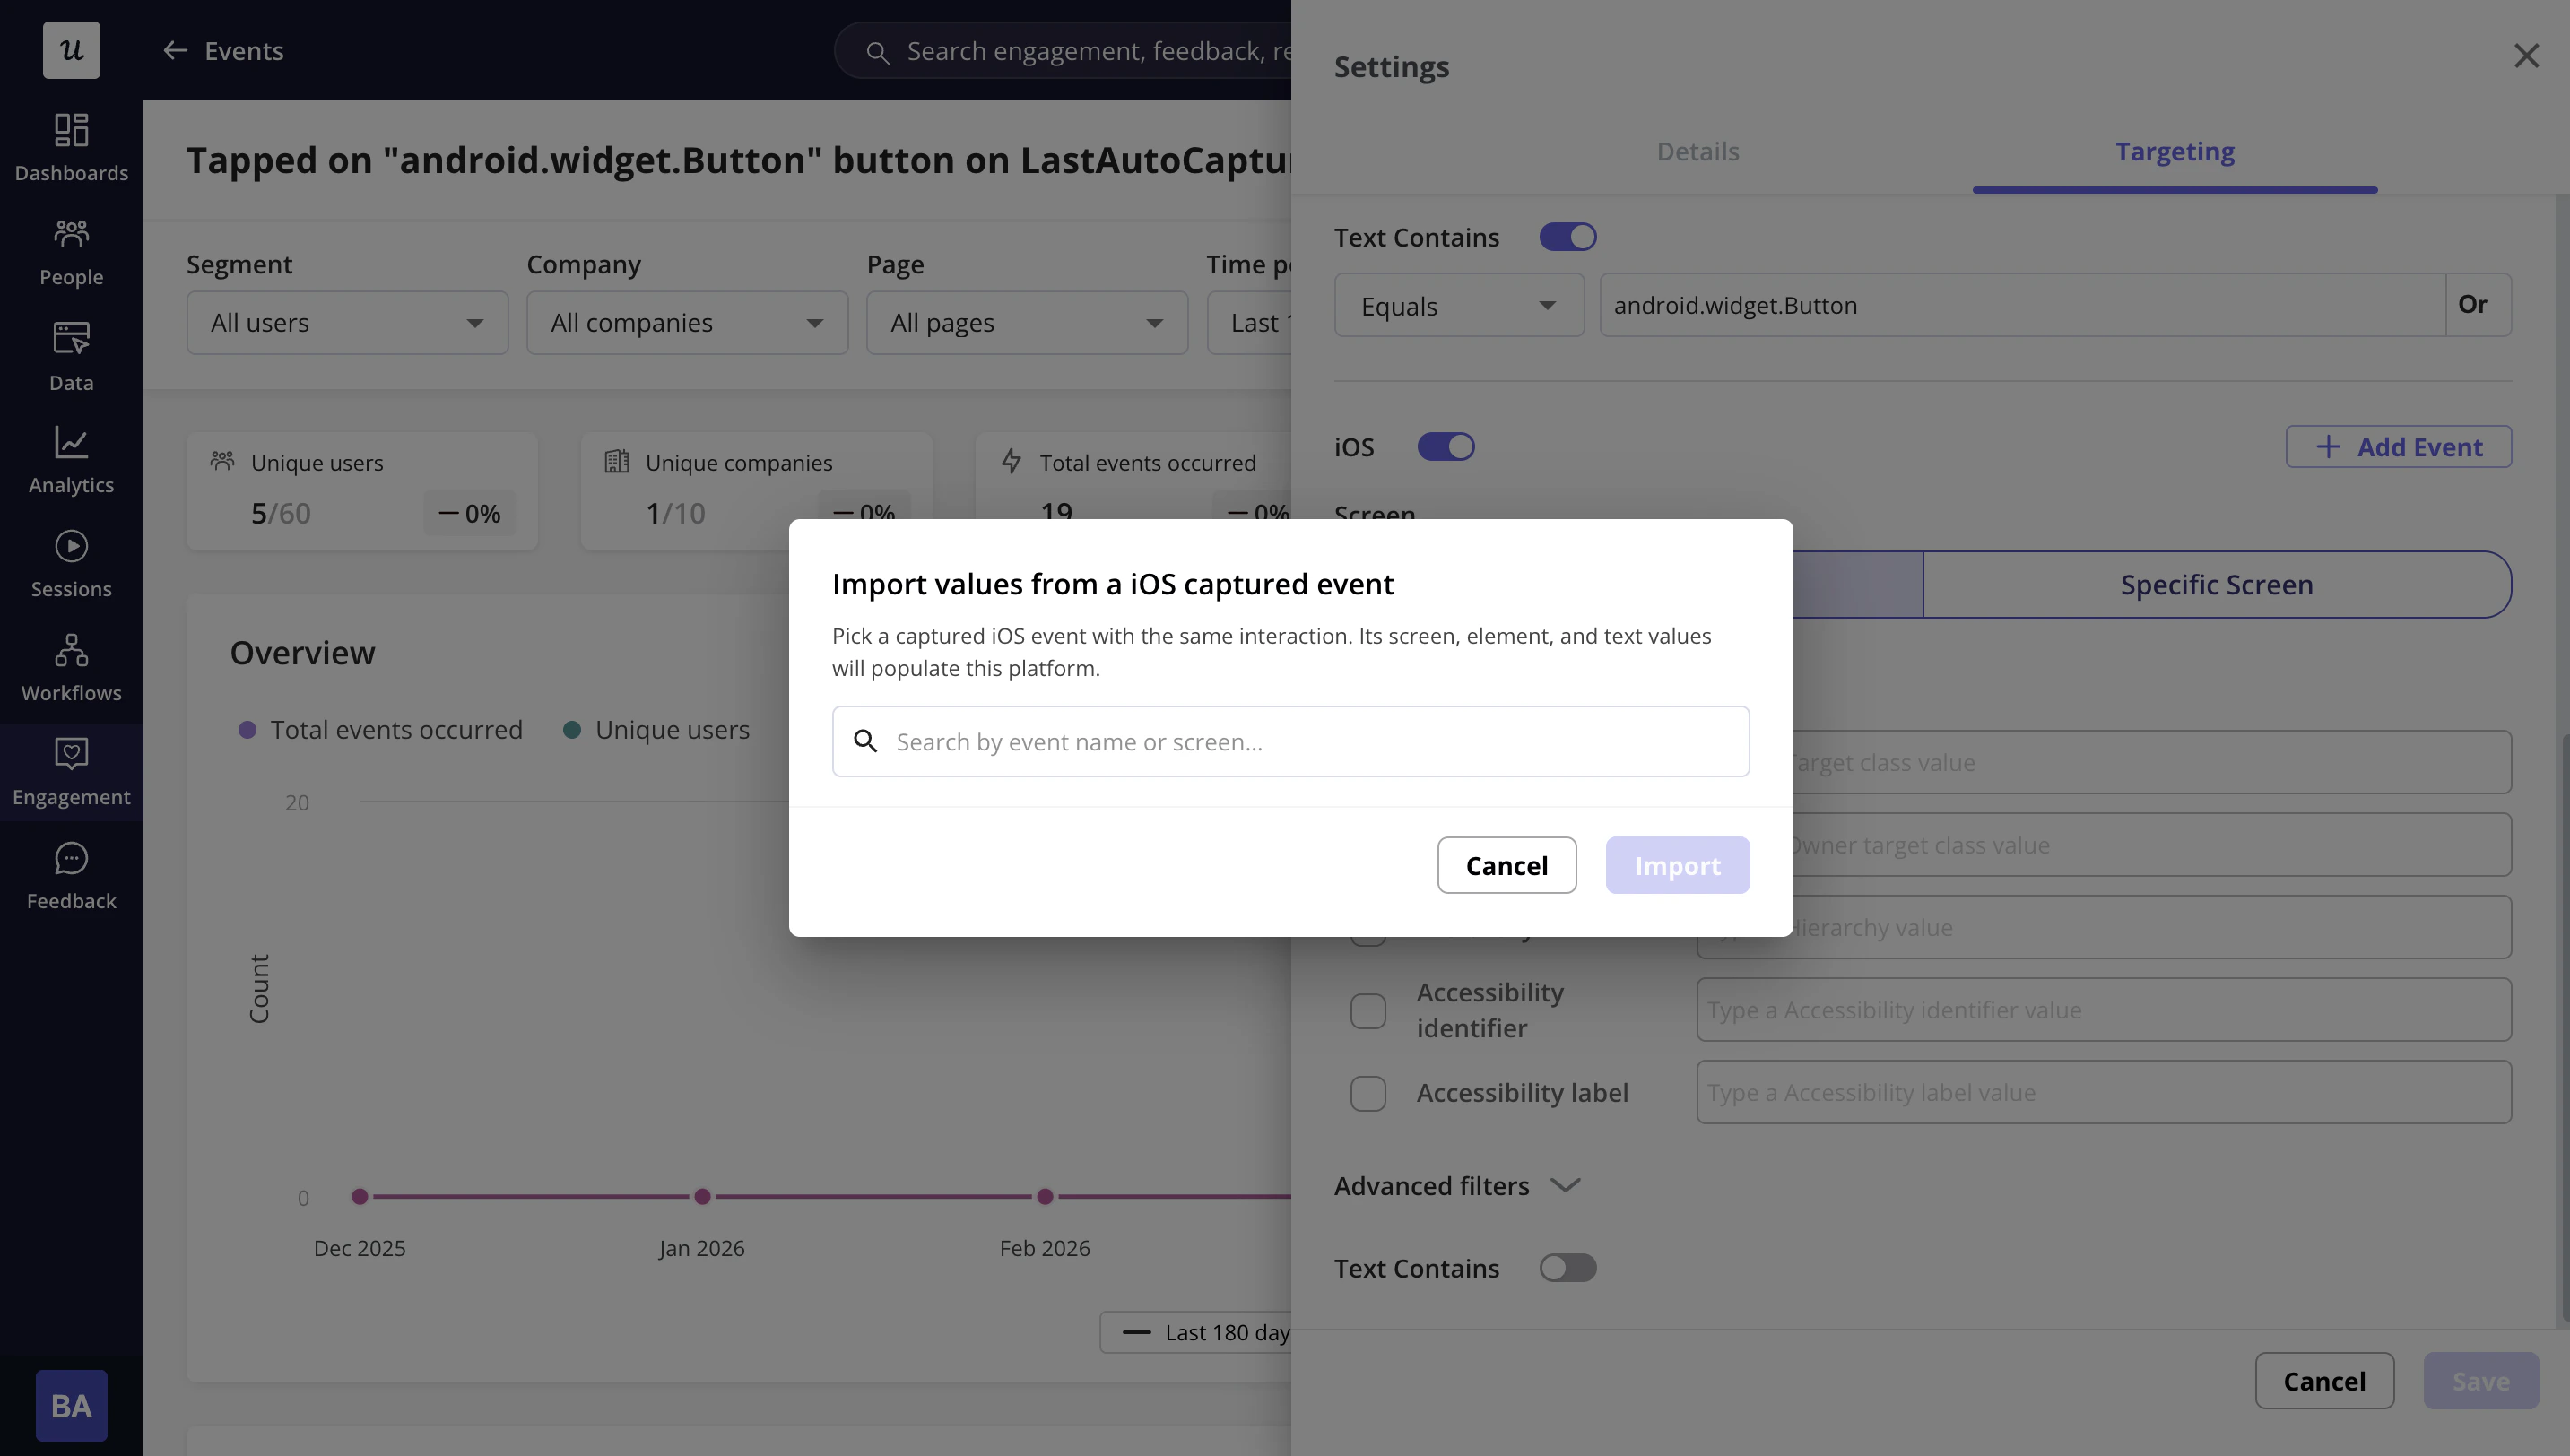
 ### Importing from raw events
You can label the event for Android, iOS, or both by enabling each OS toggle. To make this easier, Userpilot offers an option to view captured events from the other OS that match the selected attribute from the original event. You can then select the matching event and import its values to track the same interaction across Android and iOS as one labeled event.
### Importing from raw events
You can label the event for Android, iOS, or both by enabling each OS toggle. To make this easier, Userpilot offers an option to view captured events from the other OS that match the selected attribute from the original event. You can then select the matching event and import its values to track the same interaction across Android and iOS as one labeled event.
 ## Supported interaction types
The following interaction types are captured automatically when auto-capture is enabled:
| Interaction category | Interaction type | Meaning |
| :------------------- | :--------------------- | :------------------------------------------------------------------------------------------------------------------------ |
| Tapped | Tap | The user tapped/clicked on an element, such as a button, card, icon, link, or menu item |
| Changed text | text field changed | The user entered, edited, or deleted text inside an input field, such as search, email, name, comment, or password fields |
| Changed selection | radio button selected | The user selected one option from a set of radio buttons. Usually only one option can be selected at a time |
| Changed selection | chip selected | The user selected a chip/tag/pill-style option, such as a filter, category, or quick choice |
| Changed selection | list item selected | The user selected an item from a list, such as choosing a country, user, product, or setting |
| Changed selection | spinner selected | The user selected an option from a dropdown/spinner menu. Common in Android forms |
| Changed selection | tab host selected | The user selected a tab inside a tab container or tab host. Usually used when switching between sections |
| Changed selection | tab selected | The user tapped a specific tab, such as Overview, Settings, Analytics, etc |
| Changed selection | menu item selected | The user selected an item from a menu, overflow menu, or contextual menu |
| Changed value | switch changed | The user turned a switch on or off. Example: enabling notifications |
| Changed value | checkbox selected | The user checked or unchecked a checkbox. Often used for multi-select options or consent |
| Changed value | toggle button selected | The user selected or toggled a button that has an active/inactive state. Similar to a switch but often styled as a button |
| Changed value | slider changed | The user changed a slider value, such as volume, price range, percentage, or brightness |
| Changed value | date picker changed | The user selected or changed a date from a date picker |
| Changed value | time picker changed | The user selected or changed a time from a time picker |
| Presented view | view presented | A screen, modal, bottom sheet, dialog, or view became visible to the user |
## Supported interaction types
The following interaction types are captured automatically when auto-capture is enabled:
| Interaction category | Interaction type | Meaning |
| :------------------- | :--------------------- | :------------------------------------------------------------------------------------------------------------------------ |
| Tapped | Tap | The user tapped/clicked on an element, such as a button, card, icon, link, or menu item |
| Changed text | text field changed | The user entered, edited, or deleted text inside an input field, such as search, email, name, comment, or password fields |
| Changed selection | radio button selected | The user selected one option from a set of radio buttons. Usually only one option can be selected at a time |
| Changed selection | chip selected | The user selected a chip/tag/pill-style option, such as a filter, category, or quick choice |
| Changed selection | list item selected | The user selected an item from a list, such as choosing a country, user, product, or setting |
| Changed selection | spinner selected | The user selected an option from a dropdown/spinner menu. Common in Android forms |
| Changed selection | tab host selected | The user selected a tab inside a tab container or tab host. Usually used when switching between sections |
| Changed selection | tab selected | The user tapped a specific tab, such as Overview, Settings, Analytics, etc |
| Changed selection | menu item selected | The user selected an item from a menu, overflow menu, or contextual menu |
| Changed value | switch changed | The user turned a switch on or off. Example: enabling notifications |
| Changed value | checkbox selected | The user checked or unchecked a checkbox. Often used for multi-select options or consent |
| Changed value | toggle button selected | The user selected or toggled a button that has an active/inactive state. Similar to a switch but often styled as a button |
| Changed value | slider changed | The user changed a slider value, such as volume, price range, percentage, or brightness |
| Changed value | date picker changed | The user selected or changed a date from a date picker |
| Changed value | time picker changed | The user selected or changed a time from a time picker |
| Presented view | view presented | A screen, modal, bottom sheet, dialog, or view became visible to the user |
 ## Viewing and using auto-captured events
1. Once events are labeled, they are available across Userpilot for analysis and targeting. You can use labeled mobile events in:
2. **Reports** - build funnels, trends, or engagement reports based on specific mobile interactions
3. **Segments** - group users by whether they have or haven't completed a particular interaction
4. **Mobile experiences** - trigger in-app experiences when a user performs a specific action, such as tapping a button or reaching a particular screen
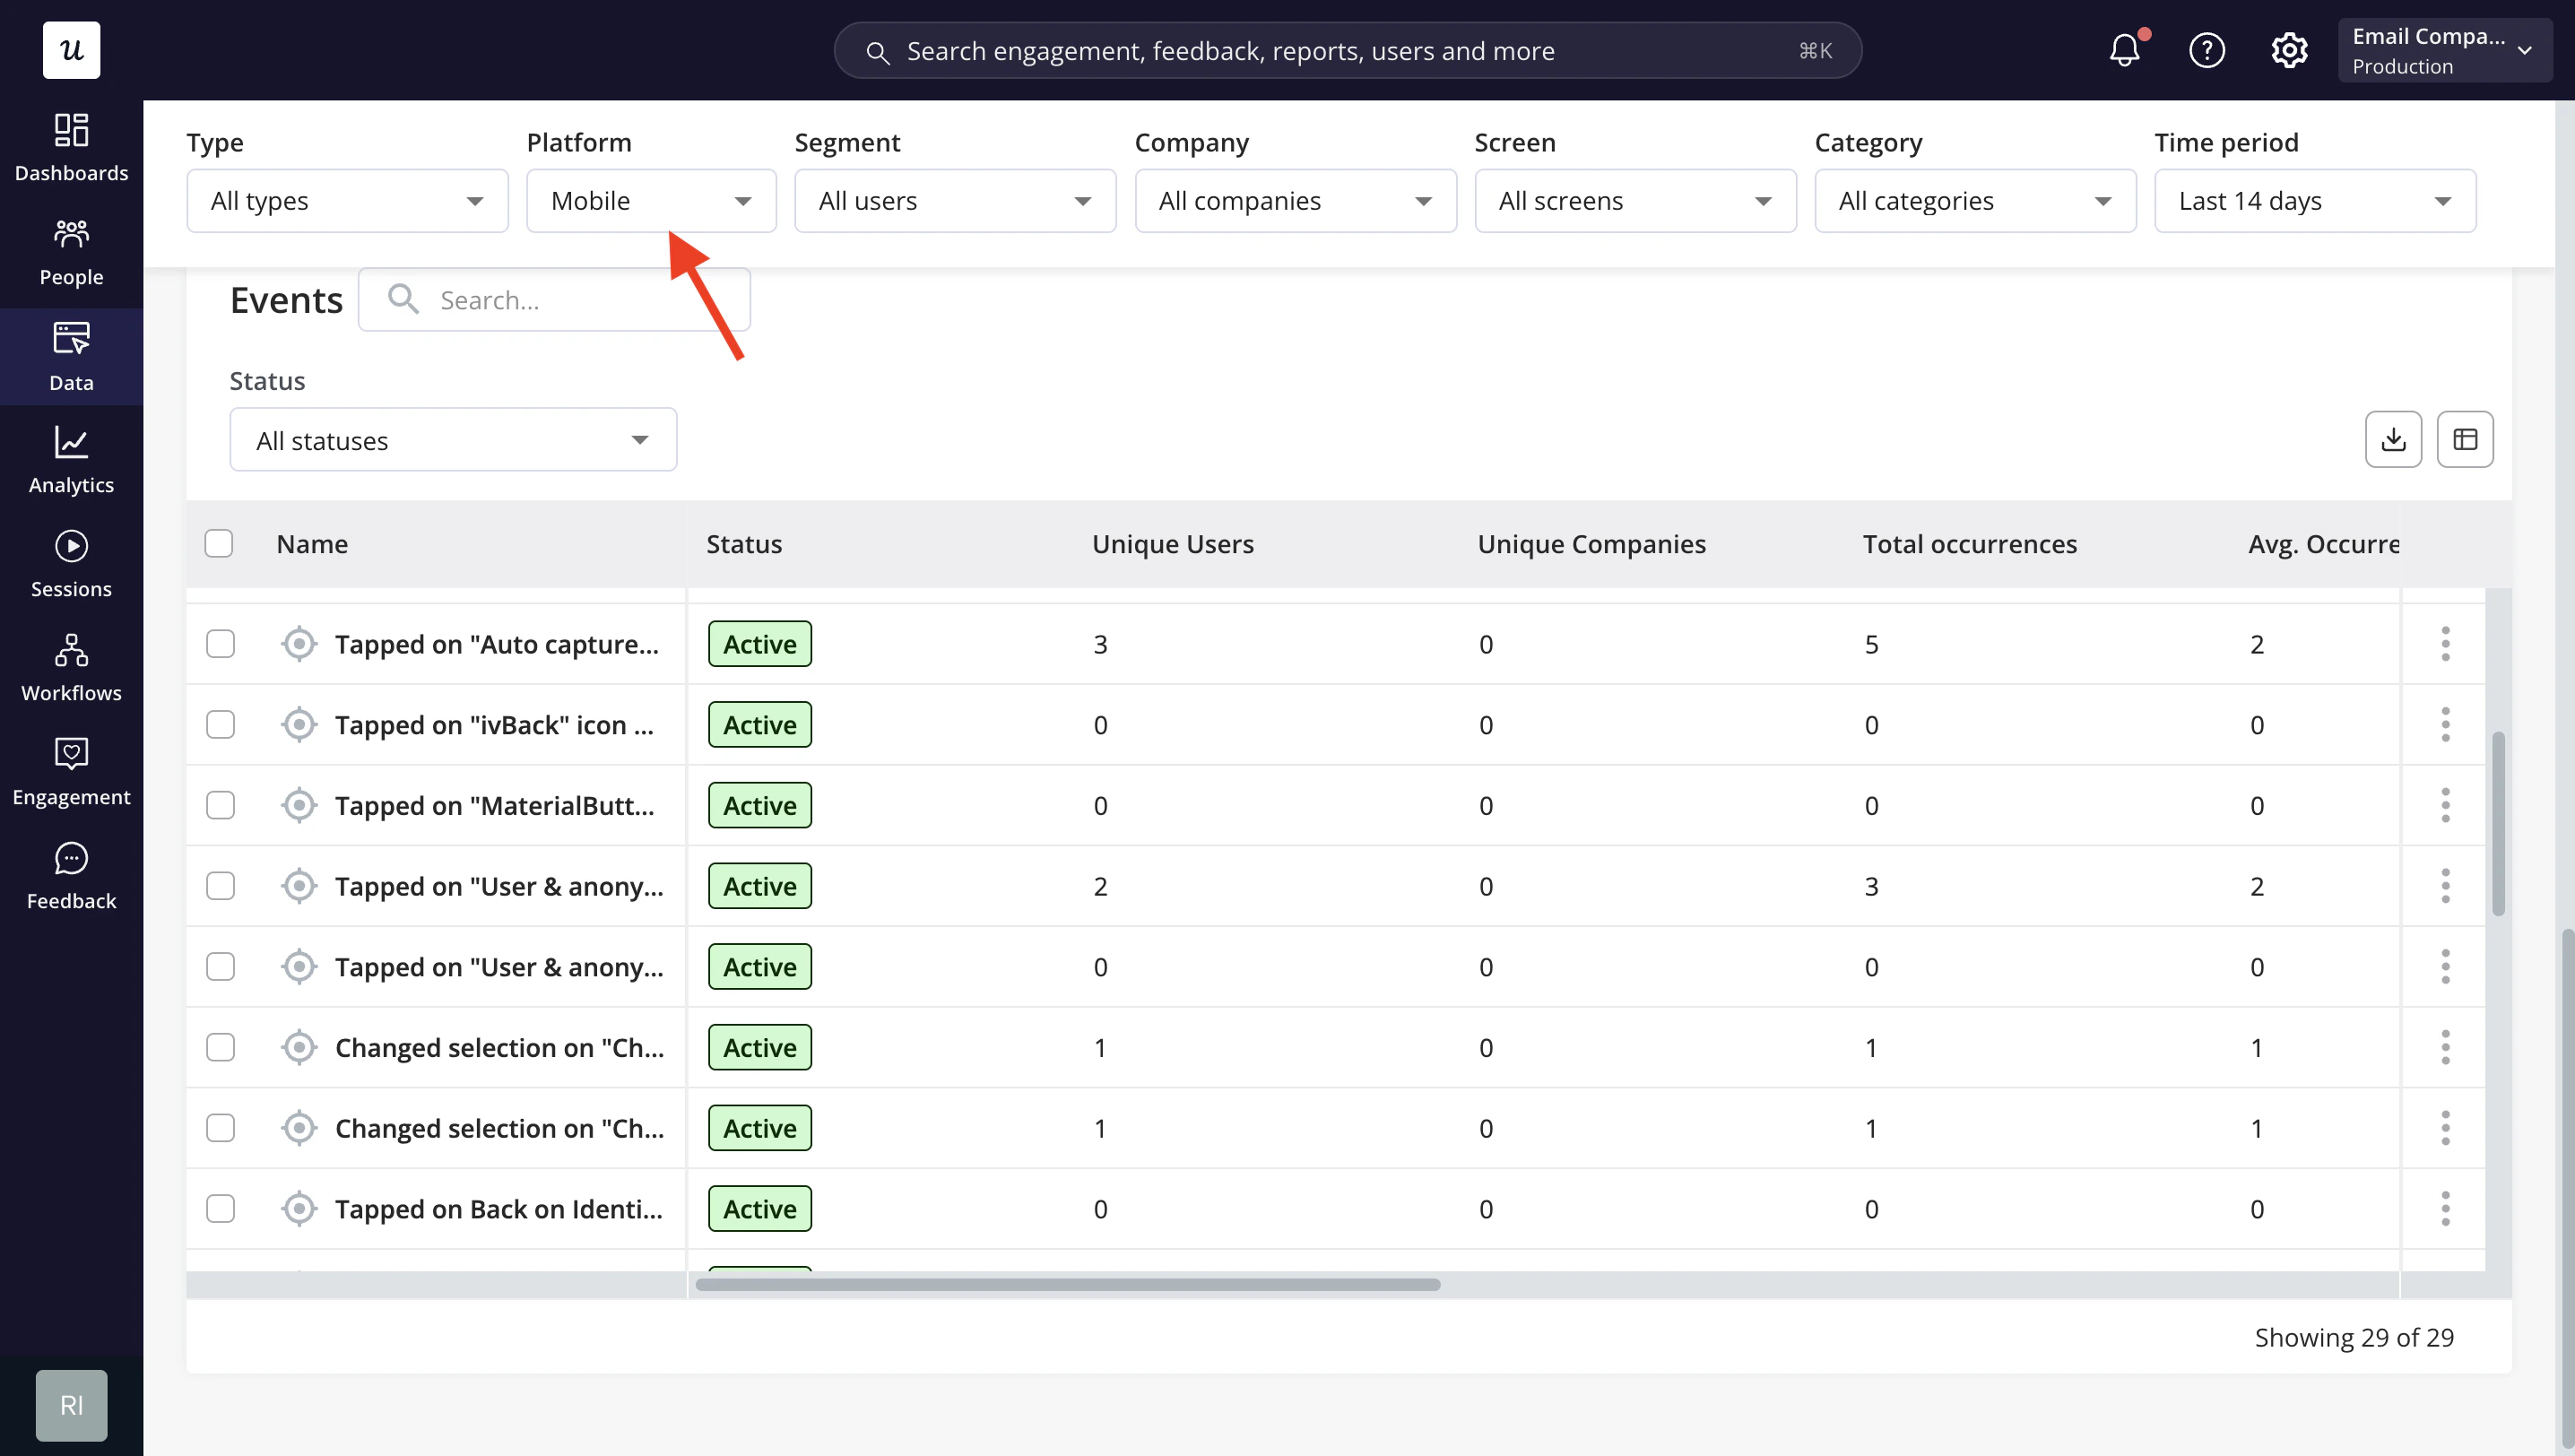
To review your labeled mobile events, navigate to [Events → Overview](https://run.userpilot.io/events/overview), then filter the data by selecting **Mobile** from the platform filter.
## Viewing and using auto-captured events
1. Once events are labeled, they are available across Userpilot for analysis and targeting. You can use labeled mobile events in:
2. **Reports** - build funnels, trends, or engagement reports based on specific mobile interactions
3. **Segments** - group users by whether they have or haven't completed a particular interaction
4. **Mobile experiences** - trigger in-app experiences when a user performs a specific action, such as tapping a button or reaching a particular screen
To review your labeled mobile events, navigate to [Events → Overview](https://run.userpilot.io/events/overview), then filter the data by selecting **Mobile** from the platform filter.
 The availability of auto-captured events in reports, segments, and experiences may depend on the mobile SDK version and platform support. Check with your engineering team to confirm your current setup.
Use the technical setup guides below to enable Mobile Event Auto-Capture in your app:
* [iOS auto-capture setup](/developer/installation/mobile/ios/auto-capture)
* [Android auto-capture setup](/developer/installation/mobile/android/auto-capture)
The availability of auto-captured events in reports, segments, and experiences may depend on the mobile SDK version and platform support. Check with your engineering team to confirm your current setup.
Use the technical setup guides below to enable Mobile Event Auto-Capture in your app:
* [iOS auto-capture setup](/developer/installation/mobile/ios/auto-capture)
* [Android auto-capture setup](/developer/installation/mobile/android/auto-capture)