> ## Documentation Index
> Fetch the complete documentation index at: https://docs.userpilot.com/llms.txt
> Use this file to discover all available pages before exploring further.
# Mobile Autocapture Screen Migration
> Migrate from manual mobile screen tracking to Userpilot auto-capture, which detects screens automatically via native lifecycle hooks on iOS and Android.
## Overview
Mobile screen auto-capture simplifies how screens are tracked in your app by removing the need for manual setup. After calling the auto-capture function from your code, Userpilot automatically detects and captures screens through the SDK without requiring you to define them one by one. You can configure your screen rules and select the operating system (iOS or Android) where tracking should apply, and Userpilot will handle collecting screen-level analytics seamlessly in the background.
Mobile screen auto-capture removes the need to manually call screen tracking APIs, such as:
```text theme={null}
Userpilot.screen("Profile")
```
Once enabled, the SDK automatically detects screen transitions using native lifecycle hooks:
* Android: Activity/Fragment lifecycle tracking
* iOS: UIViewController lifecycle (method swizzling)
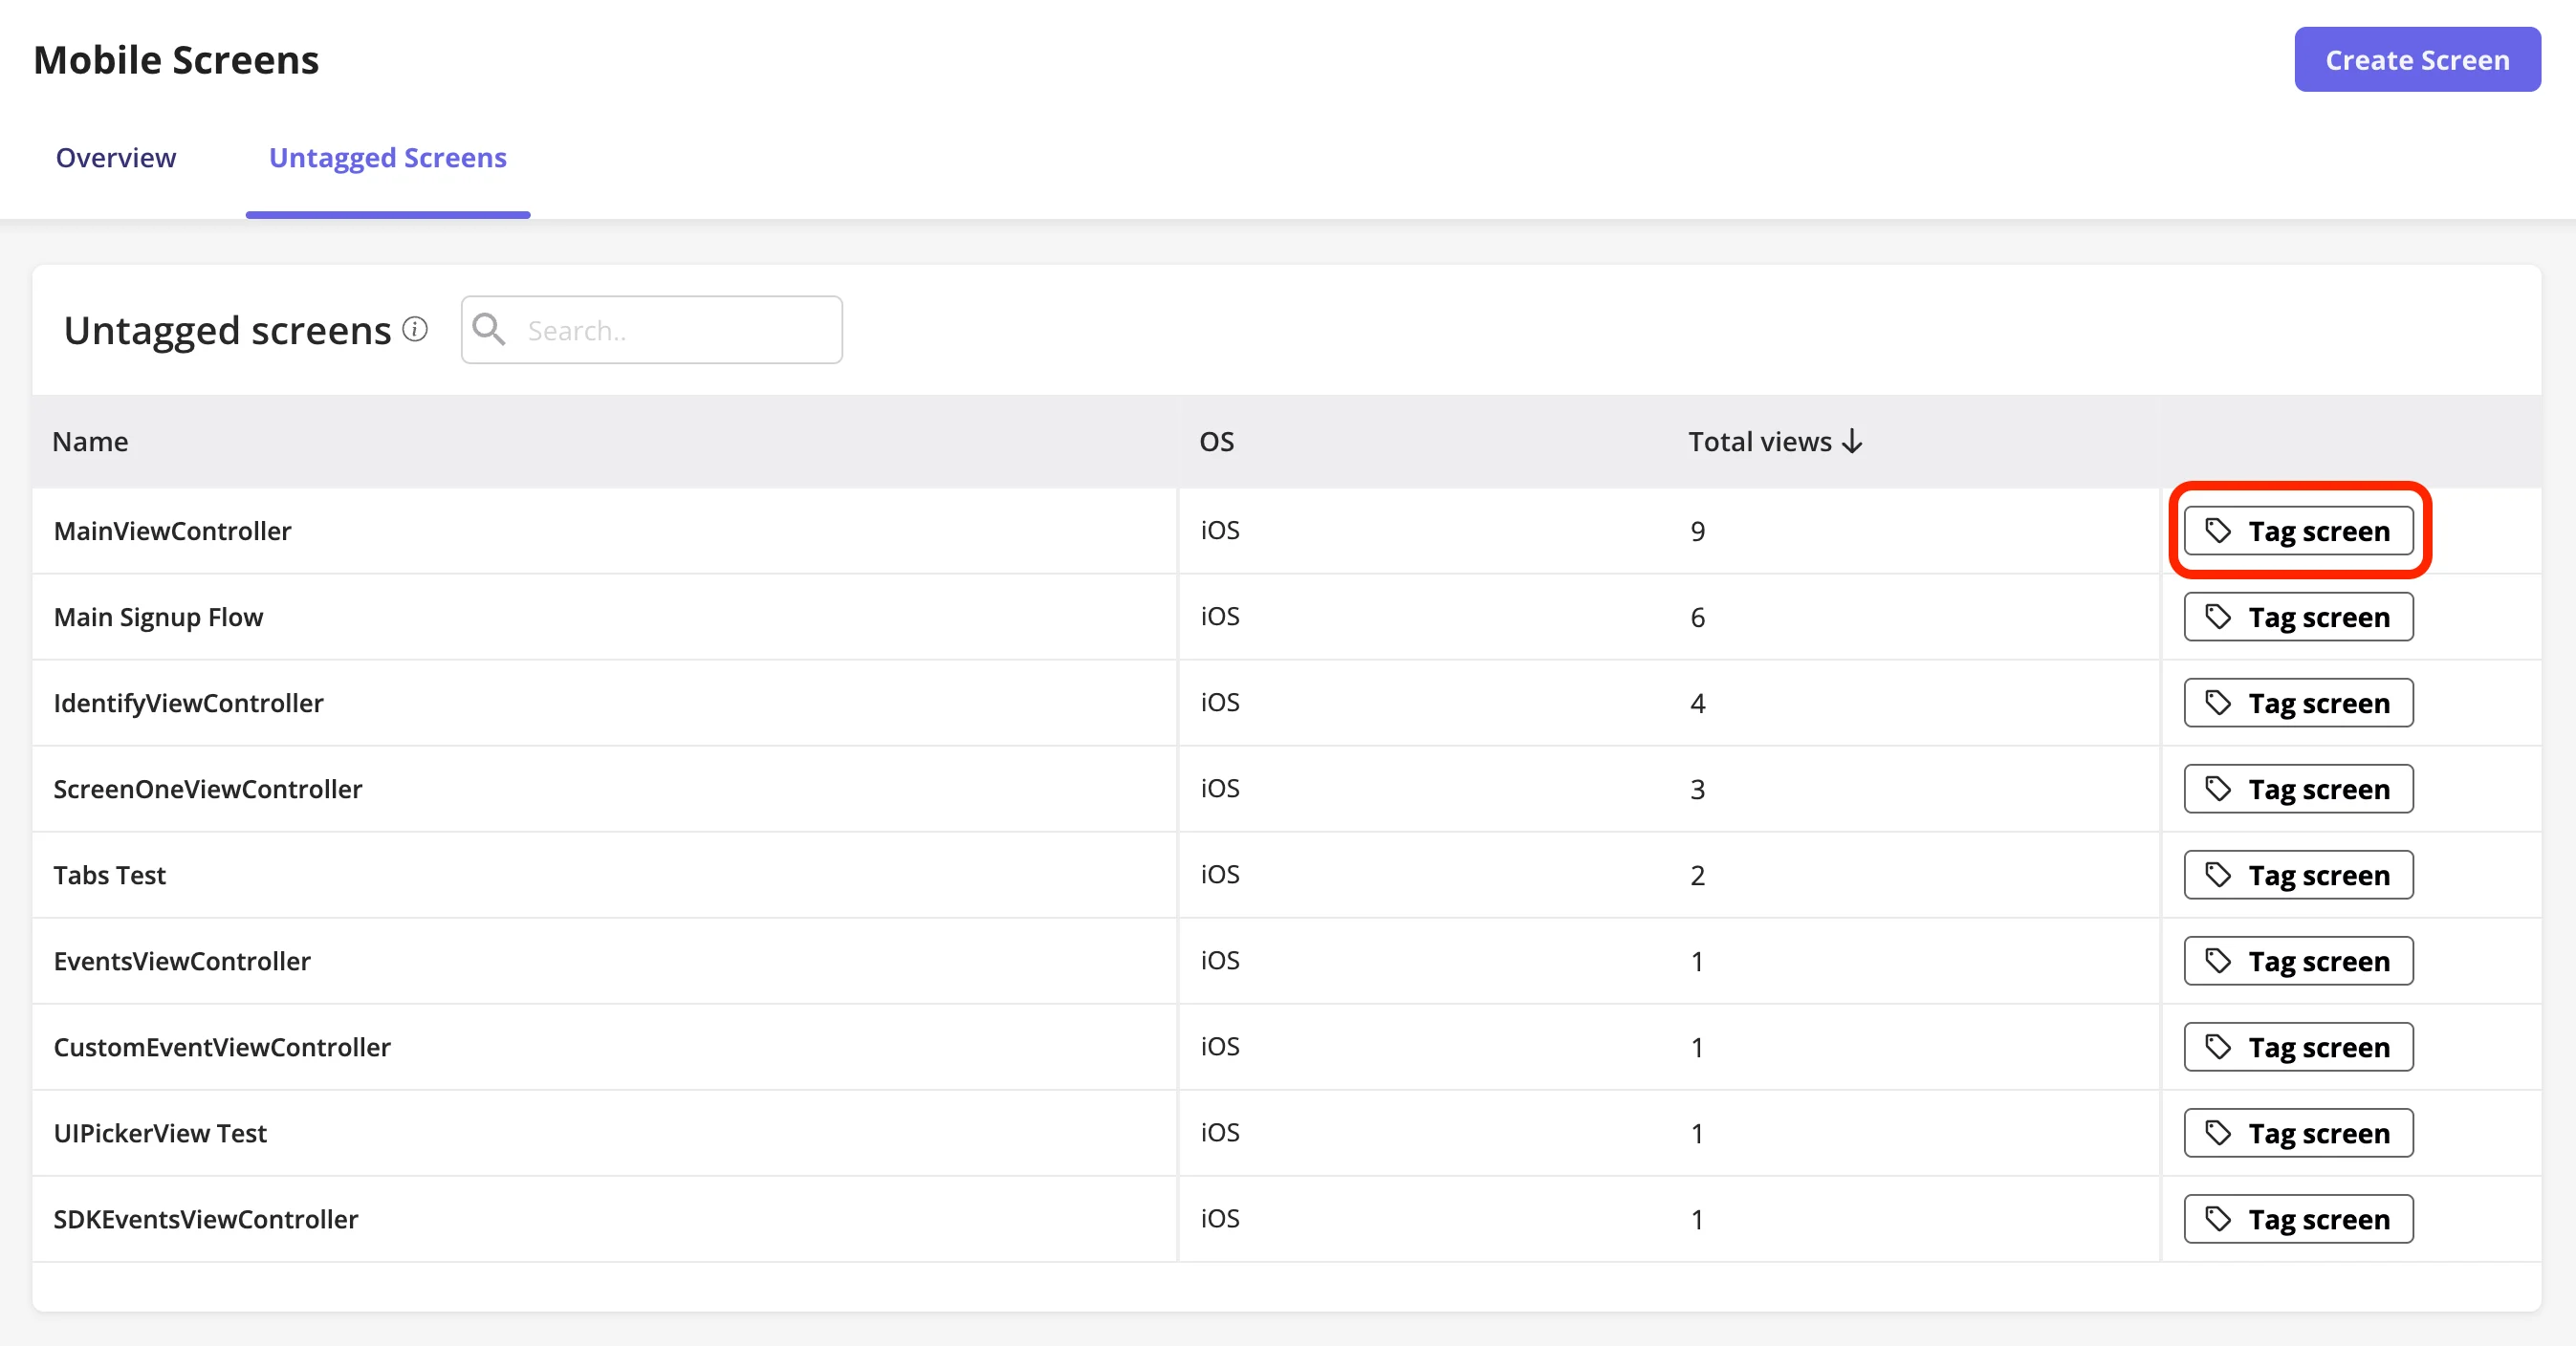
Captured screens are sent to Userpilot and appear under **Untagged Screens** for review and tagging.
## When should you use auto-capture?
Auto-capture is useful when:
1. You want to reduce engineering dependency
2. Your app has frequent screen changes
3. You want automatic coverage of all screens
4. You prefer reviewing screens later instead of defining them upfront
## How it works
1. SDK listens to native lifecycle events
2. Screen transitions are detected automatically
3. Screen metadata is generated per platform rules
4. Data is sent to Userpilot backend
5. Screens appear in **Untagged Screens**
6. Tag your mobile screens so you can target and display engagement and feedback content to users based on those screens, as well as use them in reports and segments
## Mobile Screen Tracking: Auto-Capture vs Manual Setup
### **If auto-capture is off**
You can still use the existing function `userpilot.screen("screen name")` to manually tag your mobile screens, just select the OS you want. These screens will appear under [Mobile Screens → Untagged Screens](https://run.userpilot.io/mobile-screens/untagged), where you can review and tag any new screens as needed.
 Examples of manually captured screens
```kotlin Android theme={null}
// Manifest
// Activity
class ProfileActivity : AppCompatActivity() {
override fun onResume() {
super.onResume()
Userpilot.screen("Profile")
}
}
```
```swift iOS theme={null}
lass ProfileViewController: UIViewController {
override func viewDidAppear(_ animated: Bool) {
super.viewDidAppear(animated)
Userpilot.screen("Profile")
}
}
```
### **If auto-capture is on**
Your developer needs to enable Auto-Capture in the SDK. Once enabled, the SDK will automatically collect screen data and ignore any manually tracked screen events.
### Android
```json theme={null}
{
"screen_name": "ProfileActivity",
"pathname": "com.sample.ProfileActivity",
"parentClassName": "com.sample.MainActivity"
}
```
1. `screen_name` : pulled from `android:label` in the manifest, or the class name as a fallback
2. `pathname` : the full class path
3. `parentClassName` : the parent activity (Fragments only)
### iOS
```json theme={null}
{
"screen_name": "ProfileViewController"
}
```
1. `screen_name` : the `UIViewController` class name
## ⚠️ **Important**
If you’re currently tracking mobile screens manually and want to switch to auto-capture, here’s what you need to know:
After enabling auto-capture:
1. Go to **Tagged Screens** under the [**Overview**](https://run.userpilot.io/mobile-screens) tab
2. Review your existing manually tracked screens
3. Compare the naming between your old manual screen names (in Overview) and the new auto-captured screens in **Untagged Screens**
**Why is this step important**
Auto-captured screen names may differ from your existing manually tracked ones. If not handled properly, this can break your targeting, cause engagements or surveys to stop triggering, and split your data across different screen names.
***
**Handling name differences (Important)**
Auto-captured screen names may not match your old ones.
**Android**
| Type | Value |
| :----------- | :------------------------- |
| Manual | Profile |
| Auto-capture | ProfileActivity |
| Pathname | com.sample.ProfileActivity |
**iOS**
| Type | Value |
| :----------- | :-------------------- |
| Manual | Profile |
| Auto-capture | ProfileViewController |
**What you should do**
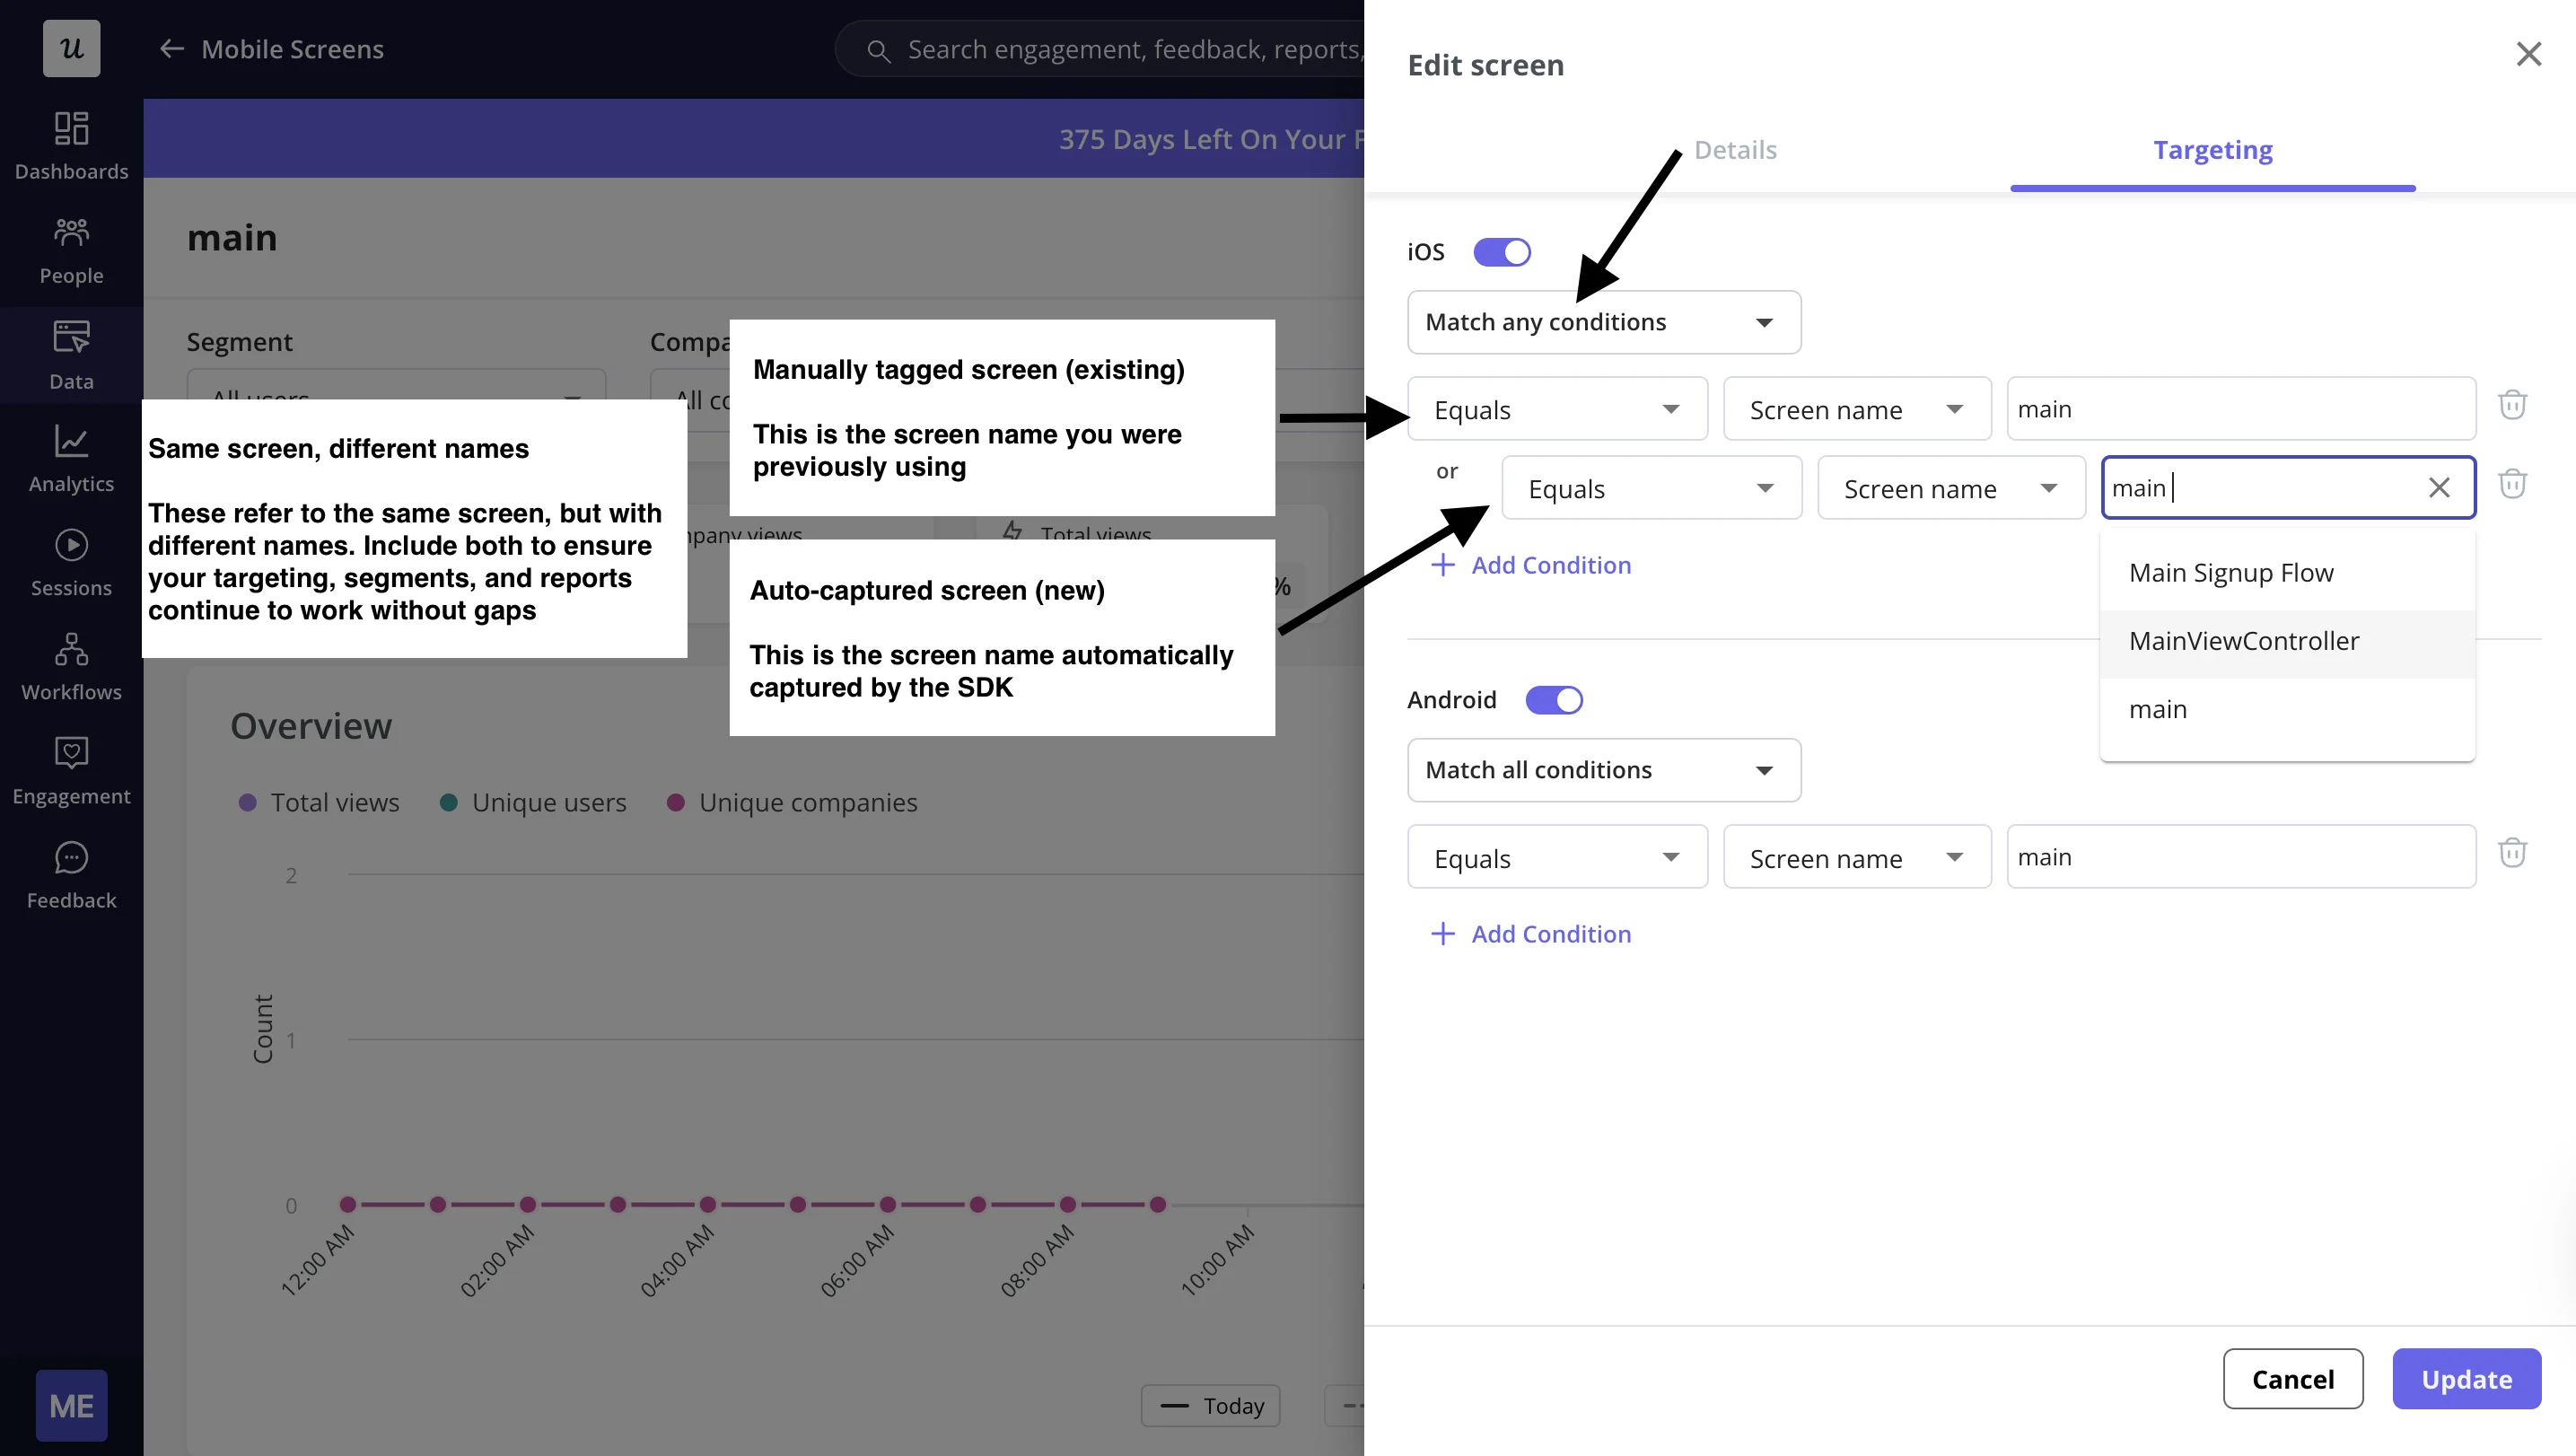
Create a new screen using the auto-captured name, then update your tagging rules:
1. Include both names
2. Use “Match any conditions”
Examples of manually captured screens
```kotlin Android theme={null}
// Manifest
// Activity
class ProfileActivity : AppCompatActivity() {
override fun onResume() {
super.onResume()
Userpilot.screen("Profile")
}
}
```
```swift iOS theme={null}
lass ProfileViewController: UIViewController {
override func viewDidAppear(_ animated: Bool) {
super.viewDidAppear(animated)
Userpilot.screen("Profile")
}
}
```
### **If auto-capture is on**
Your developer needs to enable Auto-Capture in the SDK. Once enabled, the SDK will automatically collect screen data and ignore any manually tracked screen events.
### Android
```json theme={null}
{
"screen_name": "ProfileActivity",
"pathname": "com.sample.ProfileActivity",
"parentClassName": "com.sample.MainActivity"
}
```
1. `screen_name` : pulled from `android:label` in the manifest, or the class name as a fallback
2. `pathname` : the full class path
3. `parentClassName` : the parent activity (Fragments only)
### iOS
```json theme={null}
{
"screen_name": "ProfileViewController"
}
```
1. `screen_name` : the `UIViewController` class name
## ⚠️ **Important**
If you’re currently tracking mobile screens manually and want to switch to auto-capture, here’s what you need to know:
After enabling auto-capture:
1. Go to **Tagged Screens** under the [**Overview**](https://run.userpilot.io/mobile-screens) tab
2. Review your existing manually tracked screens
3. Compare the naming between your old manual screen names (in Overview) and the new auto-captured screens in **Untagged Screens**
**Why is this step important**
Auto-captured screen names may differ from your existing manually tracked ones. If not handled properly, this can break your targeting, cause engagements or surveys to stop triggering, and split your data across different screen names.
***
**Handling name differences (Important)**
Auto-captured screen names may not match your old ones.
**Android**
| Type | Value |
| :----------- | :------------------------- |
| Manual | Profile |
| Auto-capture | ProfileActivity |
| Pathname | com.sample.ProfileActivity |
**iOS**
| Type | Value |
| :----------- | :-------------------- |
| Manual | Profile |
| Auto-capture | ProfileViewController |
**What you should do**
Create a new screen using the auto-captured name, then update your tagging rules:
1. Include both names
2. Use “Match any conditions”