> ## Documentation Index
> Fetch the complete documentation index at: https://docs.userpilot.com/llms.txt
> Use this file to discover all available pages before exploring further.
# Web Installation
> Install Userpilot on your web application using JavaScript snippet, Segment integration, or Google Tag Manager with step-by-step instructions.
There are three ways to install Userpilot: directly via JavaScript, which requires only a few minutes from an engineer; through Segment, if your web application already has it installed; or via Google Tag Manager (GTM), allowing you to install it yourself if GTM is already set up.
Copy the snippet and paste it at the beginning of your `` section in your index.html file on every page you want to use Userpilot.
Your *App Token* can be found under the [*Environment tab*](https://run.userpilot.io/environment) *.*
```javascript SDK theme={null}
```
```typescript NPM theme={null}
import { Userpilot } from 'userpilot'
// Initialize Userpilot
Userpilot.initialize('AppToken');
```
You can include the staging token on staging environments
The user ID (a unique identifier) is required. Additional user and company properties can also be included in the script.
**PII Data Notice**
Before passing any Personally Identifiable Information (PII) such as names, emails, or other sensitive user data to Userpilot:
* **Security & Compliance:** Verify internally with your legal, security, and compliance teams that doing so aligns with your organization's data privacy policies and applicable regulations (e.g., GDPR, CCPA).
* **Data Type Mapping:** Ensure correct data type mapping for all properties. Userpilot supports String, Numeric, and Date types. Make sure dates are in ISO8601 format and numeric values are properly formatted. Incorrect type mapping can cause issues with segmentation, analytics, and debugging.
* **Debugging:** Proper data formatting is crucial for effective debugging and troubleshooting. Verify that your data maps correctly to Userpilot's expected formats before implementation.
* **Multi-page Applications**
The `userpilot.identify()` call is used on each page to identify the user and determine if they should see Userpilot content.
```javascript theme={null}
```
* **Single page Applications**
You only have to call this function once, upon a successful user authentication.
The following is an example of how Userpilot's identify function is called in the app's entry point only when the user is successfully authenticated.
`localStorage.get("token")` is an example method of authentication.
```typescript React theme={null}
React.useEffect(() => {
if(isAuthenticated){
Userpilot.identify('456987',{
name: 'John Doe',
email: 'john@site-domain.com',
created_at: '2018-07-11',
});
}
}, [isAuthenticated]);
```
```typescript Angular theme={null}
@Component({
selector: 'app-root',
templateUrl: './app.component.html',
styleUrls: ['./app.component.scss']
})
export class AppComponent {
constructor(
private userService: AuthService
) {
const token = localStorage.getItem('token');
if(token){
this.userService.getUser().subscribe((user) => {
if(user.id){
Userpilot.identify(user.id,{
name: user.name,
email: user.email,
created_at: user.created_at,
});
}
});
}
}
}
```
```typescript Vue theme={null}
export const authenticationGuard = (to, from, next) => {
const authService = getAuthService();
const guardAction = () => {
if (authService.isAuthenticated) {
const user = authService.getUser();
const company = getUserCompany(user.id);
window.userpilot.identify(
user.id,
{
name: user.name,
email: user.email,
created_at: user.created_at, // Signup date as a Unix timestamp,
company: { // optional
id: company.id, // Company Unique ID
created_at: company.created_at // Signup date as a Unix timestamp
},
// Additional user properties
// plan: user.plan,
// trialEnds: user.trial_ends
}
)
return next();
}
authService.loginWithRedirect({ appState: { targetUrl: to.fullPath } });
};
}
```
This step is only required for SPAs
Userpilot must be reloaded on every route change through Userpilot's reload function. In the following example, we call the reload function in the route change watcher file (in our case it is auth.guard.ts).
The following is an example of how Userpilot's identify function is called in the app's entry point only when the user is successfully authenticated.
```javascript React theme={null}
import { useLocation } from "react-router-dom";
const location = useLocation();
React.useEffect(() => {
if(isAuthenticated){
Userpilot.reload();
}
}, [location])
```
```typescript Angular theme={null}
import { Router, NavigationEnd } from '@angular/router';
import { filter } from 'rxjs/operators';
constructor(private router: Router) {
this.router.events.pipe(
filter(event => event instanceof NavigationEnd)
).subscribe((event: NavigationEnd) => {
const token = localStorage.getItem('token');
if (token) {
Userpilot.reload();
}
});
}
```
```
console.log("Hello World");
```
```typescript Vue theme={null}
router.afterEach((route) => {
userpilot.reload();
});
```
Sending coded events to Userpilot is recommended to utilize the events in reports, in-app triggering, and segmenting users.
Use the `userpilot.track()` call to track actions users take in your application.
If you use an analytics tool (e.g. Mixpanel, Amplitude, Hotjar, FullStory, Google Analytics) add the`userpilot.track()` wherever you're already tracking events. You can also pass extra metadata alongside the event's name to pass unique information about the event.
```javascript theme={null}
userpilot.track("signed up");
//triggered when a user signs up. Helps track activation
userpilot.track("churned");
//triggered when a user cancels or becomes inactive. Useful for retention analysis
userpilot.track("plan upgraded", {
from_plan: “Starter”,
to_plan: “Growth”
});
//triggered when a user upgrades their plan. Helps track conversions and upsells
userpilot.track("payment completed", {
amount: “$500”,
invoice_number: “12345”
});
//triggered when a payment is completed. Useful for tracking revenue and billing success
```
For more advanced customizations and detailed API reference, check out our [JavaScript SDK documentation](/developer/installation/SDK-APIs).
You can install Userpilot via Segment without the need for involving engineering to install code.
### Installing Userpilot using the plugin
This will Install Userpilot on the client side where the data will be sent from the webpage itself.
You are required to have a Segment account and have Segment [fully installed](https://segment.com/docs/getting-started/04-full-install/) on your web application
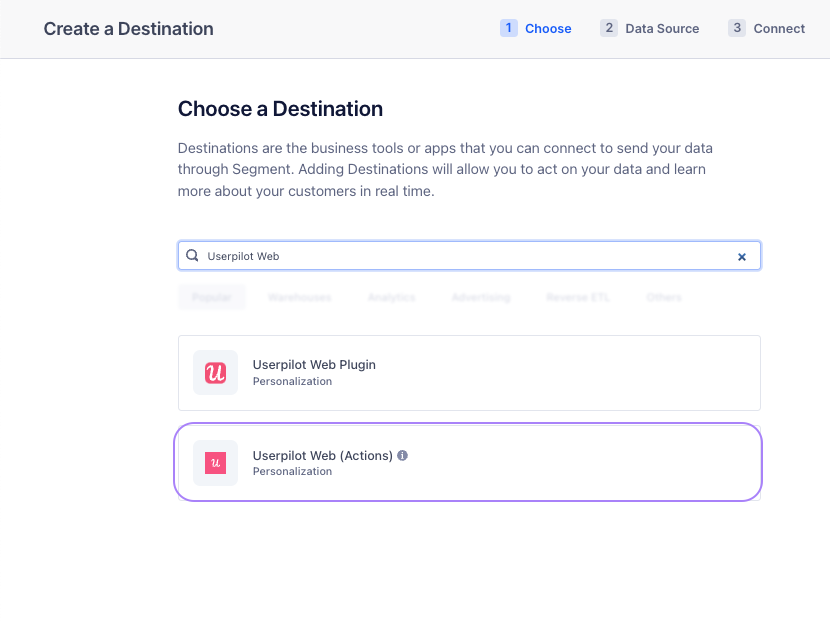
1. From the main menu, click on the Catalog tab, then click on the Destination tab.
2. Search for and select "Userpilot Web (Actions)".
 3. Choose the source you want to pass the data from and continue the setup steps and click on "Create Destination"
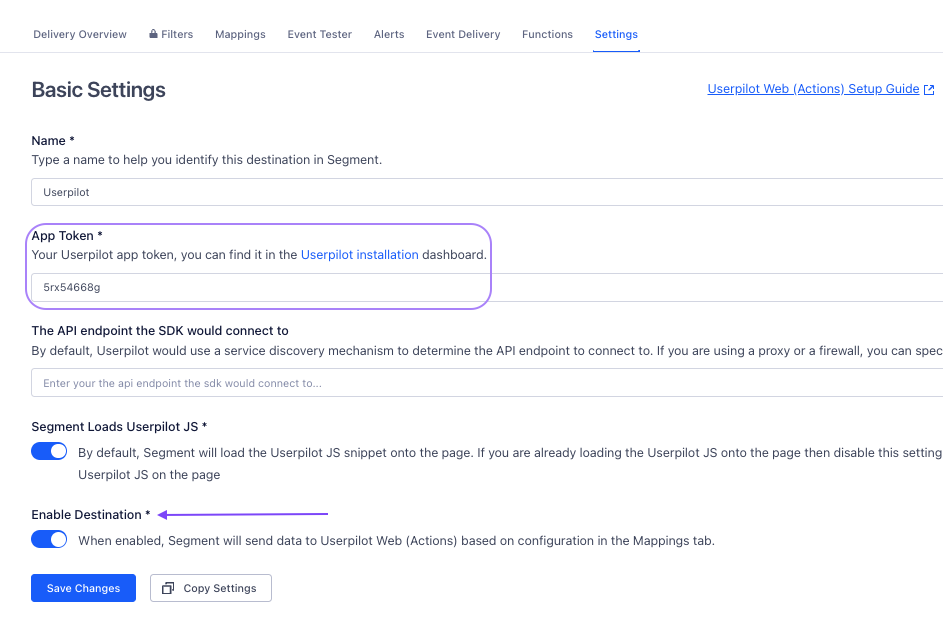
4. After completing the setup steps, fill out the app token field with your token.
You can find your App Token under the [Environment tab](https://run.userpilot.io/environment) or the [Installation tab](https://run.userpilot.io/installation/installation-method/segment)
3. Choose the source you want to pass the data from and continue the setup steps and click on "Create Destination"
4. After completing the setup steps, fill out the app token field with your token.
You can find your App Token under the [Environment tab](https://run.userpilot.io/environment) or the [Installation tab](https://run.userpilot.io/installation/installation-method/segment)
 ## Passing data through a backend service
In order to send data to Userpilot through a back-end server, you will need to follow the steps below
1. Navigate to the Destinations tab and select "Add Destination
2. Search for "Userpilot Cloud (Actions)" and add the destination
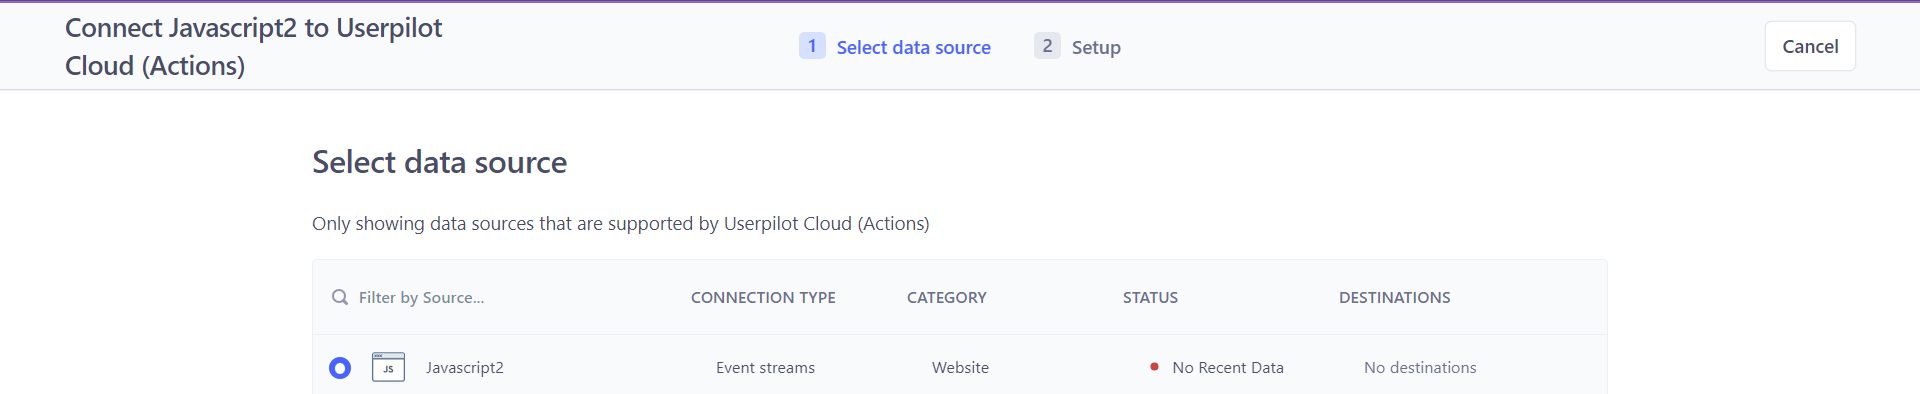
Choose the source you want to pass the data from
## Passing data through a backend service
In order to send data to Userpilot through a back-end server, you will need to follow the steps below
1. Navigate to the Destinations tab and select "Add Destination
2. Search for "Userpilot Cloud (Actions)" and add the destination
Choose the source you want to pass the data from
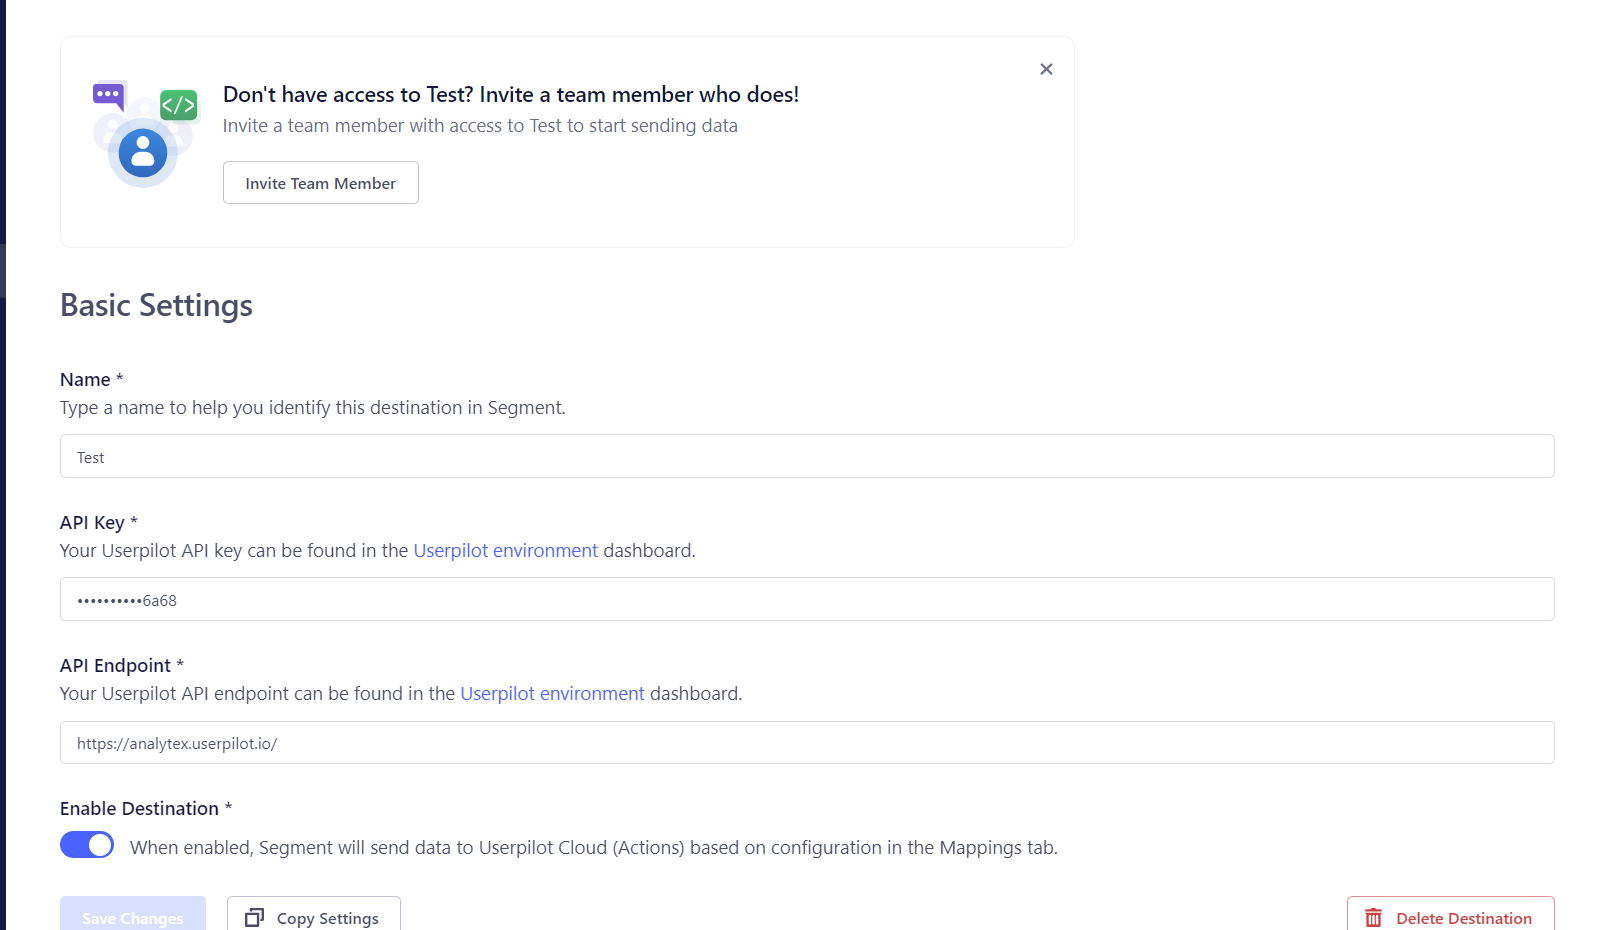
 1. Fill in the required values; you can find the **API Key** and the **API Endpoint** in your Userpilot account under the [Environment tab](https://run.userpilot.io/environment), ensure that you copy the API Key correctly.
2. Toggle to enable the destination
###
1. Fill in the required values; you can find the **API Key** and the **API Endpoint** in your Userpilot account under the [Environment tab](https://run.userpilot.io/environment), ensure that you copy the API Key correctly.
2. Toggle to enable the destination
###  FAQs
Yes! If you have Userpilot installed via Segment, events will be sent to Userpilot as soon as the `analytics.track()` method is called and will appear in the [Events tab](https://run.userpilot.io/events/overview). For more details on the Segment track method, click [here](https://segment.com/docs/connections/spec/track/)
Absolutely, [Group](https://segment.com/docs/connections/spec/group/) properties will appear under [Companies](https://run.userpilot.io/companies) in Userpilot
Installing Userpilot with google tag manager is an easy way to get up and running in no time. To get started we first need to create an account on google tag manager and install GTM code into your app.
#### Step 1: Installing the identify method
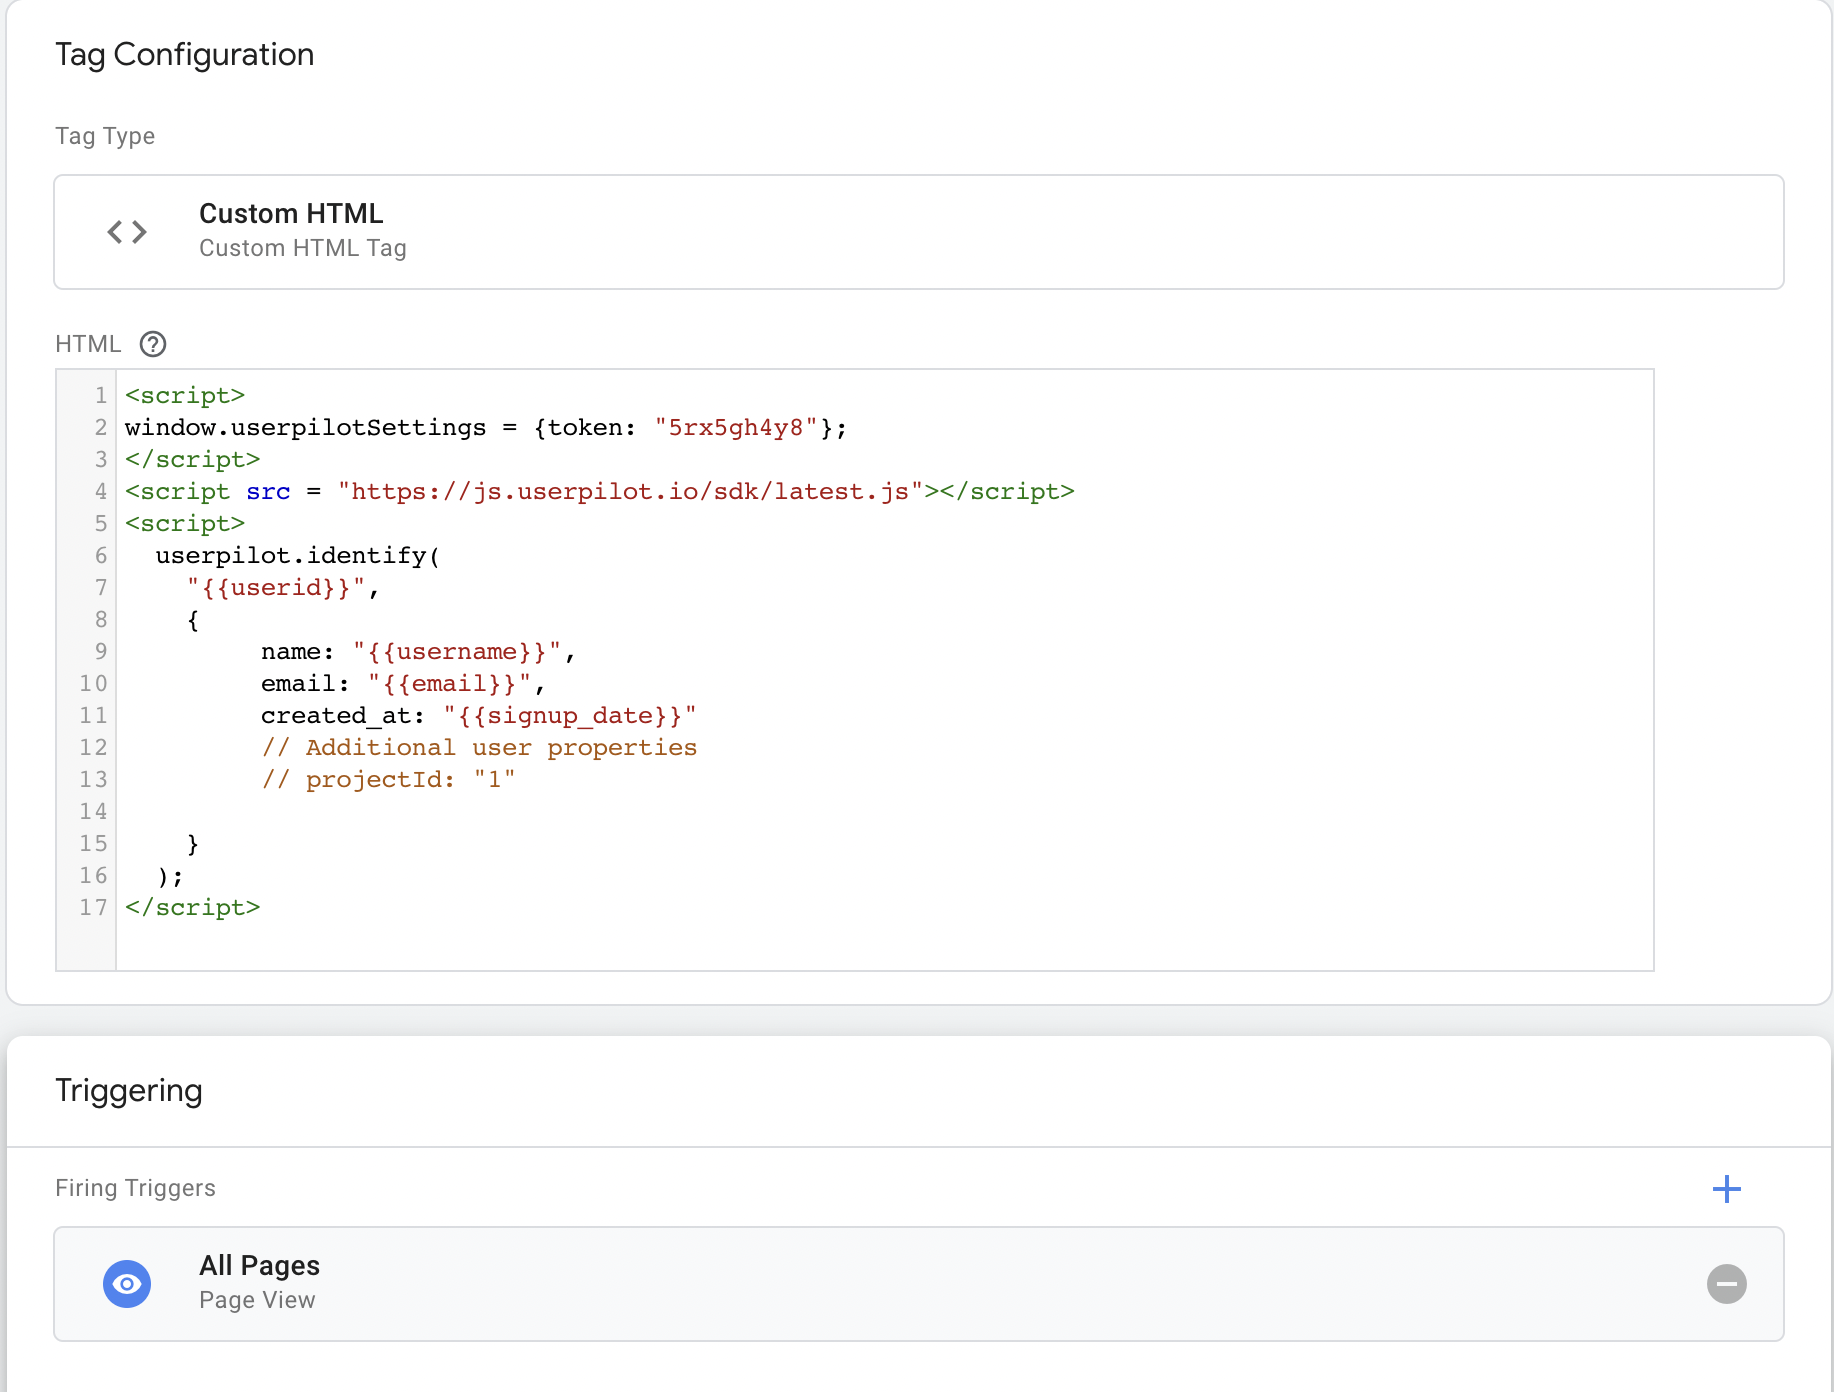
1. In order to start displaying Userpilot content on your app, we first need to create a new Custom HTML tag
2. Next, we will add the deployment script below to the HTML box.
3. As for the triggering setting, it should be set to "All pages"
You will need to pass all properties including the unique user ID directly to the [data layer](https://support.google.com/tagmanager/answer/6164391?hl=en).
**PII Data Notice**
Before passing any Personally Identifiable Information (PII) such as names, emails, or other sensitive user data to Userpilot:
* **Security & Compliance:** Verify internally with your legal, security, and compliance teams that doing so aligns with your organization's data privacy policies and applicable regulations (e.g., GDPR, CCPA).
* **Data Type Mapping:** Ensure correct data type mapping for all properties. Userpilot supports String, Numeric, and Date types. Make sure dates are in ISO8601 format and numeric values are properly formatted. Incorrect type mapping can cause issues with segmentation, analytics, and debugging.
* **Debugging:** Proper data formatting is crucial for effective debugging and troubleshooting. Verify that your data maps correctly to Userpilot's expected formats before implementation.
```javascript theme={null}
```
**Note:** You will need to replace the "appToken" with your [account app token](https://run.userpilot.io/installation)
FAQs
Yes! If you have Userpilot installed via Segment, events will be sent to Userpilot as soon as the `analytics.track()` method is called and will appear in the [Events tab](https://run.userpilot.io/events/overview). For more details on the Segment track method, click [here](https://segment.com/docs/connections/spec/track/)
Absolutely, [Group](https://segment.com/docs/connections/spec/group/) properties will appear under [Companies](https://run.userpilot.io/companies) in Userpilot
Installing Userpilot with google tag manager is an easy way to get up and running in no time. To get started we first need to create an account on google tag manager and install GTM code into your app.
#### Step 1: Installing the identify method
1. In order to start displaying Userpilot content on your app, we first need to create a new Custom HTML tag
2. Next, we will add the deployment script below to the HTML box.
3. As for the triggering setting, it should be set to "All pages"
You will need to pass all properties including the unique user ID directly to the [data layer](https://support.google.com/tagmanager/answer/6164391?hl=en).
**PII Data Notice**
Before passing any Personally Identifiable Information (PII) such as names, emails, or other sensitive user data to Userpilot:
* **Security & Compliance:** Verify internally with your legal, security, and compliance teams that doing so aligns with your organization's data privacy policies and applicable regulations (e.g., GDPR, CCPA).
* **Data Type Mapping:** Ensure correct data type mapping for all properties. Userpilot supports String, Numeric, and Date types. Make sure dates are in ISO8601 format and numeric values are properly formatted. Incorrect type mapping can cause issues with segmentation, analytics, and debugging.
* **Debugging:** Proper data formatting is crucial for effective debugging and troubleshooting. Verify that your data maps correctly to Userpilot's expected formats before implementation.
```javascript theme={null}
```
**Note:** You will need to replace the "appToken" with your [account app token](https://run.userpilot.io/installation)
 **Step 2: Calling userpilot.reload()**
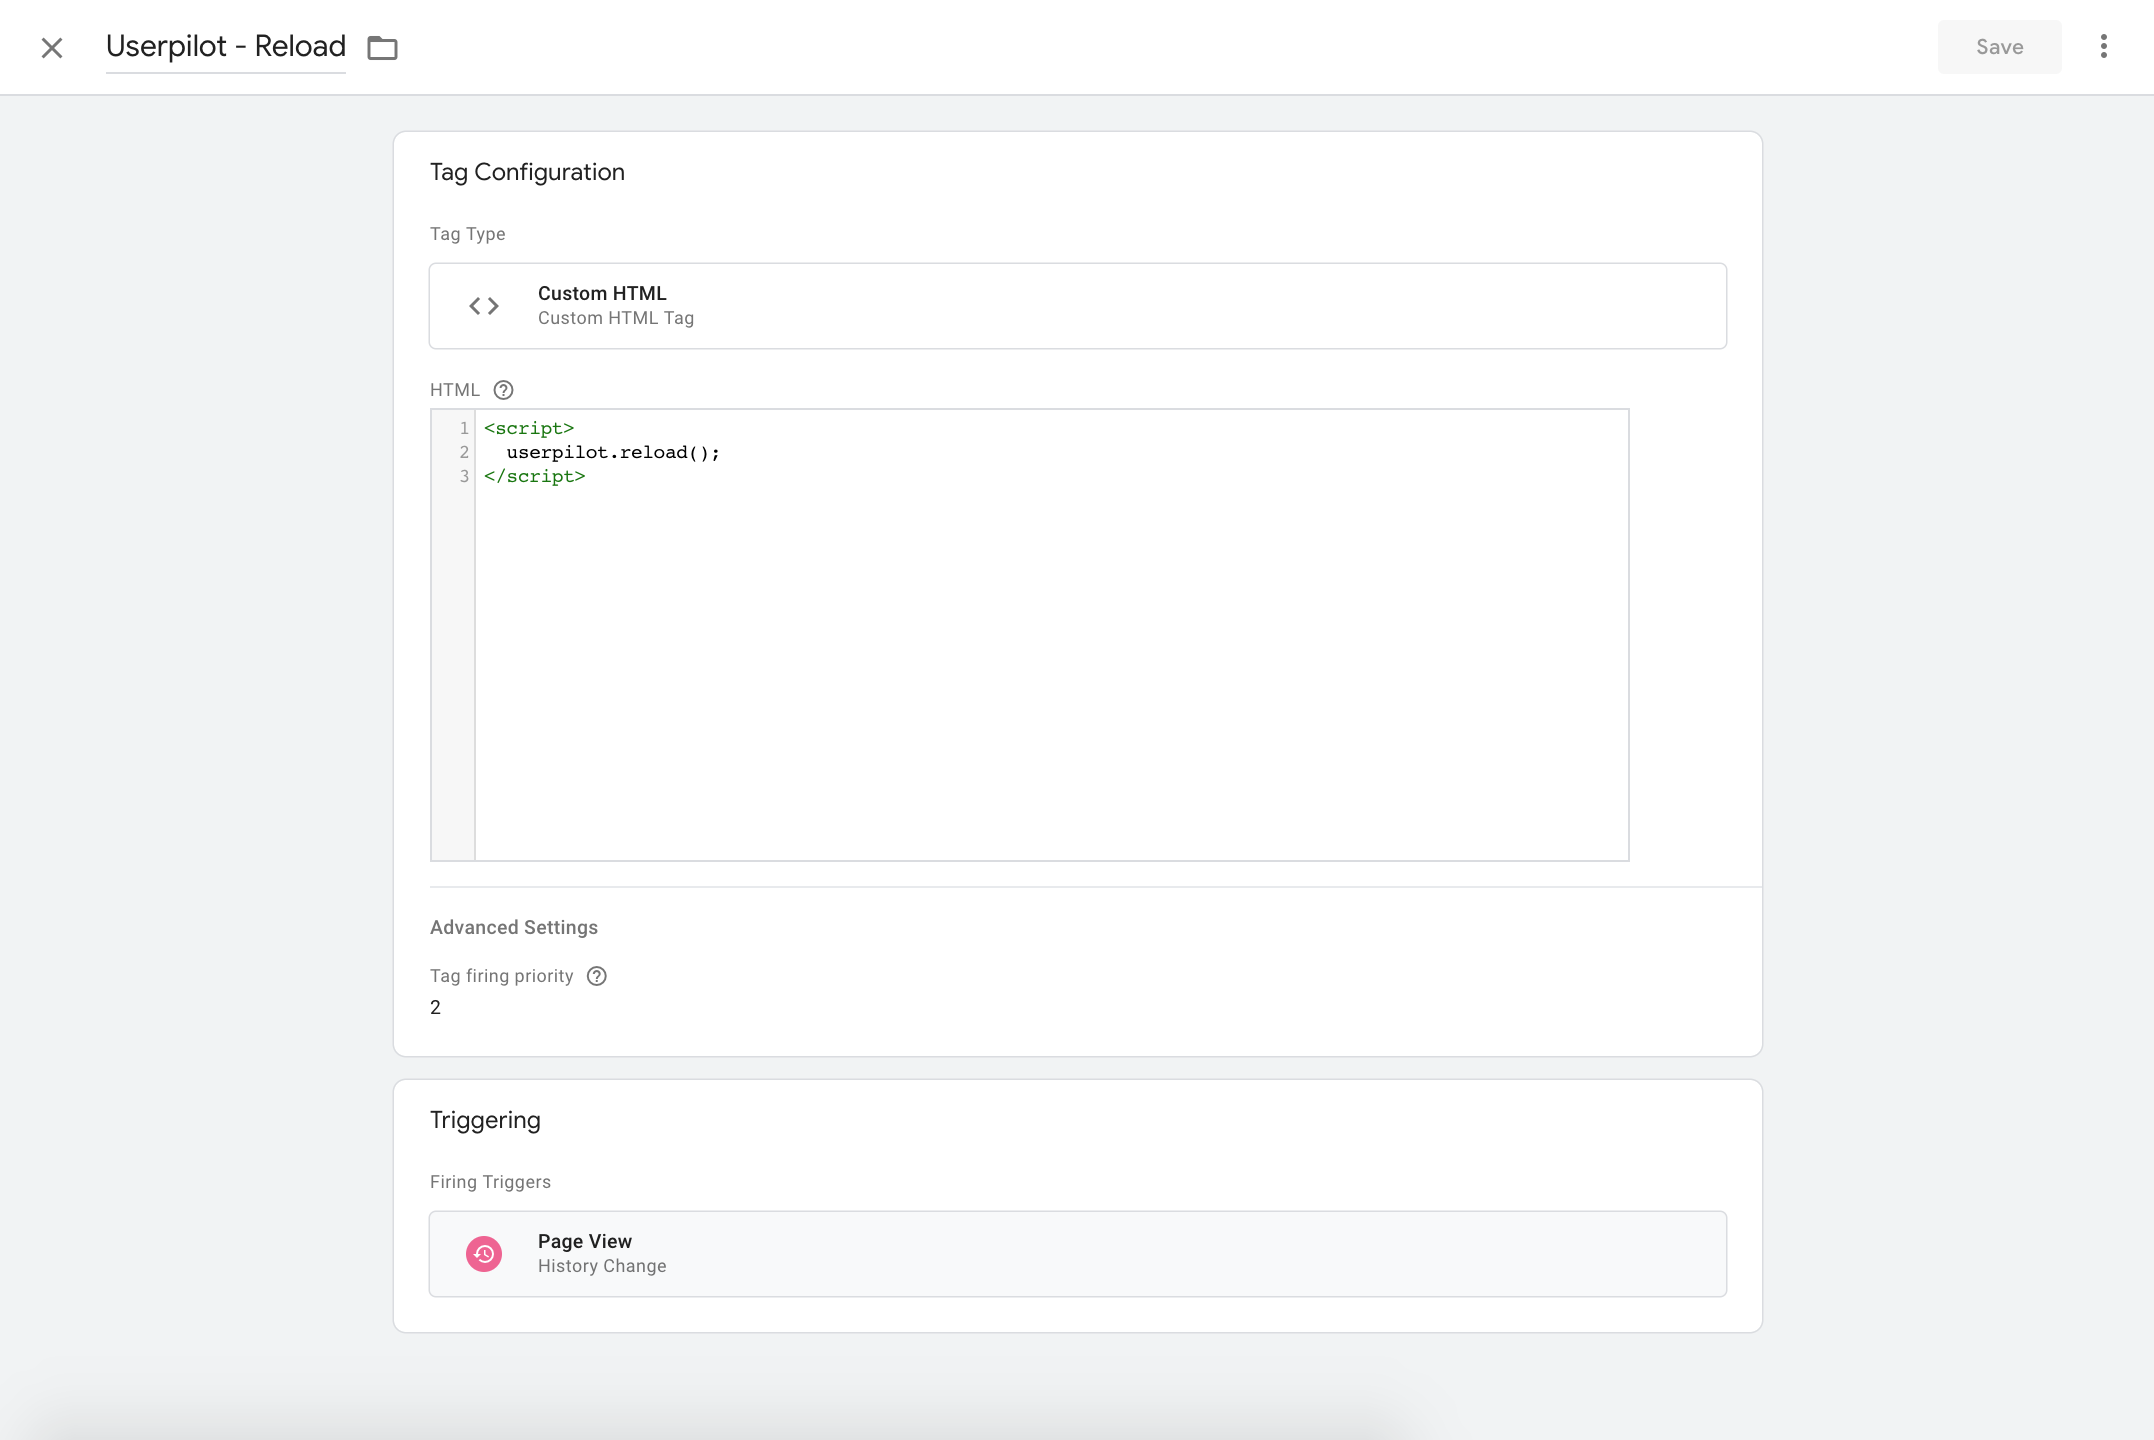
If you have a Single Page App (SPA) you will need to trigger the `userpilot.reload()` function on every page URL change.
1. To do that we will need to create a new Custom HTML tag.
2. Then simply add the code below in the HTML box.
```javascript theme={null}
```
3. After that, we need to set the Triggering to "History Change". The "History Change" trigger will run the tag only when the URL has been updated.
**Step 2: Calling userpilot.reload()**
If you have a Single Page App (SPA) you will need to trigger the `userpilot.reload()` function on every page URL change.
1. To do that we will need to create a new Custom HTML tag.
2. Then simply add the code below in the HTML box.
```javascript theme={null}
```
3. After that, we need to set the Triggering to "History Change". The "History Change" trigger will run the tag only when the URL has been updated.
 ## Prerequisites
* Access to your web application's codebase (for JavaScript) or GTM/Segment account
* Your Userpilot App Token from [Settings > Environment](https://run.userpilot.io/environment)
* User authentication system to provide unique user IDs
## Expected Result
After successful installation:
* Userpilot SDK loads on your pages (check for `window.userpilot` in console)
* Users appear in [People](https://run.userpilot.io/users) after `identify()` is called
* You can create and display flows to identified users
## Common Issues
| Symptom | Cause | Solution |
| -------------------------- | -------------------------- | ---------------------------------------------------------- |
| `userpilot is not defined` | SDK not loaded | Verify script is in ``, check for CSP blocks |
| Content not showing | User not identified | Ensure `identify()` is called before content triggers |
| SPA navigation issues | Missing `reload()` | Call `userpilot.reload()` on every route change |
| Ad blocker interference | Third-party domain blocked | Consider [custom domain hosting](/developer/custom-domain) |
## Related
* [SDK API Reference](/developer/installation/SDK-APIs) - Full SDK method documentation
* [Production vs Staging](/developer/installation/production-staging) - Environment setup
* [Content Security Policy](/developer/security/csp) - CSP configuration
* [Troubleshooting](/troubleshooting/install-troubleshoot) - Installation issues
[**For any questions or concerns please reach out to support@userpilot.com**](mailto:support@userpilot.com)
## Prerequisites
* Access to your web application's codebase (for JavaScript) or GTM/Segment account
* Your Userpilot App Token from [Settings > Environment](https://run.userpilot.io/environment)
* User authentication system to provide unique user IDs
## Expected Result
After successful installation:
* Userpilot SDK loads on your pages (check for `window.userpilot` in console)
* Users appear in [People](https://run.userpilot.io/users) after `identify()` is called
* You can create and display flows to identified users
## Common Issues
| Symptom | Cause | Solution |
| -------------------------- | -------------------------- | ---------------------------------------------------------- |
| `userpilot is not defined` | SDK not loaded | Verify script is in ``, check for CSP blocks |
| Content not showing | User not identified | Ensure `identify()` is called before content triggers |
| SPA navigation issues | Missing `reload()` | Call `userpilot.reload()` on every route change |
| Ad blocker interference | Third-party domain blocked | Consider [custom domain hosting](/developer/custom-domain) |
## Related
* [SDK API Reference](/developer/installation/SDK-APIs) - Full SDK method documentation
* [Production vs Staging](/developer/installation/production-staging) - Environment setup
* [Content Security Policy](/developer/security/csp) - CSP configuration
* [Troubleshooting](/troubleshooting/install-troubleshoot) - Installation issues
[**For any questions or concerns please reach out to support@userpilot.com**](mailto:support@userpilot.com)