> ## Documentation Index
> Fetch the complete documentation index at: https://docs.userpilot.com/llms.txt
> Use this file to discover all available pages before exploring further.
# Setup and authenticate your email domain
> Authenticate your domain so Userpilot can send emails from your own address, protecting your brand and landing more messages in the inbox.
## Overview
Domain authentication proves to email providers that Userpilot is allowed to send emails on your behalf. It's required before you can send any emails, and it's what keeps your messages trusted rather than flagged as spam.
Once your domain is authenticated, you'll:
* **Prevent spoofing** - stop others from forging emails that appear to come from your domain.
* **Pass modern sender checks** - meet the authentication requirements now enforced by Gmail, Outlook, and other major inbox providers.
* **Keep tracking links trusted** - click links are served from your own domain, so they're less likely to be stripped or flagged as suspicious.
***
## Prerequisites
Before you start, make sure you have:
* **A registered domain you own.** Your emails will be sent from this domain.
* **Access to that domain's DNS settings** through a provider like GoDaddy, Cloudflare, Route 53, etc.
***
## Authenticate DKIM + MAIL FROM (required)
1. Open **Settings → Email → Domains** in the Userpilot dashboard.
2. Click **Add domain**, enter **`yourdomain.com`**, then click **Create**.
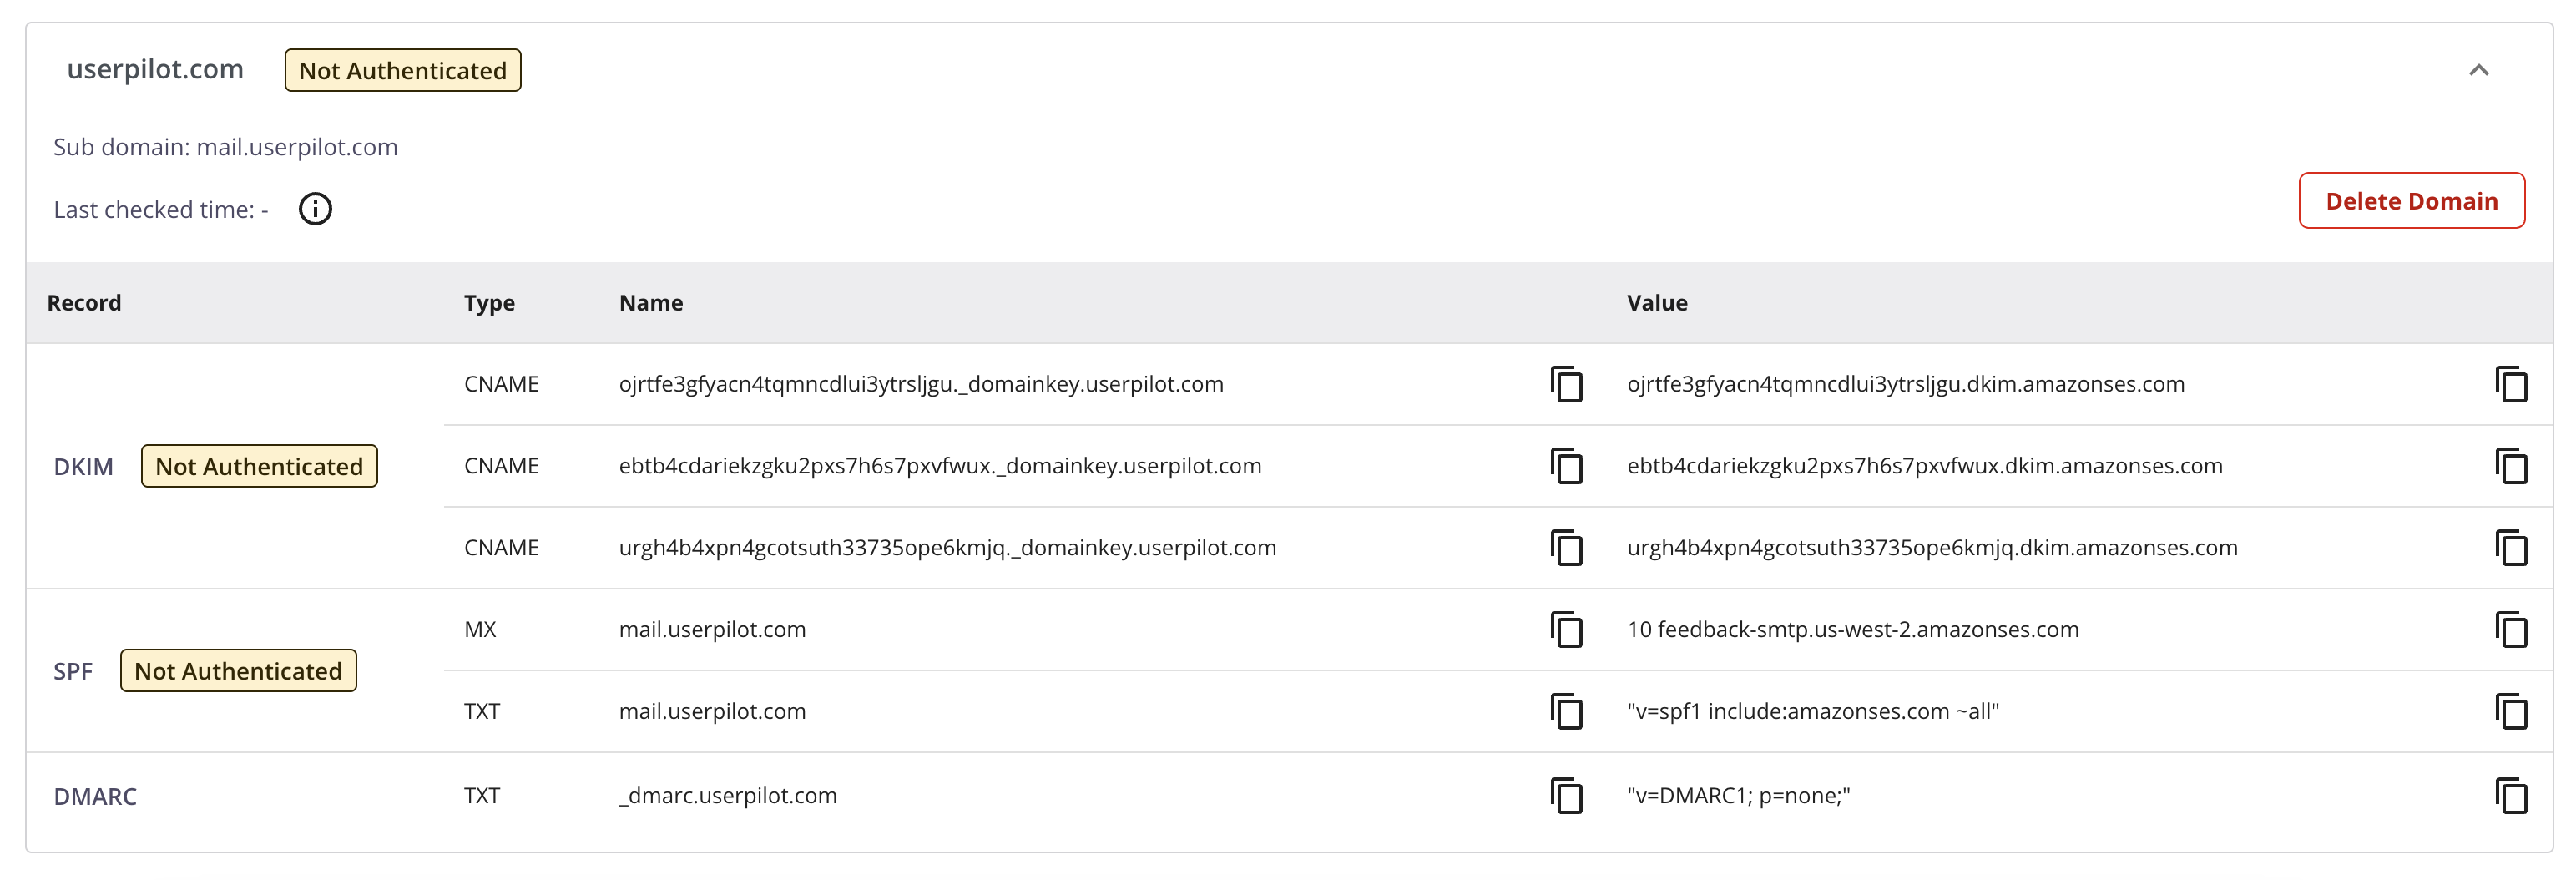 Add the generated DNS records in your DNS provider.
#### Record Description
* **DKIM:** DKIM adds a tamper-proof signature to every email your app sends. Receiving mail providers check that signature against public keys in your DNS to confirm the message really came from you and wasn’t altered in transit.
* **SPF:** SPF is an allow-list that Internet Service Providers use to check email authorization.
* **TXT Record** → Authorizes our mail server to send emails on your behalf.
* **MX Record** → A return-path which mail clients use to route bounces. Ensures block spoofing and keeps your main email (e.g., Gmail/Office 365) untouched.
* **DMARC:** DMARC helps protect your domain from email spoofing by working alongside SPF and DKIM. It lets you define how email providers should handle messages that fail authentication checks and provides reports so you can monitor and improve your domain’s email security.
> **Note:** You don't need to add or adjust your DMARC TXT record if you already have one. Simply review it to ensure it meets your needs.
If you use Cloudflare, set all records to **DNS Only**. Proxying breaks verification.
DNS may take a few minutes (rarely up to 48h).
Verified domains will automatically cover all their subdomains.\
For example, if you’ve verified [**example.pxl.studio**](http://example.pxl.studio), you can now send emails from addresses like [**noreply@eng.example.pxl.studio**](mailto:noreply@eng.example.pxl.studio)
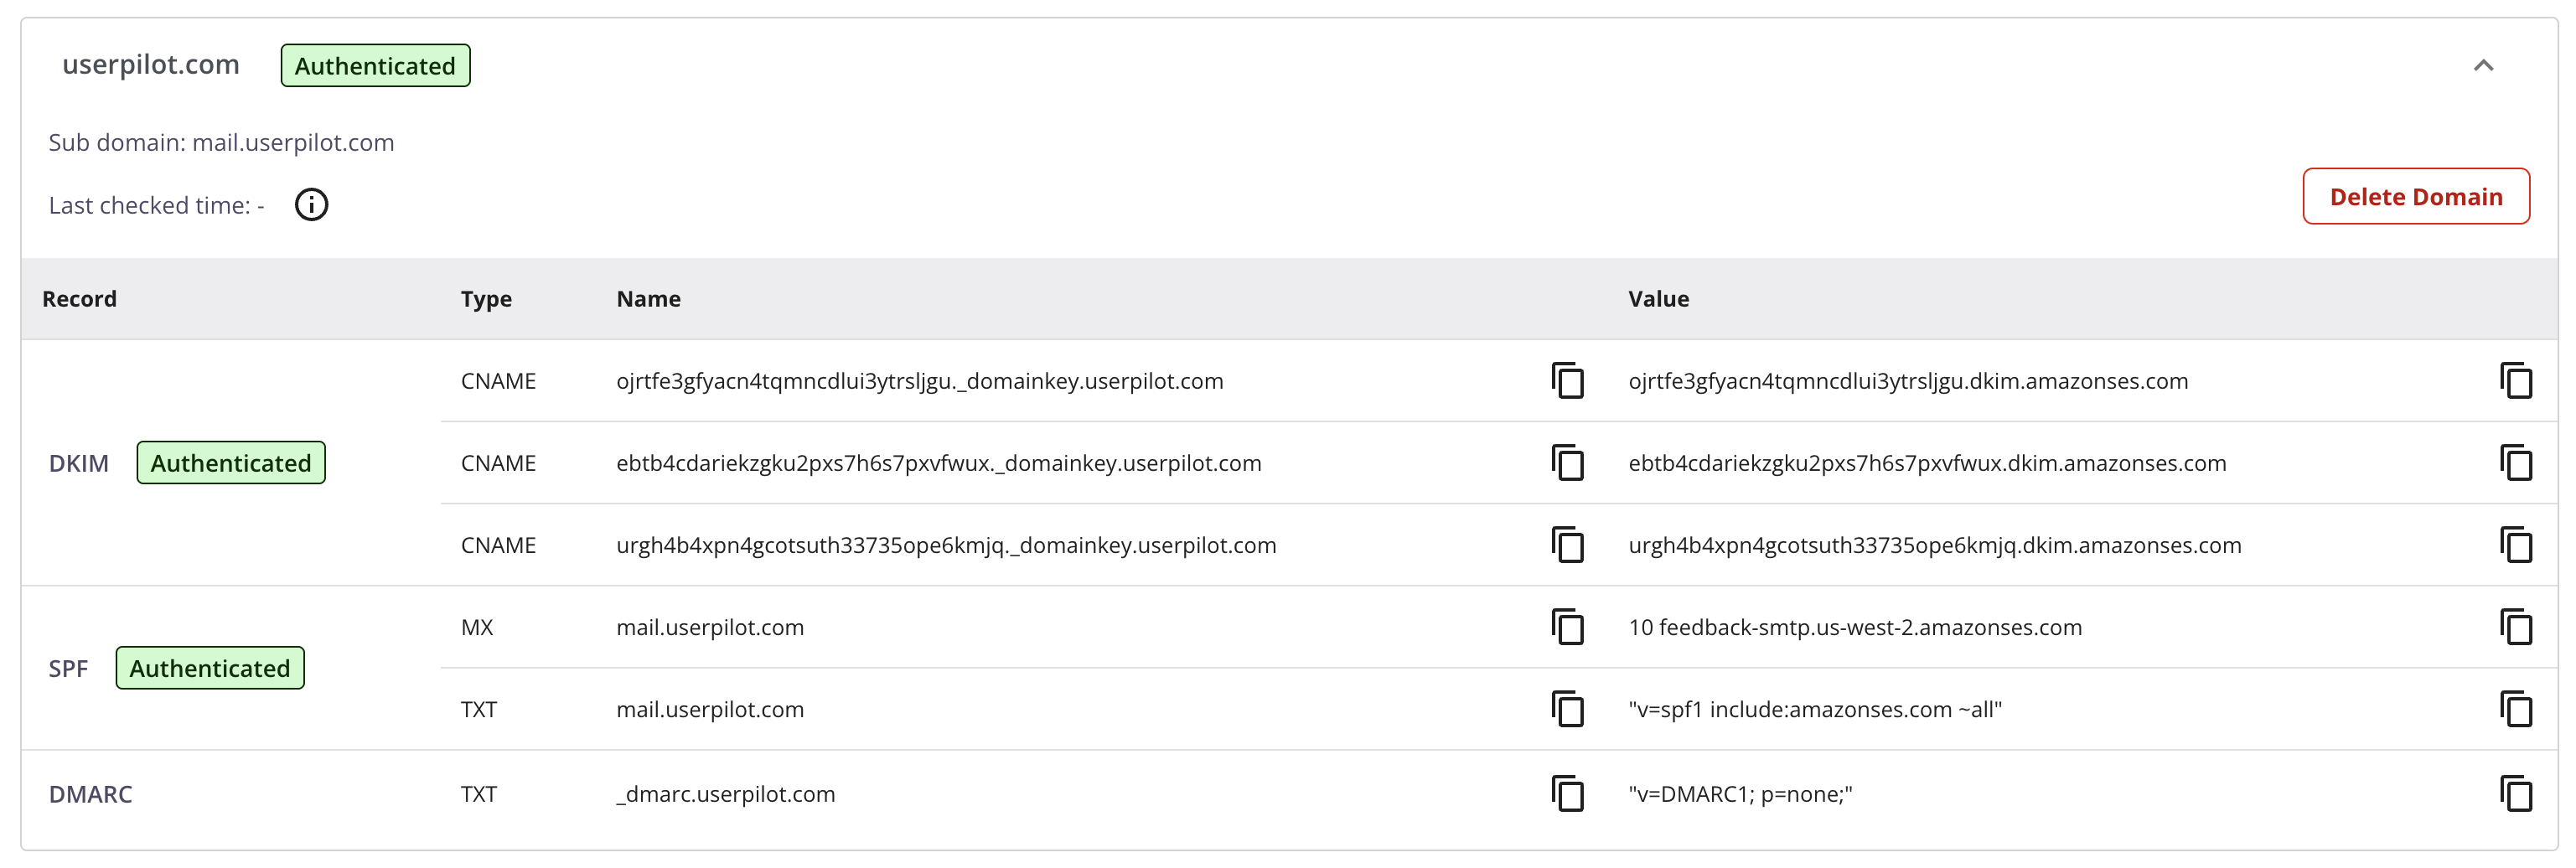
Status switches to **Authenticated** when DKIM and SPF records are valid. You are now ready to send emails.
Add the generated DNS records in your DNS provider.
#### Record Description
* **DKIM:** DKIM adds a tamper-proof signature to every email your app sends. Receiving mail providers check that signature against public keys in your DNS to confirm the message really came from you and wasn’t altered in transit.
* **SPF:** SPF is an allow-list that Internet Service Providers use to check email authorization.
* **TXT Record** → Authorizes our mail server to send emails on your behalf.
* **MX Record** → A return-path which mail clients use to route bounces. Ensures block spoofing and keeps your main email (e.g., Gmail/Office 365) untouched.
* **DMARC:** DMARC helps protect your domain from email spoofing by working alongside SPF and DKIM. It lets you define how email providers should handle messages that fail authentication checks and provides reports so you can monitor and improve your domain’s email security.
> **Note:** You don't need to add or adjust your DMARC TXT record if you already have one. Simply review it to ensure it meets your needs.
If you use Cloudflare, set all records to **DNS Only**. Proxying breaks verification.
DNS may take a few minutes (rarely up to 48h).
Verified domains will automatically cover all their subdomains.\
For example, if you’ve verified [**example.pxl.studio**](http://example.pxl.studio), you can now send emails from addresses like [**noreply@eng.example.pxl.studio**](mailto:noreply@eng.example.pxl.studio)
Status switches to **Authenticated** when DKIM and SPF records are valid. You are now ready to send emails.
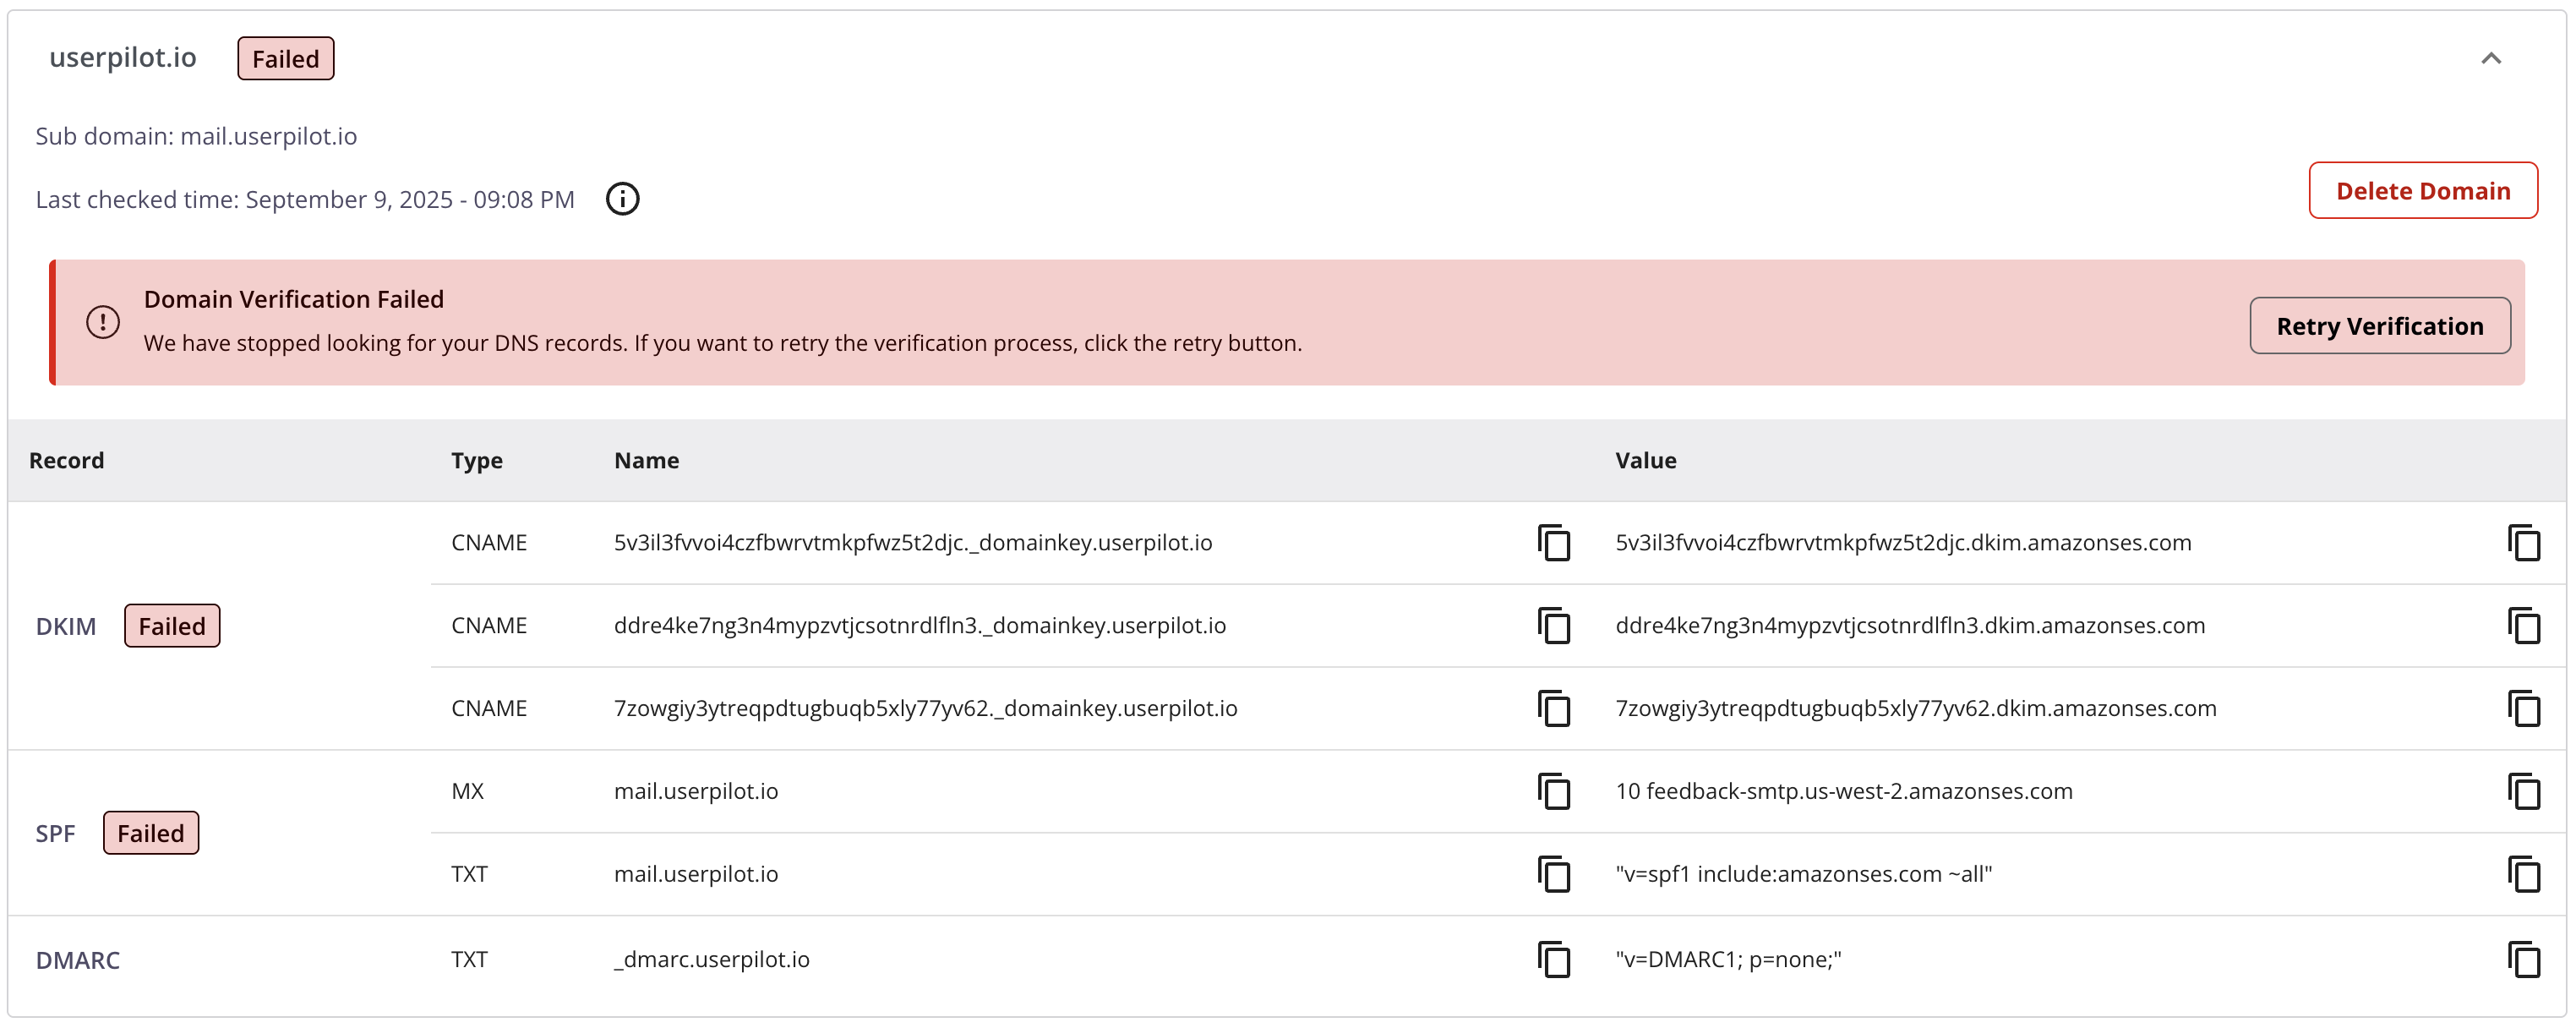
 If DNS records are not found after **72 hours**, the status changes to **Failed**. Click **Retry Verification** to restart the lookup process.
 ***
## Custom Link-Tracking Domain (Optional - Strongly Recommended)
Spam filters and recipient servers assess the root domain of email links to decide whether to trust an email, so using a domain you control significantly improves deliverability and reduces “suspicious link” flags.
By default, Userpilot serves your email links with its own domain to track opens and clicks. With custom tracking domain enabled, those assets are served from your custom tracking subdomain instead (e.g., `tracking.yourdomain.com`). This keeps link URLs brand aligned and leverages your domain's reputation for better inbox placement.
### Option A – Userpilot-Managed *(Easiest)*
Email [**support@userpilot.com**](mailto:support@userpilot.com) with the tracking subdomain you want to use (e.g. `tracking.yourdomain.com`). Make sure the subdomain is not used for other purposes.
Userpilot will then provision the following resources for you:
* SSL certificate.
* CDN Distribution.
We will reach out to you once the resources are provisioned and ready to use. We will provide you with a set of CNAME records for both resources to add in your DNS provider.
Confirm to the support team that you have added the CNAME records. We will then configure the custom tracking domain for your emails.
### Option B – Bring your Own CDN *(Advanced)*
Origin: **`r.us-west-2.awstrack.me`**
Origin: **`r.eu-west-3.awstrack.me`**
If your security policy requires using your own CDN/certificate, you can manage the tracking subdomain yourself.
1. Create a CDN/edge distribution (e.g. CloudFront) for the tracking subdomain (e.g. `tracking.yourdomain.com`) pointing to the origin value above.
Make sure your CDN is configured to:
* Force **HTTPS** protocol.
* Forward original Host headers to the origin.
* Disable caching.
2. Attach an SSL certificate for the subdomain to your CDN distribution.
3. Add a **CNAME** record for your subdomain to point to your CDN distribution.
```txt theme={null}
CNAME
```
4. Reach out to [**support@userpilot.com**](mailto:support@userpilot.com) when you have verified the setup. We will then configure the custom tracking domain for your emails and confirm it with you.
You can find your Userpilot hosting region in the [Environment page](https://run.userpilot.io/environment). If your HTTP endpoint is `https://analytex-eu.userpilot.io/`, you're in the EU region.
***
## Verify Link-Tracking Domain
```bash theme={null}
curl -I https://tracking.yourdomain.com/favicon.ico
```
A 200 response with headers like below confirms the setup:
```txt theme={null}
x-amz-ses-region: us-west-2 # or eu-west-3
x-amz-ses-request-protocol: https
```
***
## Troubleshooting
* Check for typos in records.
* Disable CDN/proxy if using Cloudflare.
* Add **DMARC** and a **tracking subdomain**.
* Make sure your emails contain valid links.
[For any questions or concerns please reach out to **support@userpilot.com**](mailto:support@userpilot.com)
***
## Custom Link-Tracking Domain (Optional - Strongly Recommended)
Spam filters and recipient servers assess the root domain of email links to decide whether to trust an email, so using a domain you control significantly improves deliverability and reduces “suspicious link” flags.
By default, Userpilot serves your email links with its own domain to track opens and clicks. With custom tracking domain enabled, those assets are served from your custom tracking subdomain instead (e.g., `tracking.yourdomain.com`). This keeps link URLs brand aligned and leverages your domain's reputation for better inbox placement.
### Option A – Userpilot-Managed *(Easiest)*
Email [**support@userpilot.com**](mailto:support@userpilot.com) with the tracking subdomain you want to use (e.g. `tracking.yourdomain.com`). Make sure the subdomain is not used for other purposes.
Userpilot will then provision the following resources for you:
* SSL certificate.
* CDN Distribution.
We will reach out to you once the resources are provisioned and ready to use. We will provide you with a set of CNAME records for both resources to add in your DNS provider.
Confirm to the support team that you have added the CNAME records. We will then configure the custom tracking domain for your emails.
### Option B – Bring your Own CDN *(Advanced)*
Origin: **`r.us-west-2.awstrack.me`**
Origin: **`r.eu-west-3.awstrack.me`**
If your security policy requires using your own CDN/certificate, you can manage the tracking subdomain yourself.
1. Create a CDN/edge distribution (e.g. CloudFront) for the tracking subdomain (e.g. `tracking.yourdomain.com`) pointing to the origin value above.
Make sure your CDN is configured to:
* Force **HTTPS** protocol.
* Forward original Host headers to the origin.
* Disable caching.
2. Attach an SSL certificate for the subdomain to your CDN distribution.
3. Add a **CNAME** record for your subdomain to point to your CDN distribution.
```txt theme={null}
CNAME
```
4. Reach out to [**support@userpilot.com**](mailto:support@userpilot.com) when you have verified the setup. We will then configure the custom tracking domain for your emails and confirm it with you.
You can find your Userpilot hosting region in the [Environment page](https://run.userpilot.io/environment). If your HTTP endpoint is `https://analytex-eu.userpilot.io/`, you're in the EU region.
***
## Verify Link-Tracking Domain
```bash theme={null}
curl -I https://tracking.yourdomain.com/favicon.ico
```
A 200 response with headers like below confirms the setup:
```txt theme={null}
x-amz-ses-region: us-west-2 # or eu-west-3
x-amz-ses-request-protocol: https
```
***
## Troubleshooting
* Check for typos in records.
* Disable CDN/proxy if using Cloudflare.
* Add **DMARC** and a **tracking subdomain**.
* Make sure your emails contain valid links.
[For any questions or concerns please reach out to **support@userpilot.com**](mailto:support@userpilot.com)