Data Sync

Userpilot Data Sync is designed to provide you with direct, granular access to your raw event data, empowering you to integrate Userpilot insights seamlessly into your broader data strategy. This section offers an overview of what Data Sync is, the key benefits it offers, and common ways our customers are using it to drive their business forward.


What is Userpilot Data Sync?

Userpilot Data Sync is an add-on that automatically exports your raw Userpilot event stream into your own data infrastructure (data lake, warehouse, or BI tools). It breaks down silos by delivering unfiltered, granular event data so you can run custom analyses, build bespoke reports, and integrate with external systems, all on a reliable, scalable pipeline designed for businesses of any size.


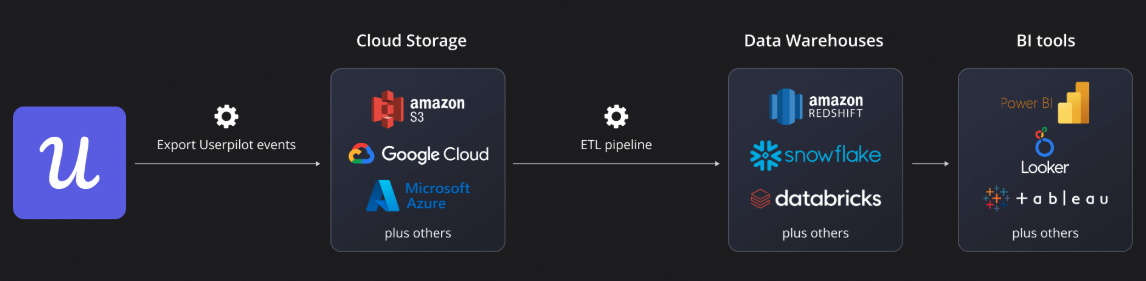
Why Use Userpilot Data Sync?

  • Deep, granular insights: Gain full access to every tracked interaction rather than relying on aggregated metrics.
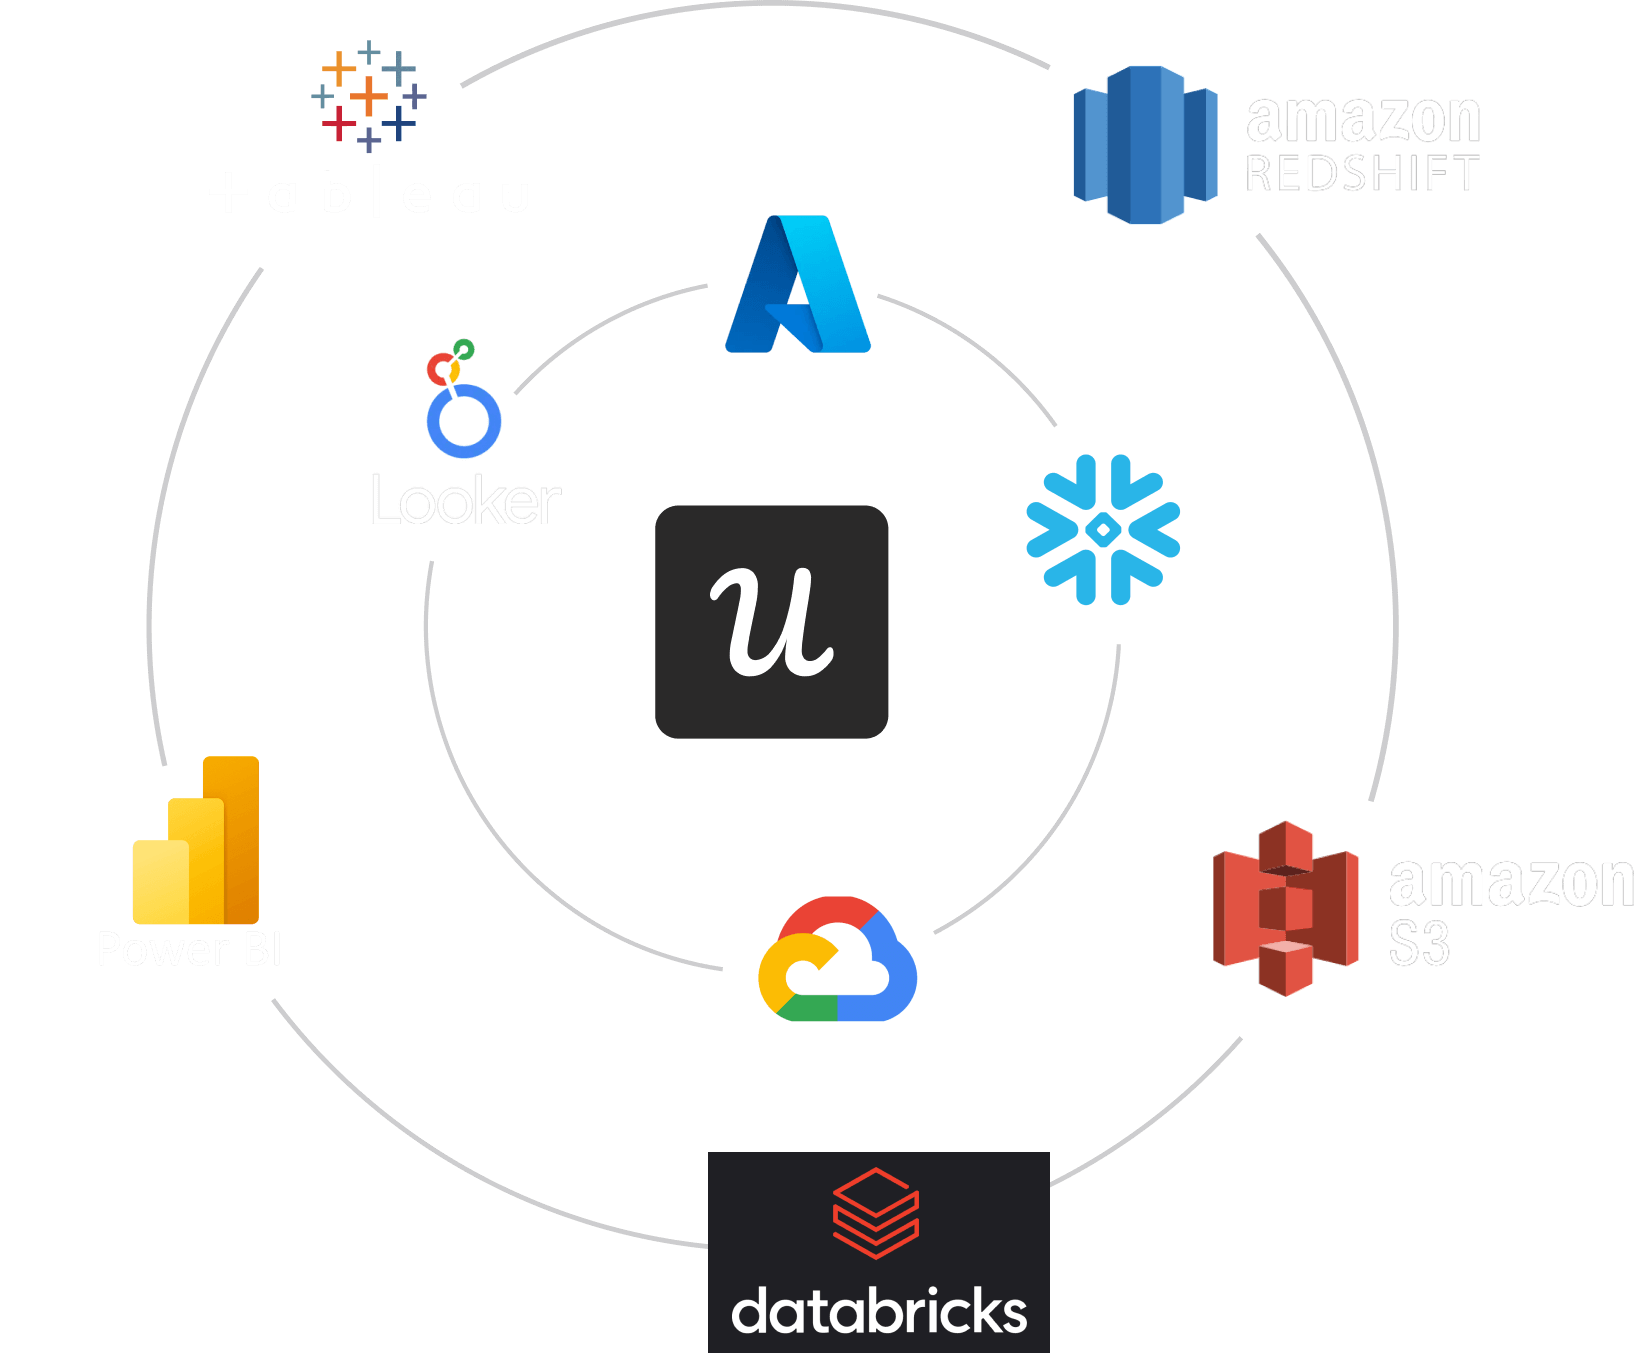
  • Seamless integration: Pipe data into your existing warehousing (Snowflake, BigQuery, Redshift) and BI stack (Tableau, Power BI, Looker) for a unified view alongside CRM, sales, or support data.
  • Advanced analytics: Leverage SQL, Python/R, and custom models (e.g., funnel drop-offs, attribution, churn/upsell predictions) in your own environment.
  • 360Β° data enrichment: Combine Userpilot events with other business sources for a complete customer journey.
  • Ownership & compliance: Retain, archive, and manage your data under your own policies (GDPR, CCPA).
  • Reliable, scalable automation: Schedule recurring exports to ensure your teams always have fresh data without manual effort.

Prerequisites

Before you can begin leveraging the powerful capabilities of Userpilot Data Sync, it’s essential to ensure that a few prerequisites are met. This section outlines the necessary account requirements, destination storage setup, and technical considerations to ensure a smooth and successful Data Sync implementation.

2.1. Account Requirements

To utilize Userpilot Data Sync, please ensure the following account-related conditions are satisfied:

  • Appropriate Userpilot Plan: Data Sync is an add-on feature. Your Userpilot subscription plan must include access to the Data Sync functionality. If you are unsure about your current plan or wish to enable Data Sync, please contact your Userpilot Account Manager or our support team for assistance.
  • Necessary User Permissions: The user configuring Data Sync within your Userpilot account must have the appropriate administrative permissions. Typically, this requires an admin role or a custom role with specific permissions to access and manage Data Sync settings. Please verify your user role and permissions within the Userpilot dashboard.

2.2. Destination Storage Setup

Userpilot Data Sync exports your event data to your chosen cloud storage destination. You will need to have an active account and a configured storage location with one of our supported cloud providers. As of the current documentation, Userpilot Data Sync supports the following:

πŸ”’ Security First: IAM Best Practices

When configuring access for Userpilot Data Sync to your cloud storage, always follow the principle of least privilege. Create a dedicated IAM user/role or service account with only the necessary write permissions (e.g., s3:PutObject for S3) to the specific bucket and path prefix. Avoid using root account credentials.

  • Amazon S3: You will need an S3 bucket, the bucket name, its region, and appropriate AWS IAM credentials (Access Key ID and Secret Access Key) that grant Userpilot write access to the specified bucket and path prefix.
  • Google Cloud Storage (GCS): You will need a GCS bucket, your Google Cloud Project ID, and a service account credentials with permissions to write to the bucket. You will also specify a path prefix.

Key considerations for your storage destination:

  • Ensure the storage location (bucket/container) is created in the region that best suits your data residency and performance needs.
  • Configure access permissions meticulously. Userpilot will require write access to the specified path within your storage to deliver the data files. It is best practice to create dedicated credentials or roles with the principle of least privilege.
  • Note down all necessary details (bucket/container names, regions, access keys, path prefixes, etc.) as you will need them during the Data Sync configuration process in Userpilot.

2.3. Technical Considerations

While Userpilot Data Sync is designed to be user-friendly, some technical understanding can be beneficial for a seamless experience and effective utilization of the synced data:

  • Understanding Data Formats: Be aware of the data format in which Userpilot will deliver the files (e.g., Avro, JSON, Parquet). Understanding the structure of these formats will be crucial for parsing and ingesting the data into your downstream systems.
  • Familiarity with Data Warehousing and ETL/ELT: While not strictly required to set up the sync, a basic understanding of data warehousing concepts and ETL (Extract, Transform, Load) or ELT (Extract, Load, Transform) processes will be highly beneficial for your data teams who will be consuming and analyzing the synced data.

πŸ› οΈ Prepare Your Data Environment

Before using Data Sync, make sure your data team is ready. Familiarity with your data format (e.g., Avro, JSON, Parquet), cloud storage, and ETL tools will make syncing and analyzing Userpilot data much smoother.

  • Network Configuration: In most scenarios, Userpilot will connect to your cloud storage provider’s public endpoints, and no special network configurations are needed. However, if your organization has strict outbound firewall policies, ensure that Userpilot’s egress IP addresses are whitelisted to access the necessary cloud storage APIs.
  • Data Volume and Storage Costs: Consider the volume of event data your application generates. Regular data syncs can accumulate significant amounts of data over time. Be mindful of the storage costs associated with your chosen cloud provider and implement appropriate data lifecycle management policies on your storage bucket/container if necessary.

Understanding Your Data

Once Userpilot Data Sync is active and data is flowing into your storage destination, the next step is to understand its structure and content. This knowledge is crucial for effectively ingesting, processing, and analyzing the data to extract meaningful insights. This section covers the typical file organization, data formats, and key entities you will encounter.


File Structure and Naming Conventions

Userpilot exports data in a structured manner to your cloud storage, typically organized by date and possibly event type, to facilitate easier management and querying.

  • Directory Structure: Data files are usually organized hierarchically. A common pattern is by date:
[your_path_prefix]/userpilot_datasync_{SYNC_ID}_{APP_TOKEN}/YYYY-MM-DD/
  • For example, data synced on May 10, 2025, might be found in a path like userpilot_events/userpilot_datasync_13214_NX-123454/2025-05-10/ .
  • File Naming Conventions: Files within these directories often include timestamps or unique identifiers to prevent overwrites and indicate the batch of data they contain.
  • Data Granularity per File: Each file typically contains data for a specific time window (e.g., one hour or one day, depending on your sync frequency).

Data Format Details

Userpilot exports data in a well-defined format to ensure consistency and ease of parsing. The most common formats for raw event data are JSON (JavaScript Object Notation) or Parquet.

  • JSON (JavaScript Object Notation):
    • Data is typically provided as one JSON object per line (NDJSON/JSON Lines).
    • Each line represents a single event.
    • Use Cases: Easy to read and parse by many systems, widely supported in data pipelines and analytics tools.
    • Example:
{
  "app_token": "NX-123ASVR",
  "event_type": "track",
  "event_name": "Subscription Purchased",
  "source": "web-client",
  "user_id": "user-001",
  "company_id": "company-001",
  "inserted_at": "2025-05-11T07:45:30.123456Z",
  "hostname": "app.example.com",
  "pathname": "/features/subscription",
  "screen_width": 1920,
  "screen_height": 1080,
  "operating_system": "Windows",
  "browser": "Chrome",
  "browser_language": "en-US",
  "user_agent": "Mozilla/5.0 (Windows NT 10.0; Win64; x64) AppleWebKit/537.36 (KHTML, like Gecko) Chrome/135.0.0.0 Safari/537.36",
  "device_type": "desktop",
  "country_code": "US",
  "metadata": {
    "subscription_id": "sub-001",
    "subscription_type": "monthly",
    "subscription_price": 10,
    "subscription_currency": "USD"
  }
}
  • CSV (Comma-Separated Values):
    • Data is provided as plain text, with each line representing a record and fields separated by commas. The first line is a header row with column names.
    • Use Cases: Easily imported into spreadsheets, relational databases, and many data analysis tools. Best for flat data structures where all records have the same set of fields.
    • Example:
app_token,event_type,event_name,source,user_id,company_id,hostname,pathname,country_code,screen_width,screen_height,operating_system,browser,browser_language,user_agent,device_type,inserted_at
NX-APP-TOKEN,page_view,,web-client,user-123,company-456,example.com,/,US,1920,1080,macOS,Chrome,en-US,Mozilla/5.0...,desktop,2025-05-06T12:30:00.123Z
    • Note: The metadata  field may be stringified as JSON, omitted, or flattened depending on implementation.
  • Parquet:
    • Parquet is a columnar storage file format optimized for use with big data processing frameworks.
    • Use Cases: Ideal for large-scale analytics, efficient storage, and fast querying in data lakes and warehouses. Supported by tools like Apache Spark, Pandas (Python), and most modern data platforms.
    • Note: You will need tools or libraries that can read this format (e.g., Apache Spark, Pandas in Python with pyarrow  or fastparquet ).
  • Apache Avro:
    • Avro is a row-oriented data serialization framework that stores data in a compact binary format, with the schema included alongside the data.
    • Use Cases: Common in Apache Kafka, Hadoop, and for long-term data archival where schema evolution is important. Supports adding/removing fields over time without breaking downstream consumers.
    • Note: Data is stored in binary format. Use Avro libraries in your programming language of choice (Java, Python, etc.) to read and write Avro files. The schema is used to interpret the binary data.

Folder Structure

Userpilot Data Sync organizes your exported data in a clear, hierarchical folder structure to make it easy to locate, process, and analyze your data. This structure is designed to support both granular event analysis and high-level reporting.

Below is an overview of the folder structure you will find in your storage destination:

userpilot_datasync_{Sync_ID}_{APP_TOKEN}/
β”œβ”€β”€ all_companies/
β”‚   └── all_companies.avro
β”œβ”€β”€ all_users/
β”‚   └── all_users.avro
β”œβ”€β”€ {Date}/
β”‚   β”œβ”€β”€ all_events.avro
β”‚   β”œβ”€β”€ feature_tags/
β”‚   β”‚   β”œβ”€β”€ matched_events/
β”‚   β”‚   β”‚   └── track_feature_{ID}.avro
β”‚   β”‚   β”œβ”€β”€ feature_tags_breakdown.avro
β”‚   β”‚   └── feature_tags_definitions.avro
β”‚   β”œβ”€β”€ interaction/
β”‚   β”‚   └── matched_events/
β”‚   β”‚       └── interaction_{Type}_{Id}.avro
β”‚   β”œβ”€β”€ labeled_events/
β”‚   β”‚   β”œβ”€β”€ matched_events/
β”‚   β”‚   β”‚   └── track_labeled_{ID}.avro
β”‚   β”‚   β”œβ”€β”€ labeled_events_breakdown.avro
β”‚   β”‚   └── labeled_events_definitions.avro
β”‚   β”œβ”€β”€ tagged_pages/
β”‚   β”‚   β”œβ”€β”€ matched_events/
β”‚   β”‚   β”‚   └── page_view_{ID}.avro
β”‚   β”‚   β”œβ”€β”€ tagged_pages_breakdown.avro
β”‚   β”‚   └── tagged_pages_definitions.avro
β”‚   β”œβ”€β”€ trackable_events/
β”‚   β”‚   β”œβ”€β”€ matched_events/
β”‚   β”‚   β”‚   └── track_event_{NAME}.avro
β”‚   β”‚   β”œβ”€β”€ trackable_events_breakdown.avro
β”‚   β”‚   └── trackable_events_definitions.avro
β”‚   β”œβ”€β”€ users/
β”‚   β”‚   └── identify_user.avro
β”‚   └── companies/
β”‚       └── identify_company.avro

Folder & File Descriptions

  • all_companies/ and all_users/
    • Contain a snapshot of all identified companies and users, respectively, as of the latest sync. Each file (e.g., all_companies.avroall_users.avro ) includes the most recent state and all auto-captured and custom properties for each entity.
  • {Date}/
    • Each date folder contains all data synced for that specific day. This allows for easy partitioning and historical analysis.
    • all_events.avro: All raw events captured on that date, across all event types.
    • feature_tags/labeled_events/tagged_pages/trackable_events/interaction/:
      • Each of these folders contains:
        • matched_events/: Raw events for each identified/tagged/labeled event (e.g., track_feature_{ID}.avrotrack_labeled_{ID}.avro , etc.).
        • breakdown files (e.g., feature_tags_breakdown.avro ): Aggregated counts and engagement metrics for that day.
        • definitions files (e.g., feature_tags_definitions.avro ): Metadata such as name, description, and category, allowing you to map event IDs to human-readable definitions.
    • users/ and companies/: Contain user and company identification events for that day (identify_user.avroidentify_company.avro ).

How to Use This Structure

  • Use the all_companies and all_users files to get the latest state and properties for all entities in your app.
  • Use the {Date} folders to analyze daily event activity, engagement, and breakdowns.
  • The matched_events folders provide access to all raw events for each feature, label, or tag, enabling deep-dive analysis.
  • The breakdown and definitions files make it easy to join raw event data with descriptive metadata for reporting and analytics.

Planning for Data Ingestion:

A clear understanding of the file structure and naming is vital for setting up automated ETL/ELT pipelines to load this data into your data warehouse or data lake. Your ingestion scripts will rely on these patterns to discover new files.


Event Schema Reference

Userpilot's event schema is fully documented and maintained at:

Userpilot Event Data Schema Documentation

This official reference includes:

  • A complete list of event attributes and their types
  • Detailed descriptions for each field
  • Examples for all major event types (e.g., tracked events, interactions, surveys, NPS, checklists, flows, etc.)
  • Guidance on how the metadata /attributes  object varies by event type

We recommend always consulting the above link for the most up-to-date schema details.

Schema Evolution

Userpilot may add new properties or event types over time. Your data processing pipelines should be designed to handle such changes gracefully (e.g., by not breaking if new, unexpected fields appear).


Setting Up and Configuring Data Sync

This feature is available as an add-on for Growth and Enterprise plans. Please contact your Userpilot account manager to have it enabled.

This section provides a comprehensive, step-by-step guide to help you begin using the Data Sync feature. It covers everything from initially accessing the feature within the platform to configuring your first data export destination, creating and customizing sync jobs, and effectively managing your ongoing data exports. We will draw heavily on the user interface elements visible in the provided screenshots to make these instructions as clear and practical as possible.


Accessing Data Sync

To access the Data Sync feature:

  1. Log in to your Userpilot account.
  2. In the left-hand navigation menu, click on Data.
  3. Under the Data section, click on Data Sync.

This will take you to the Data Sync dashboard.


The Data Sync Dashboard

The Data Sync dashboard provides an overview of all your configured export jobs. From here, you can see key information at a glance and manage your existing jobs or create new ones.

Dashboard Information:

For each export job listed, you will see the following details:

  • Name: The custom name you assigned to the export job.
  • Destination: The cloud storage provider and bucket where the data is being sent (e.g., Amazon S3, Google Cloud Storage).
  • Status: The current status of the export job (e.g., Live, Disabled, Ended).
  • Created by: The Userpilot user who created the export job.
  • Last Sync: The date and time of the most recent successful data export for that job.

Filtering Export Jobs:

You can filter the list of export jobs to quickly find specific ones:

  • By Status: Click the "Status" dropdown (defaulting to "All statuses") to filter by:
    • All statuses
    • Live
    • Disabled
    • Ended
  • By Environment: Click the "Environment" dropdown (defaulting to "All Environments") to filter by:
    • Production
    • Staging

Creating a New Export Job

Setting up a new export job involves a straightforward wizard that guides you through the necessary configuration steps. Once you click the "Create Export" button on the Data Sync dashboard, the creation process begins.

The wizard typically involves the following main stages, which we will detail using Google Cloud Storage as an example:

  1. Select Export Destination & Review Data Structure
  2. Setup Connection
  3. Verify Connection
  4. Setup Export Configuration
  5. Review Export Configuration

Step 1: Select Export Destination & Review Data Structure

In the first step of creating an export, you will choose where you want your data to be sent and get an overview of the data structure.

  • Choose your cloud storage provider:
    • Amazon S3: Amazon Simple Storage Service.
    • Google Cloud Storage: Google Cloud Storage Service. Select the provider you wish to use.
  • Review example data structure: On the right side of the screen, you will see examples of the data you will be exporting:
    • Example of event schema: This shows the structure of a single raw event object, detailing the fields and their data types (e.g., app_tokenevent_typeuser_idinserted_atmetadata ).
    • Example of tree structure: This illustrates the directory (folder) structure that Userpilot will create in your cloud storage bucket to organize the exported data files (e.g., userpilot_datasync_{SYNC_ID}_{APP_TOKEN}/{Date}/all_events.avro ).


Once you have reviewed this information and selected your provider, click Next: Setup Connection to proceed.

Step 2: Setup Connection

In this step, you will configure the connection details for your chosen cloud storage provider. The fields required will vary slightly depending on whether you selected Amazon S3 or Google Cloud Storage.


You will need to provide the following information to configure your destination bucket:

  • Region: The Google Cloud region where your bucket is located (e.g., US East (Ohio)). Select this from the dropdown menu.
  • Bucket: The exact name of your Google Cloud Storage bucket where the data will be exported (e.g., userpilot-sync ).
  • Access Key & Secret Key

πŸ”‘ Important: Secure Your Credentials! Treat your Access Keys and Secret Keys like passwords. Store them securely and never share them publicly. Userpilot requires these to write data to your bucket. Ensure the credentials have the minimum necessary permissions.

  • File Prefix (Optional): You can specify a folder path (prefix) within your bucket where the exported data should be stored (e.g., userpilot/data/exports ). If left blank, data will be stored at the root level of the bucket.

After filling in the required connection details, click Next: Verify Connection.


Step 3: Verify Connection

Once you provide your connection details, Userpilot will attempt to verify the connection to your cloud storage bucket. This is done by trying to upload a small test file to the bucket and then deleting it if successful.

If the connection is successful, you will see a confirmation message:

Success! Test file was successfully uploaded and deleted from the Google Cloud Storage bucket. After finishing the configuration, data will begin to export within the next hour.

If the connection fails, an error message will be displayed, providing information about the cause of the failure. You will need to review your connection settings and credentials and try again.

πŸ” Troubleshooting Tip: Connection Failed? If connection verification fails, double-check:

  1. Bucket/Container Name: Exact match, case-sensitive.
  2. Region: Correct region selected for your bucket.
  3. Credentials: Access Key, Secret Key, or Service Account JSON are accurate and have not expired.
  4. Permissions: The provided credentials have write access to the bucket/container and the specified path prefix (if any).
  5. Firewall/Network: Ensure Userpilot IPs can reach your storage provider.

Upon successful verification, click Next: Setup Export.


Step 4: Setup Data Export Configuration

After successfully verifying your connection, the next step is to configure the specifics of your data export.

This involves setting up Job Details and Event Filters:

Job Details:

  • Job Title: Give your export job a descriptive name that will help you identify it later (e.g., "Daily Production Event Export to GCS", "Identified users").
  • Recurring Period: Define how often you want the data to be exported. Common options include "Every day", but other frequencies might be available. Select the desired period from the dropdown.
  • Export Format: Choose the file format for your exported data. "Avro format" is shown as an example. Other formats like JSON or CSV might be available depending on the implementation.
  • Environment: Select the Userpilot environment from which to export data (e.g., "Production", "Staging").
  • Export time period (Optional): You can specify a date range for the data to be exported. For example, you might want to export historical data from "Apr 1, 2023 - Today". If left unspecified, it will default to ongoing exports and to fill back the data up to 365 days from today.

Event Filters:

This section allows you to refine which data is included in your export.

  • Event Types: Choose which types of events to include. You can select "All events" or specify particular event types (e.g., identify users/companies, interactions events, page views, tracked events, …etc). Select event types from the dropdown or search to include them.
  • Segments (Optional): If you have defined user segments in Userpilot, you can choose to export data only for users belonging to specific segments. Search for and select the desired segments.
  • Users (Optional): Filter the export to include data only for specific users. Search for users to add them to the filter. Leave empty to include all users (unless other filters apply).
  • Companies (Optional): Filter the export to include data only for specific companies. Search for companies to add them to the filter. Leave empty to include all companies (unless other filters apply).
  • Exclude users/companies you have set in the web app using exclusion lists (Checkbox): If you have global exclusion lists set up in Userpilot, checking this box will ensure that data from those excluded users/companies is not included in this export job.

Once you have configured all the job details and event filters, click Next: Review.


Review Export Configuration

This is the final step before creating your export job. It provides a summary of all the settings you have configured, allowing you to review everything one last time.

Review the setup details, If all the settings are correct, click Create Export to finalize and activate your new data export job.

If you need to make any changes, you can click the Back button to return to previous steps in the wizard.


Managing Export Jobs

Once your export jobs are created, you can manage them from the Data Sync dashboard and individual job detail pages.


Viewing Job Status on Dashboard

After creating an export job, it will appear on the Data Sync dashboard. You can quickly see its status (e.g., "Live", "Disabled", "Ended") along with other key details.

Viewing Individual Export Job Details & Run History

To see more details about a specific export job and its run history, click on its name from the Data Sync dashboard.

This page will show you a list of individual export runs for that job, including:

  • Sync date: The date or date range for which the data was synced.
  • Status: The status of that specific sync run (e.g., "Completed", "Failed").
  • Completed At: The date and time when the sync run finished.
  • Records exported: The number of records (events) exported during that run.
  • Errors: If a sync run failed, this column will indicate an error. Hovering over an error icon may provide more details.

Examples of Run History Views:

  • No Exports Yet: If a job is newly created and hasn't run yet, you might see a message like: "No exports available. You should wait for the next run to be available."

  • Successful Runs: For jobs that have run successfully, you will see a list of completed syncs with the number of records exported.

  • Failed Runs: If a sync fails, the status will show "Failed", and there might be an error indicator. Hovering over the error icon (often a warning triangle) can display a tooltip with the error message, such as "Connection failed to the storage provider".

On this page, you will also typically find a Manage button in the top-right corner, which allows you to modify the settings of the selected export job.


Managing Export Settings (via "Manage" button)

From the individual export job details page (where you view the run history), or sometimes directly from the main Data Sync dashboard, you can access the settings for an existing export job. This is typically done by clicking a "Manage" button or an equivalent.

This will usually open a side panel titled "Manage Export Settings" where you can modify various aspects of your job.

Settings you can typically manage:

  • Export Name: You can update the name of your export job.
  • Status (Enable/Disable Export):
    • A toggle switch (labeled, β€œData is automatically exported") allows you to enable (Live) or disable the export job. Disabling a job will pause future exports without deleting the configuration.
  • Connection Details (Read only)
  • Job Settings:
    • Recurring Period: Change how often the export runs (e.g., from Daily to Hourly).
    • Export Format: Modify the file format of the exported data (e.g., from Avro to JSON format).
    • Export time period (Optional): Adjust the date range for the data export.
  • Filters:
    • You can modify the event filters applied to the export job, similar to how they were set during creation:
      • Event Types: Add or remove specific event types.
      • Segments (Optional): Update segment-based filtering.
      • Users (Optional): Modify user-specific filters.
      • Companies (Optional): Adjust company-specific filters.
      • Exclude users/companies you have set in the web app using exclusion lists: Toggle this checkbox.

Saving Changes:

After making any modifications in the "Manage Export Settings" panel, you must click the Save button to apply them. If you wish to discard your changes, click Cancel.


Deleting an Export Job:

The option to delete an export job might be found as a separate action on the Data Sync dashboard. Deleting a job will stop all future exports and remove its configuration from Userpilot. This action is usually permanent and cannot be undone.


Troubleshooting

Even with careful setup, you might occasionally encounter issues with Userpilot Data Sync. This section covers common problems and how to diagnose and resolve them.


Common Sync Issues and Resolutions

  • Issue: Sync Fails with Authentication Error
    • Symptoms: Sync history shows failed attempts with error messages related to authentication, access denied, or invalid credentials.
    • Possible Causes:
      • Incorrect Access Key ID, Secret Access Key, Service Account JSON, or Connection String/SAS Token provided during configuration.
      • Credentials have expired or been revoked (e.g., rotated AWS keys, expired SAS token).
      • Insufficient permissions for the provided credentials (e.g., IAM user/role lacks s3:PutObject permission, GCS service account lacks Storage Object Creator role).
      • Typo in bucket name, project ID, or container name.
    • Resolution:
      1. Carefully verify all credentials and configuration parameters entered in the Userpilot Data Sync settings against your cloud provider console.
      2. Ensure the credentials are still active and have not expired.
      3. Check the permissions granted to the IAM user/role or service account in your cloud provider. Ensure they have the necessary write permissions to the specified bucket/container and path prefix.
      4. If using IP whitelisting, ensure Userpilot’s IPs (if applicable) are allowed.
      5. After correcting, try re-saving the configuration or manually triggering a sync if possible.

❗ Security Best Practice: Credential Management Always use dedicated credentials (e.g., a specific IAM user or service account) for Userpilot Data Sync with the minimum necessary permissions (principle of least privilege). Regularly review and rotate these credentials as per your security policy.

  • Issue: Sync Completes, but No New Files Appear in Storage
    • Symptoms: Userpilot indicates the sync was successful, but you don’t see new data files in your S3 bucket, or GCS bucket for the expected period.
    • Possible Causes:
      • Incorrect path prefix specified in Userpilot Data Sync settings, causing files to be written to an unexpected location within your bucket/container.
      • Delays in your cloud storage provider reflecting new objects (rare, but possible for very short periods).
      • No new event data was generated in Userpilot during the sync period (e.g., for a new setup with no user activity yet).
      • Filters on your storage browser or listing commands are hiding the files.
    • Resolution:
      1. Double-check the Path Prefix in your Userpilot Data Sync configuration. Ensure it matches exactly where you expect the files.
      2. Use your cloud provider’s console or CLI tools to list objects at the exact path prefix without any filters.
      3. Verify that there was actual user activity in your application that would have generated Userpilot events during the sync window.
      4. Check Userpilot’s sync logs (if available) for any specific file names or paths it attempted to write.
  • Issue: Data Discrepancies or Missing Data
    • Symptoms: You notice that the data in your storage seems incomplete compared to what you see in the Userpilot dashboard, or specific events/properties are missing.
    • Possible Causes:
      • Sync latency: Data for the most recent period might not have been included in the latest sync batch yet (especially for hourly syncs).
      • Schema changes: If Userpilot updated its event schema and your ingestion process wasn’t prepared, it might fail to parse new fields or events.
      • Errors during your ETL/ELT process: The issue might be in how you are loading or transforming the data after it lands in your storage.
      • Partial sync failure: A sync job might have partially completed before encountering an error.
    • Resolution:
      1. Allow for some latency, especially if comparing to real-time Userpilot dashboards. Check the timestamp of the last successful sync.
      2. Review the β€œData Sync: Event Schema Reference” for any recent changes. Ensure your downstream processes can handle the current schema.
      3. Thoroughly examine your own data ingestion and transformation logs for errors.
      4. Check Userpilot’s sync history for any reported partial failures or errors.
      5. Contact Userpilot support if you suspect an issue with the data export itself.
  • Issue: Slow Sync Performance
    • Symptoms: Sync jobs are taking an unusually long time to complete.
    • Possible Causes:
      • Very large data volumes being exported.
      • Throttling by your cloud storage provider if API limits are exceeded (less common for standard usage).
      • Temporary network issues between Userpilot and the cloud storage provider.
    • Resolution:
      1. If data volume is the cause, this might be normal. Consider if a less frequent sync (e.g., daily instead of hourly) is acceptable if performance is a concern.
      2. Monitor for persistent slowness. If it’s a consistent issue, contact Userpilot support to investigate.

Data Validation Tips

It’s good practice to periodically validate the synced data to ensure integrity and completeness.

  • File Counts: Check if the number of files being delivered per sync period is consistent (accounting for variations in event volume).
  • Record Counts: After ingesting data into your warehouse, run basic counts. For example, count the number of events per day and compare this trend with general activity levels in the Userpilot dashboard. Expect some differences due to sync timing and processing, but look for major discrepancies.
  • Schema Checks: Periodically verify that the data being received matches the expected schema. Tools in your data pipeline can often be configured to alert on schema drifts.
  • Spot-Checking Key Metrics: Calculate a few key metrics from the raw data (e.g., number of specific key events, active user counts for a past period) and compare them directionally with Userpilot’s analytics. Remember that Data Sync provides raw data, and Userpilot’s internal analytics may have different calculation logic or aggregation windows.

ℹ️ Note: Comparing with Userpilot Analytics

Direct 1:1 matching of numbers between your synced raw data and Userpilot’s aggregated dashboard analytics can be challenging due to differences in processing times, time zone handling (raw data is typically UTC), and specific metric definitions. Focus on directional consistency and trends rather than exact matches for high-level validation.


Frequently Asked Questions (FAQ)

This section addresses common questions about Userpilot Data Sync.

  • What are the costs associated with Userpilot Data Sync?

    Userpilot Data Sync is an add-on feature and may have an associated cost depending on your Userpilot subscription plan. Please contact your Userpilot Account Manager or our sales team for specific pricing details. Additionally, remember that you will incur costs from your cloud storage provider (Amazon S3, Google Cloud Storage) for storing the exported data and for any data transfer or API request charges they may levy.

  • How far back can historical data be synced when I first set up Data Sync?

    We support backfill up to 365 days and sync back on a weekly basis up to 365 days from the current sync day.

  • What is the typical latency for data to appear in my storage after an event occurs?

    The latency depends on your configured sync frequency. If you have set up an hourly sync, data for a given hour will typically be exported within the next hour after that period closes. For daily syncs, data for a given day will be exported after that day (UTC) concludes; specifically, for the daily sync, we do the sync daily at 3 AM UTC. There is also the processing time for the sync job itself.

  • Can I change my storage destination or configuration details later?

    You can't change the destination configurations (like the S3 bucket, or GCS project details) after the initial setup of a Data Sync job. However, you can modify other export job details such as the job title, sync period/frequency, data filters, and export formats through the Data Sync settings page in Userpilot.

  • How is data security and privacy handled during the sync process?

    Userpilot uses secure, encrypted connections (HTTPS) to transfer data to your cloud storage provider. You are responsible for securing your cloud storage credentials and the storage bucket/container itself according to best practices. Userpilot only requires write access to the specified location. We recommend using dedicated credentials with minimal privileges for the Data Sync feature.

  • What happens if my Userpilot subscription changes or if I disable Data Sync?

    If your subscription plan changes and no longer includes Data Sync, or if you manually disable the feature, Userpilot will stop exporting new data to your storage. The data already exported will remain in your storage under your control.

  • Which Userpilot events are included in the Data Sync?

    Data Sync typically exports all raw event data tracked by your Userpilot installation, including tracked events, labeled events, flow interactions, checklist engagement, NPS responses, survey submissions, etc. For a detailed list and schemas, please refer to the "Data Sync: Event Schema Reference" document.

  • In what time zone is the inserted_at field in the exported data?

    Event timestamps in the raw data export are typically in Coordinated Universal Time (UTC). You will need to convert these to your desired local time zone during your data processing or analysis if required.

  • Who should I contact for support if I have issues with Data Sync?

    If you encounter any problems or have questions not covered in this documentation, please reach out to the Userpilot support team through your usual support channels (e.g., in-app chat, email support@userpilot.com). Provide as much detail as possible about your issue for a faster resolution.

Did this answer your question? Thanks for the feedback There was a problem submitting your feedback. Please try again later.