Overview
Userpilot’s Email feature helps you re-engage users, boost retention, and deliver behavior-based messages outside the product. Whether you’re announcing a new feature, reminding inactive users to return, or encouraging an upgrade, Userpilot Emails make it simple, scalable, and compliant.Use cases
- Notify users about newly launched features or updates.
- Target users who haven’t logged in or interacted with the platform for a specific period.
- Identify users nearing the limits of their current plans and send upgrade prompts tailored to their usage.
- Send follow-up emails to users who started but didn’t complete key workflows (e.g., checkout processes or onboarding steps).
- Invite users to upcoming webinars, workshops, or product demos.
- Request feedback from users after significant interactions, such as completing a feature or reaching a milestone.
How to create an email
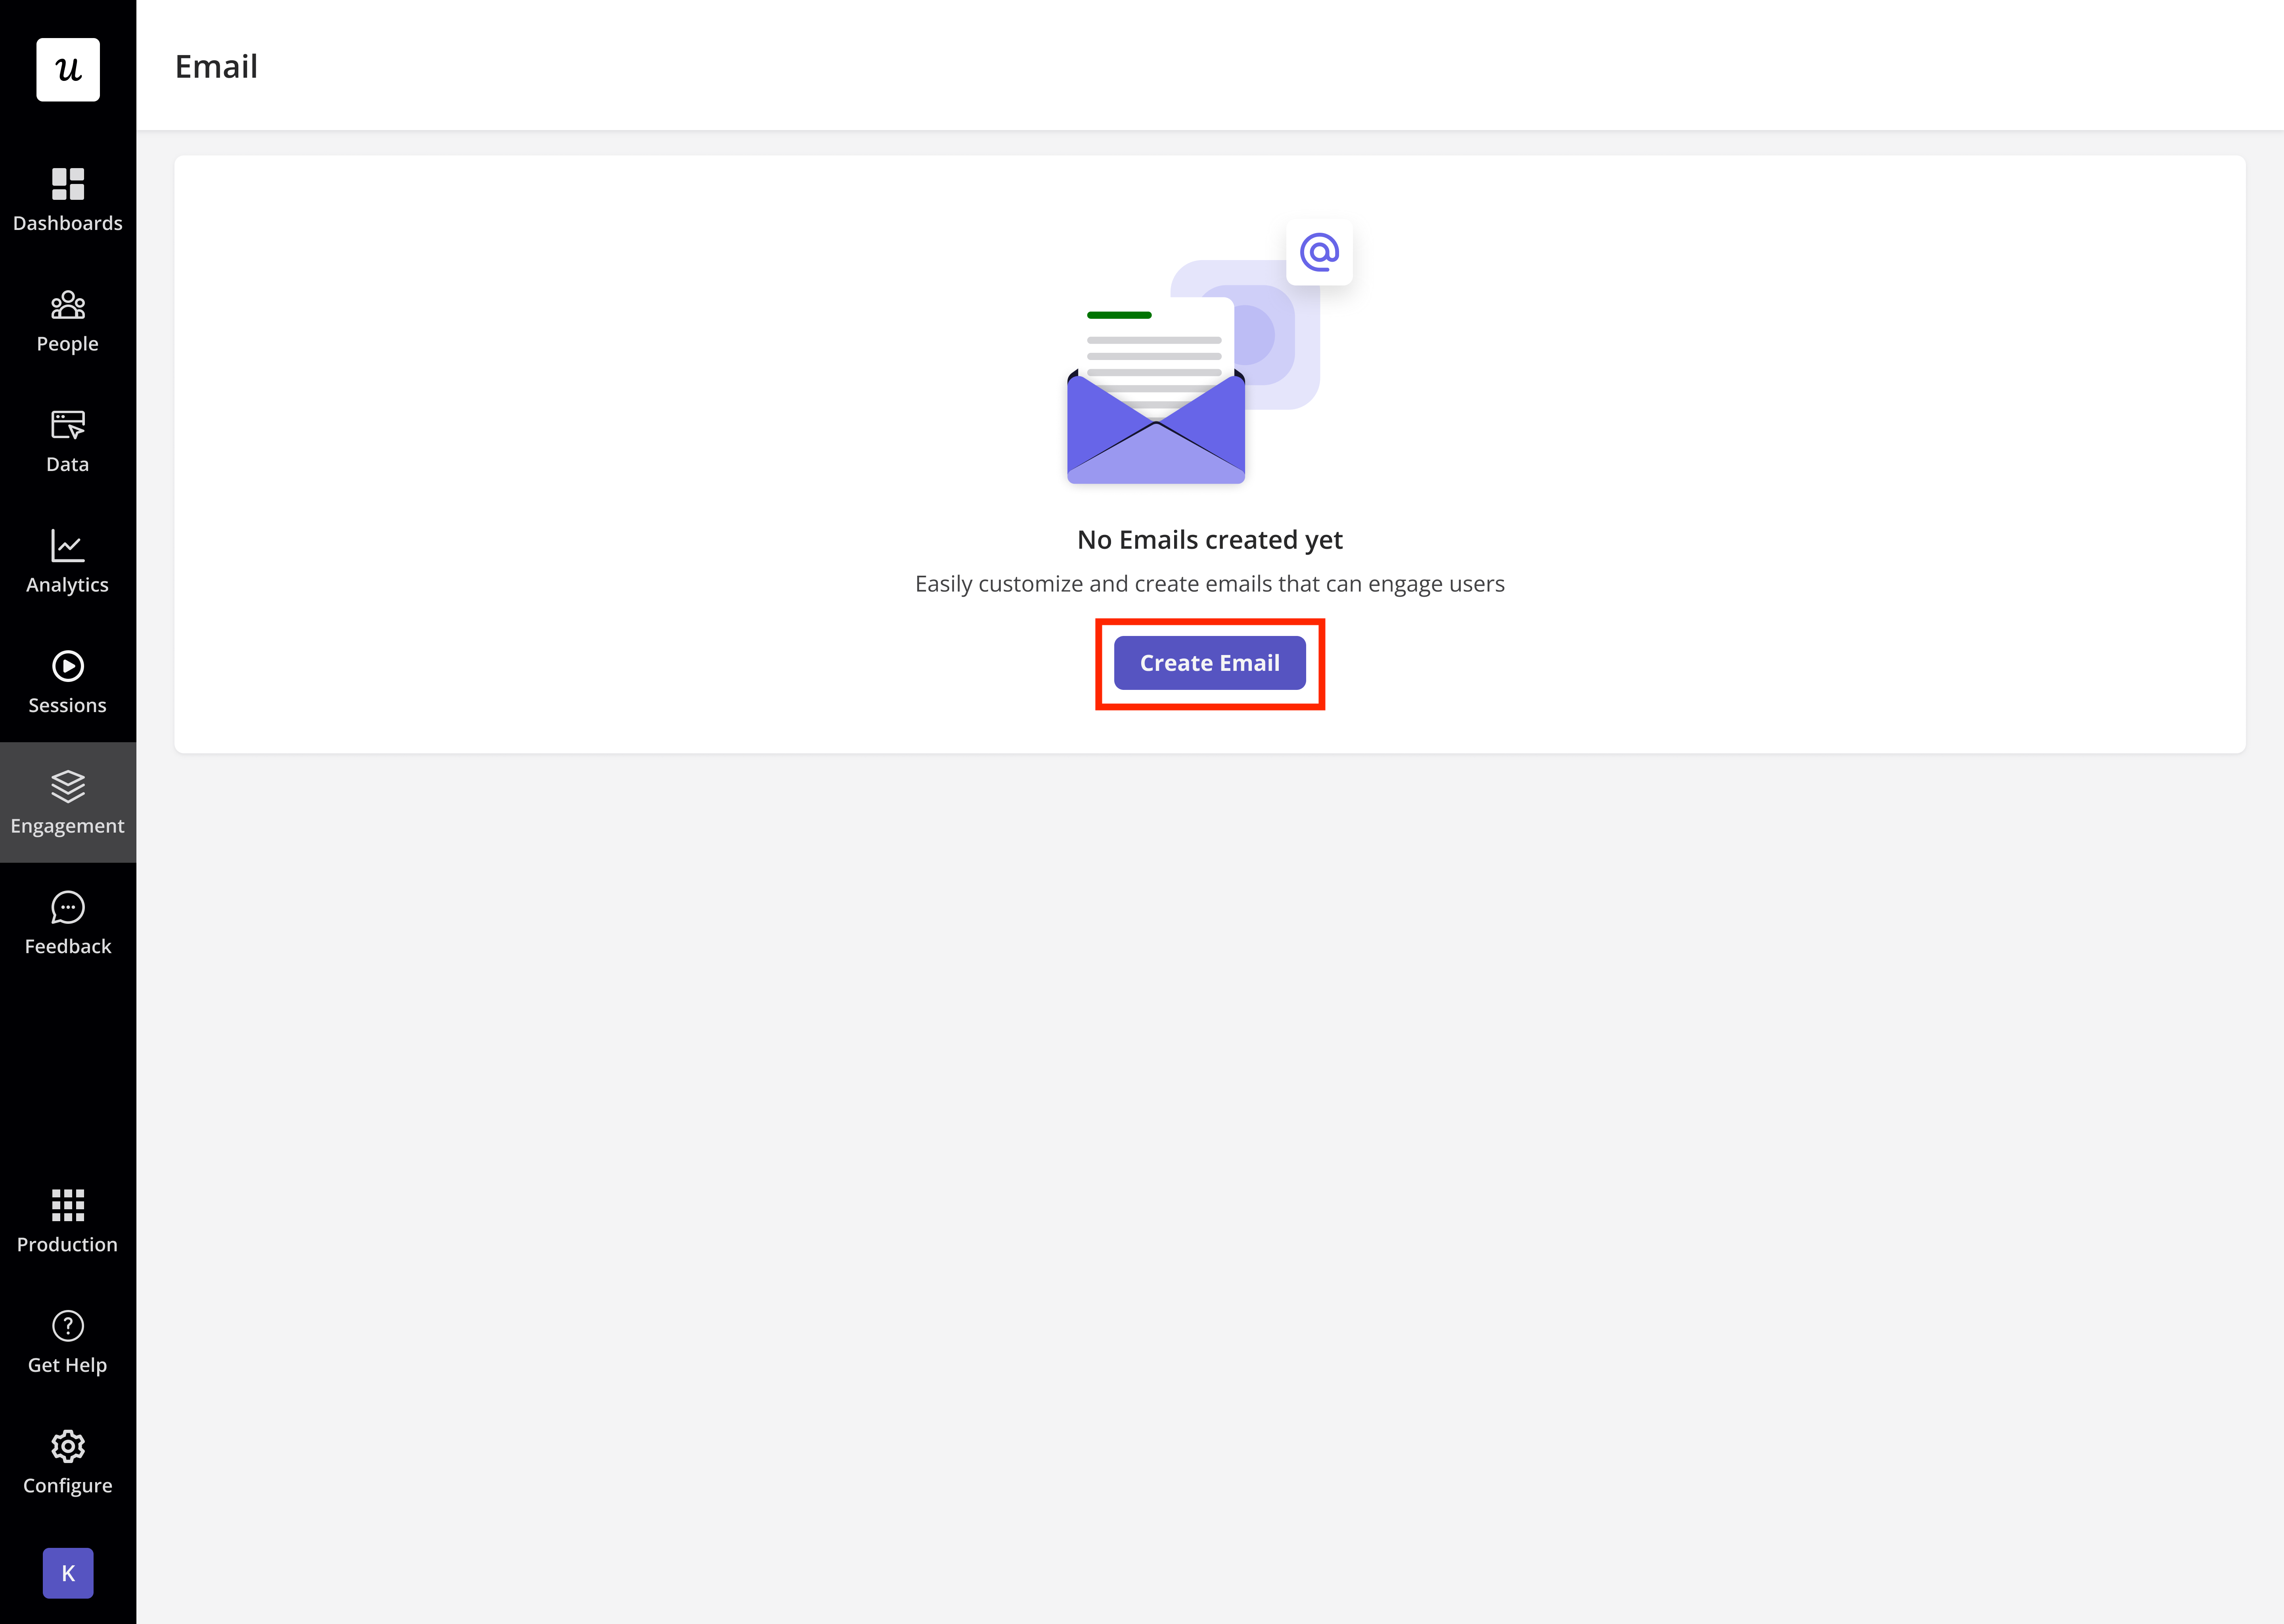
Navigate to Engagement > Emails from the sidebar, and then click Create Email..png?fit=max&auto=format&n=4bTZyxkEsWzJ39h7&q=85&s=695bb01c814eaf890f8ba61a7af4b9d7)
You’ll find email templates for various use cases, like re-engaging inactive users, reminding users about expired subscriptions, or encouraging them to upgrade their plan.
General email settings
Before you start creating your email, you’ll see options on the left to set the sender and choose which email address should receive the replies. This helps build trust with your audience and ensures replies go to the right person or team.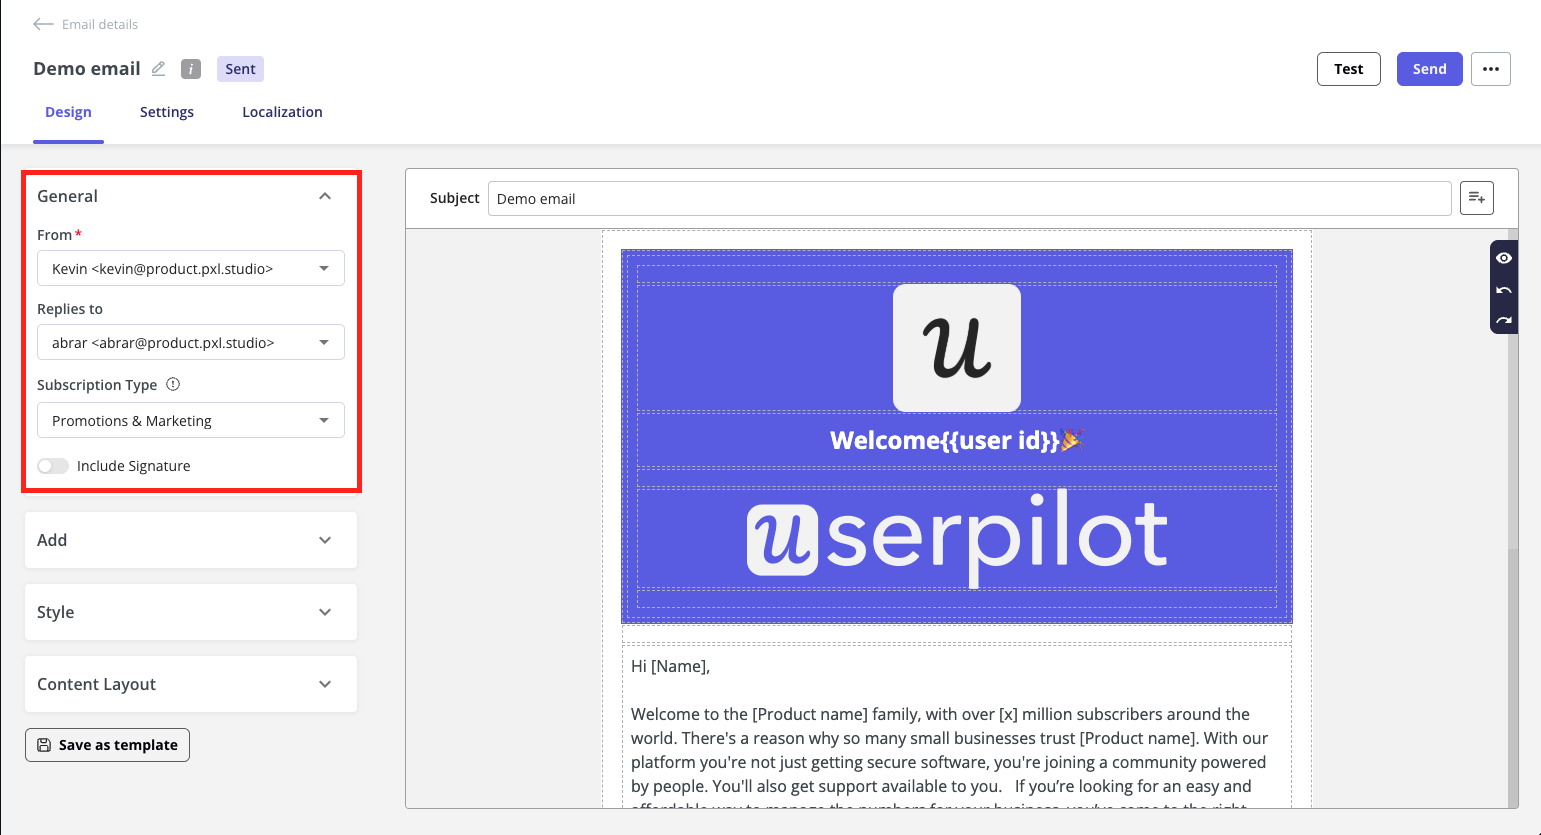
Notes
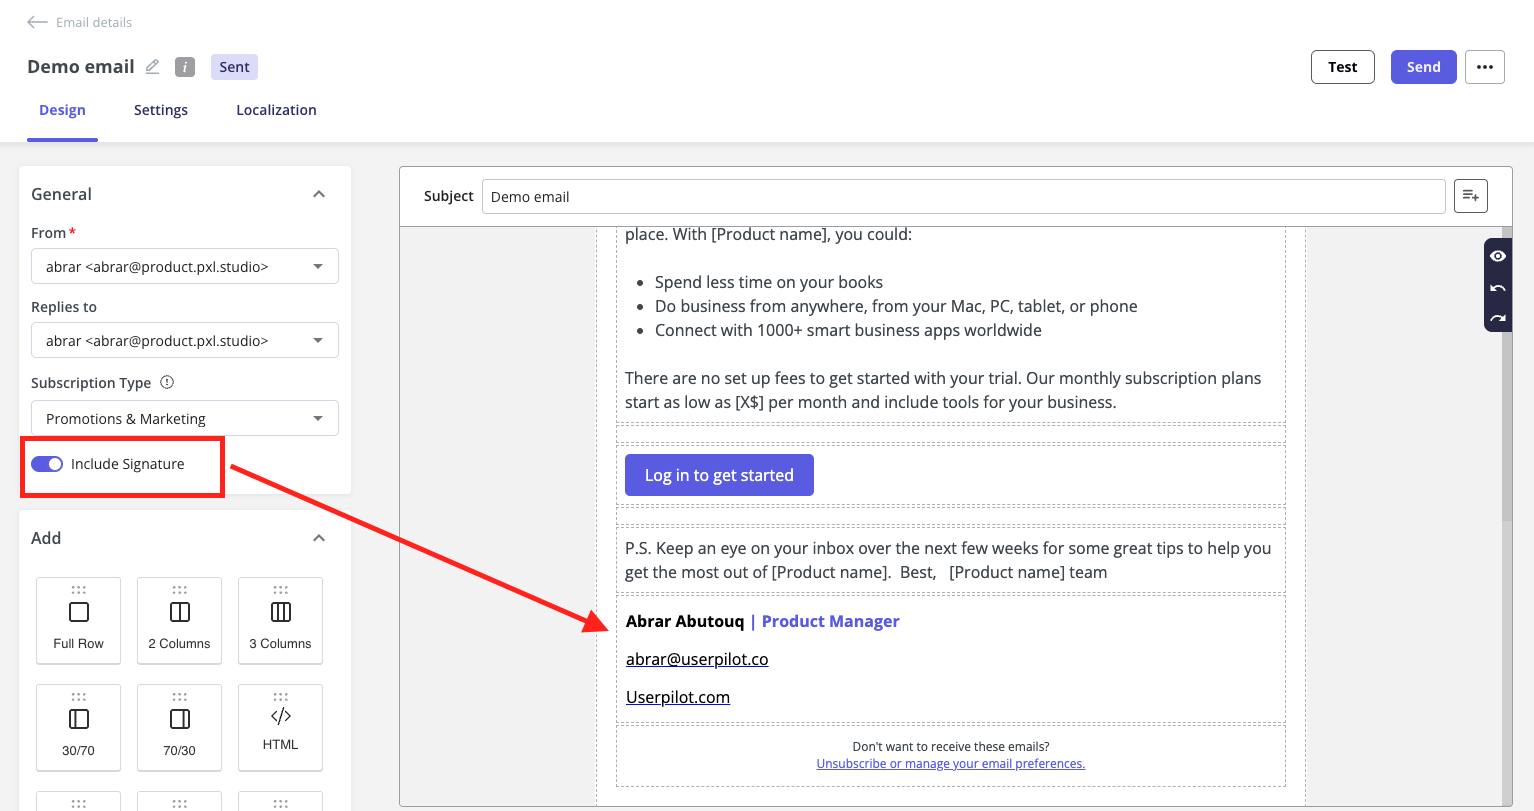
- Each user can create one email signature per added email address, and it will always appear at the bottom of the email.
- The signature is shown based on the selected “From” email address. If no signature exists, you’ll need to create one first before using it in the email builder.
- You can’t edit the signature in the email builder. To update it, go to Email settings → Signature, make your changes, and Userpilot will apply them automatically.

Notes
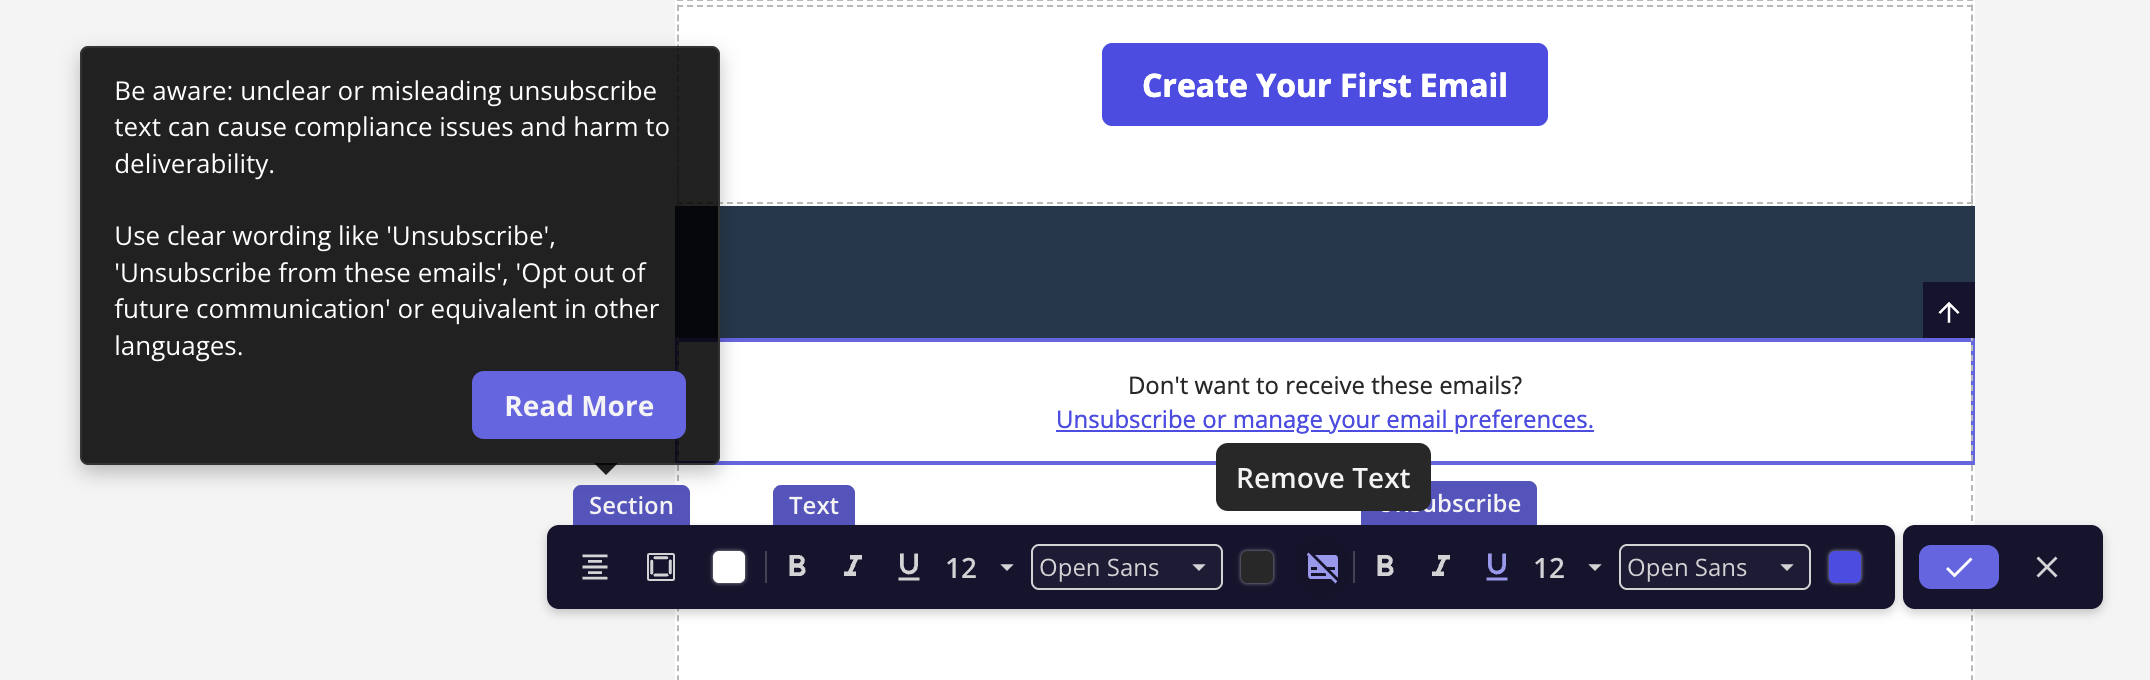
- You can customize the unsubscribe text and link, including writing it in different languages, and they can even remove the text if they would like. Just keep in mind that the unsubscribe link itself is always required.
-
The unsubscribe section is always placed at the bottom and can’t be moved at the moment.
Add sections to build your email content
- Start creating your email by filling in the subject line
- Preview text (optional) - add a custom preview text to improve user engagement with your email. If left empty, Userpilot will automatically pull the first few lines from your email body as the preview.
- Use the drag-and-drop editor to build your message using
- Text
- Image
- Button
- Spacer
- Line
- Embed
- Video
- HTML
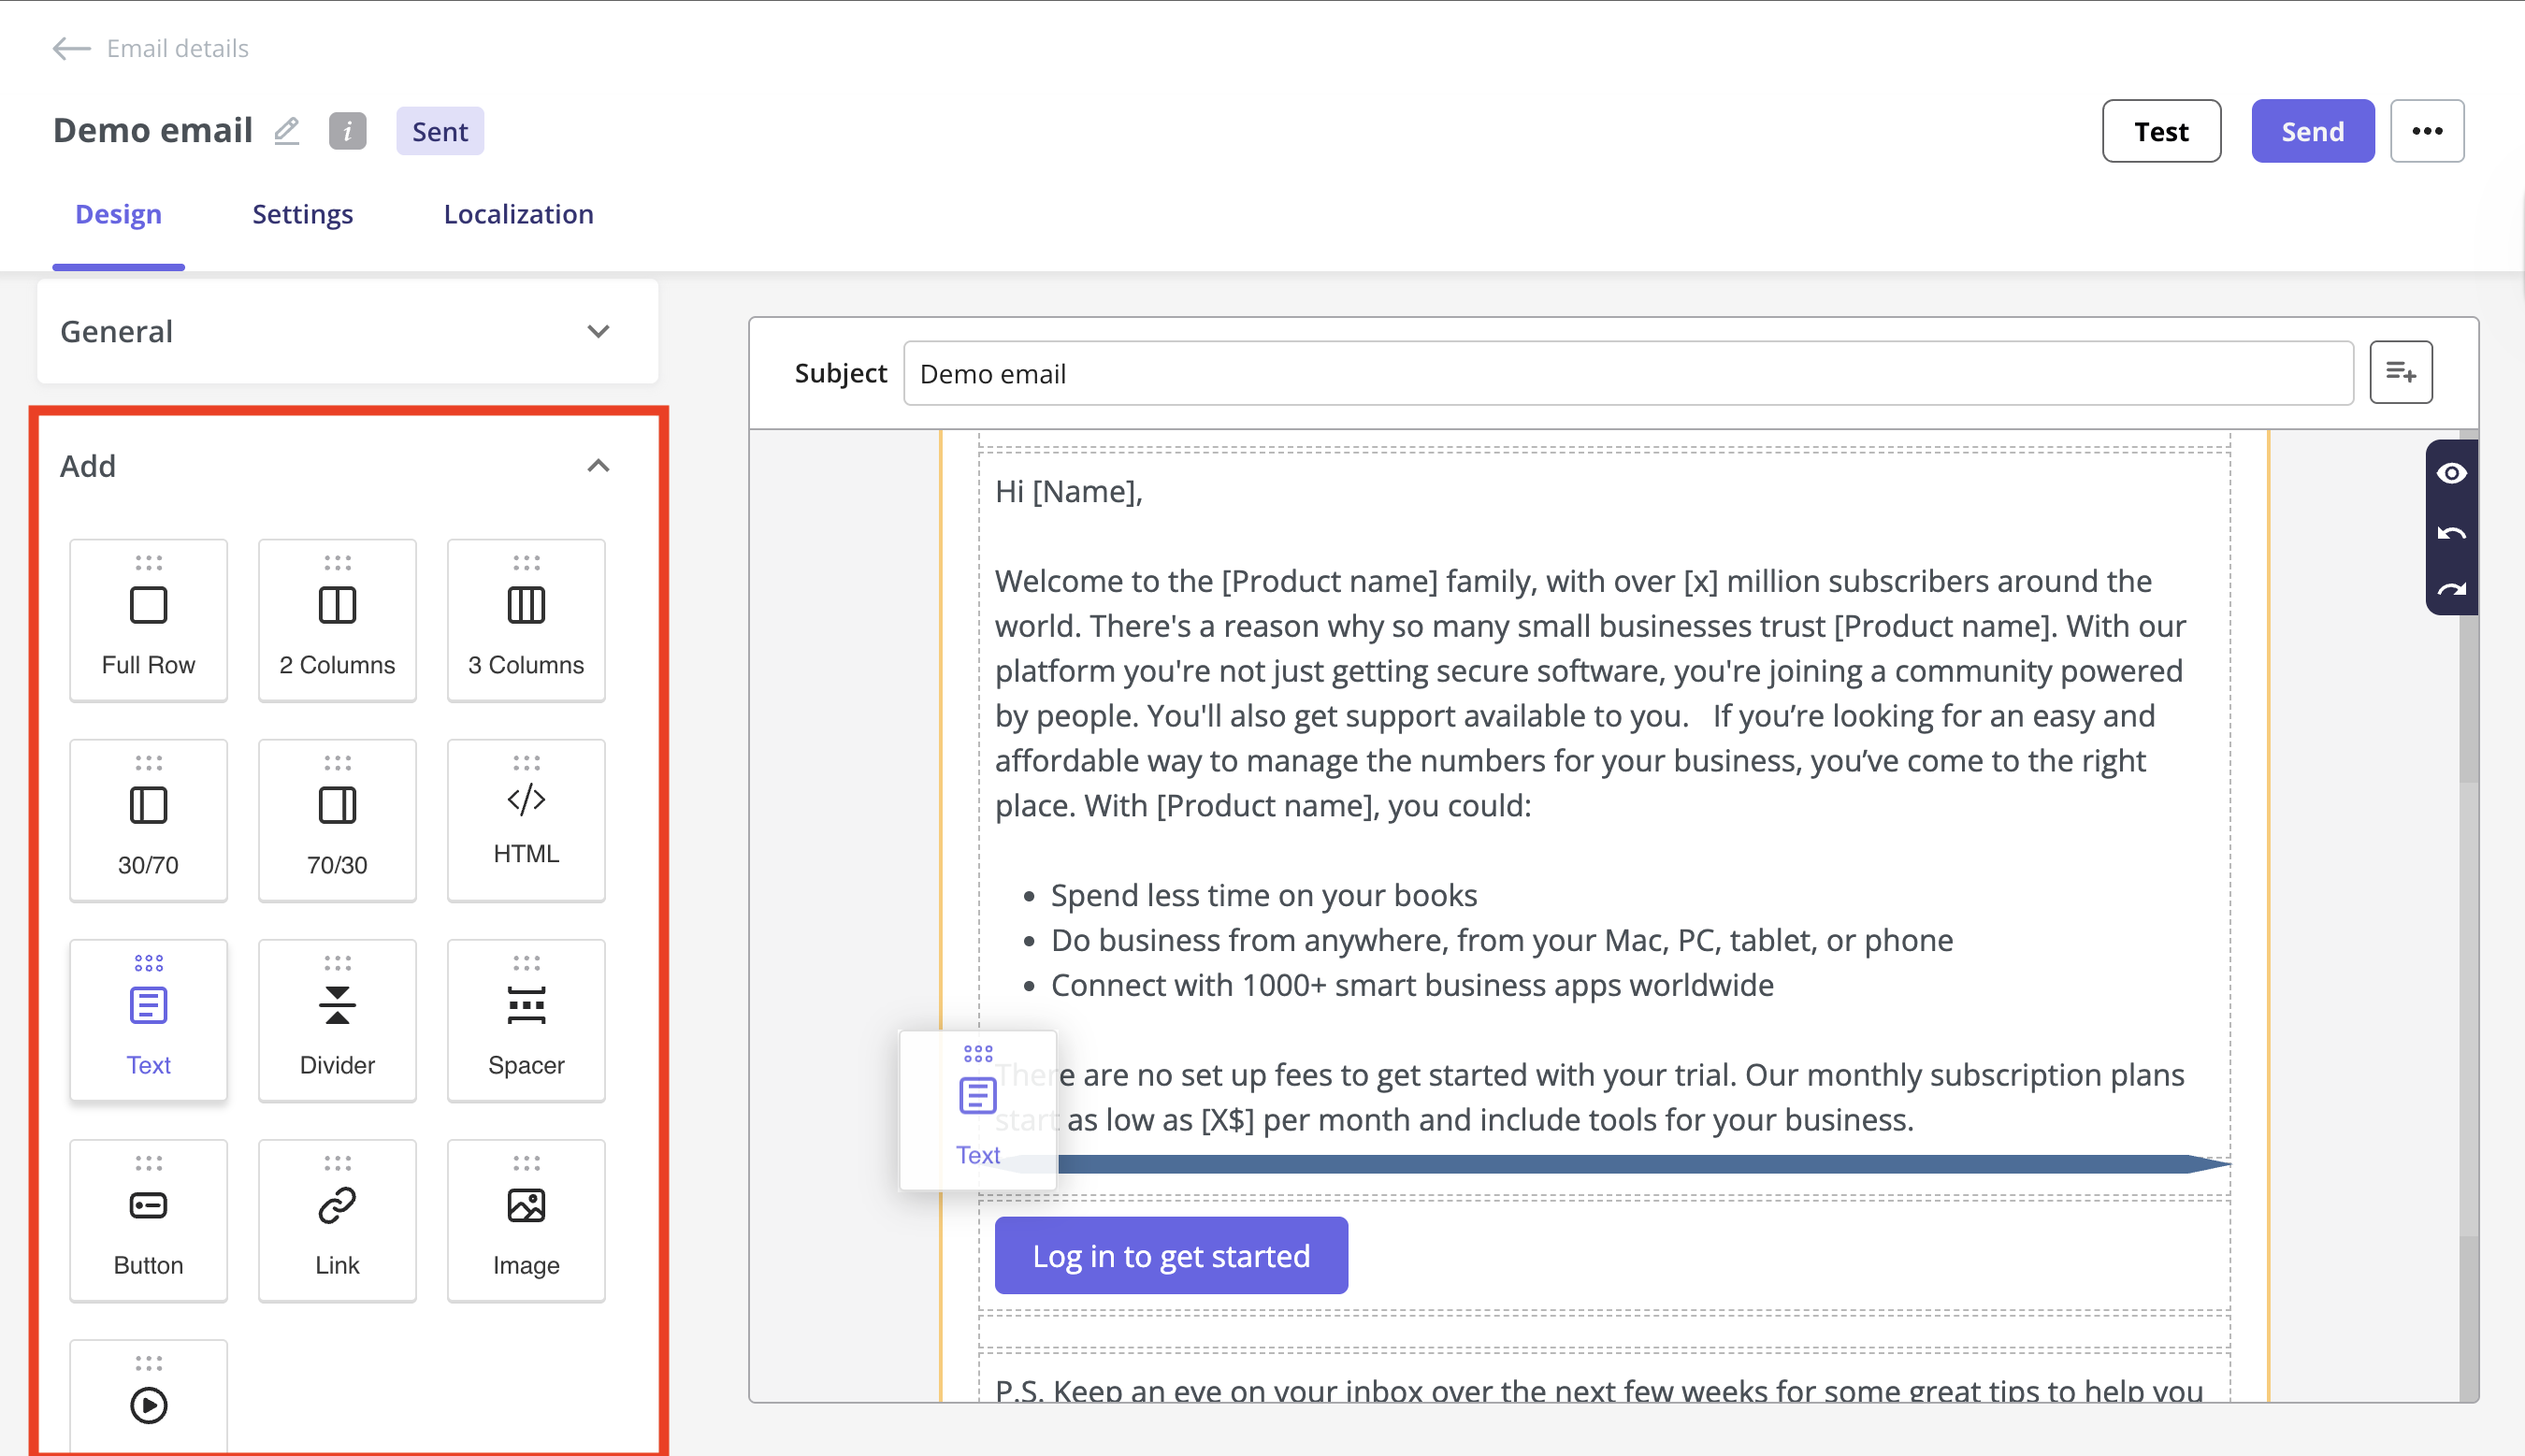
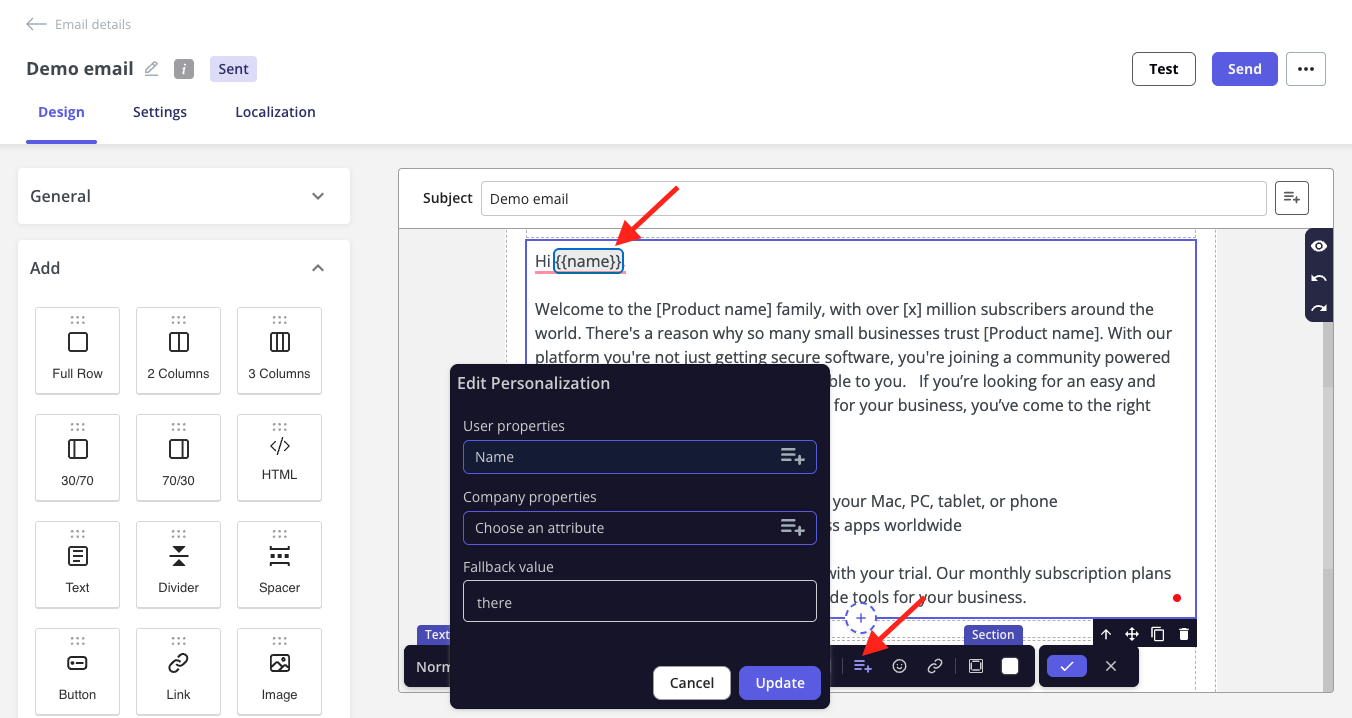
- Personalizing emails using user or company attributes, like first name, helps make your message feel more relevant and tailored. This increases engagement and builds stronger relationships with your audience.
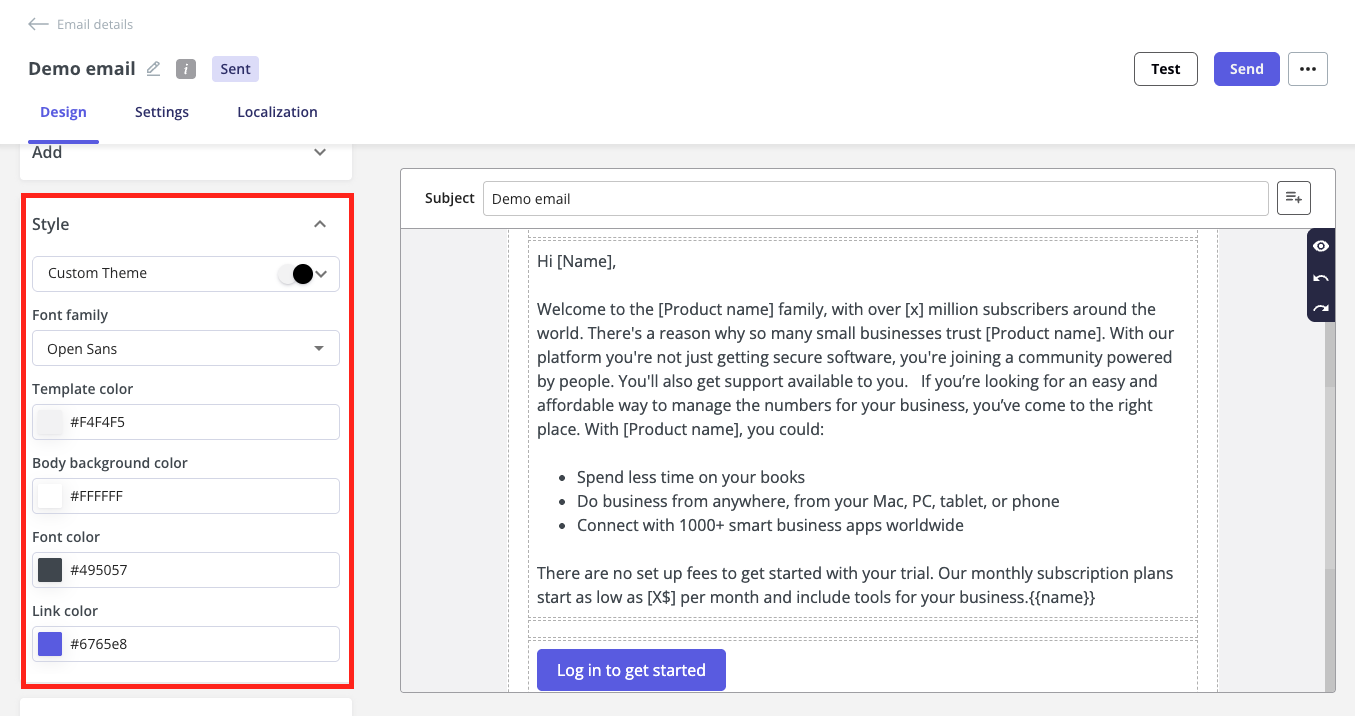
Style your email
Now it’s time to customize your email style to match your brand to ensure every message feels consistent and professional. Including:- Theme: choose a pre-defined theme to quickly apply a cohesive style to your entire email, including colors, fonts, and spacing.
- Font Family: choose a font style that aligns with your brand and ensures your message is easy to read across all devices.
- Template color: set the background color for the main content area of your email to match your brand or enhance visual clarity.
- Body background color: set a template color for all email sections to keep your design consistent.
- Font color: customize the text and button label colors in your email content
- Link color: customize the color of hyperlinks within your email content to make them stand out and stay on-brand.
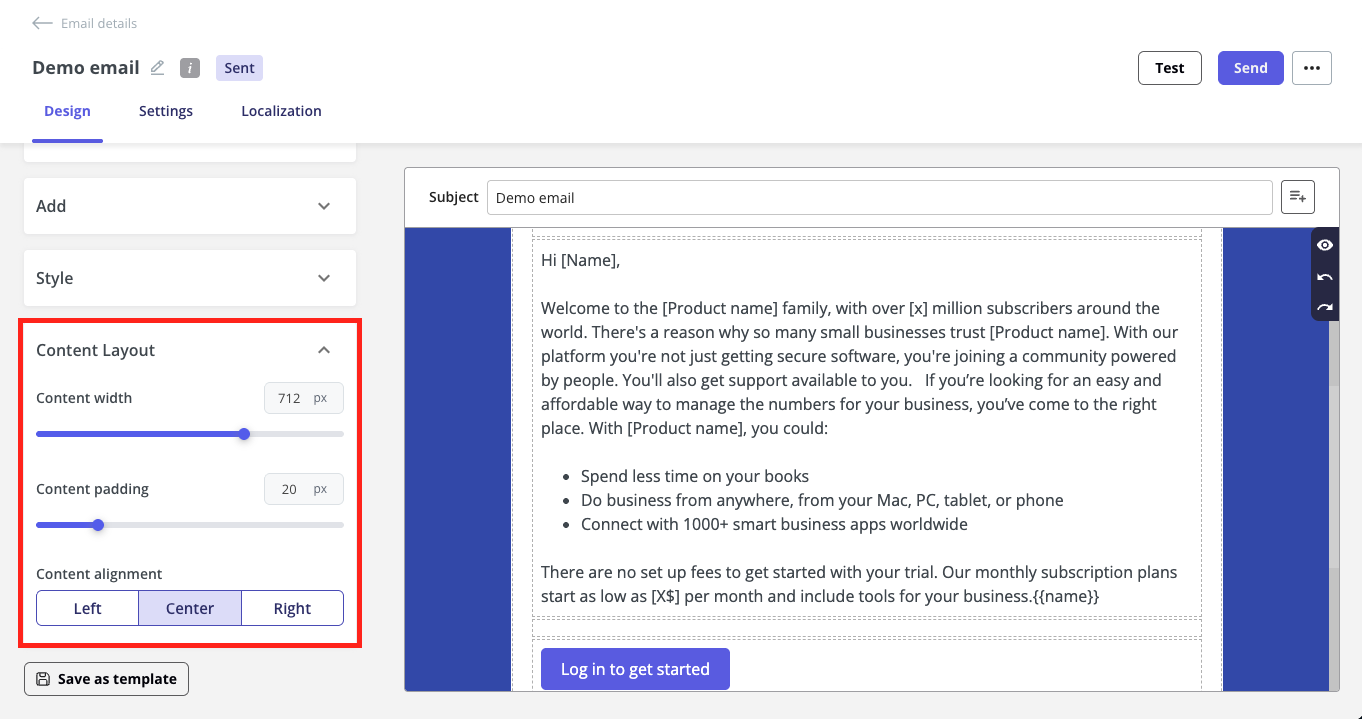
Content layout
- Content width: adjusts how wide your email content appears (in pixels).
- Content padding: adds spacing inside the content area to give it breathing room.
- Content alignment: sets whether your content is aligned to the left, centered, or aligned to the right.
Save your email as a template
You can save the layout, style, and content of your email as a reusable template. This makes it easy to create future emails without starting from scratch, saving you time and effort. Saved templates will be available for you to select when creating a new email.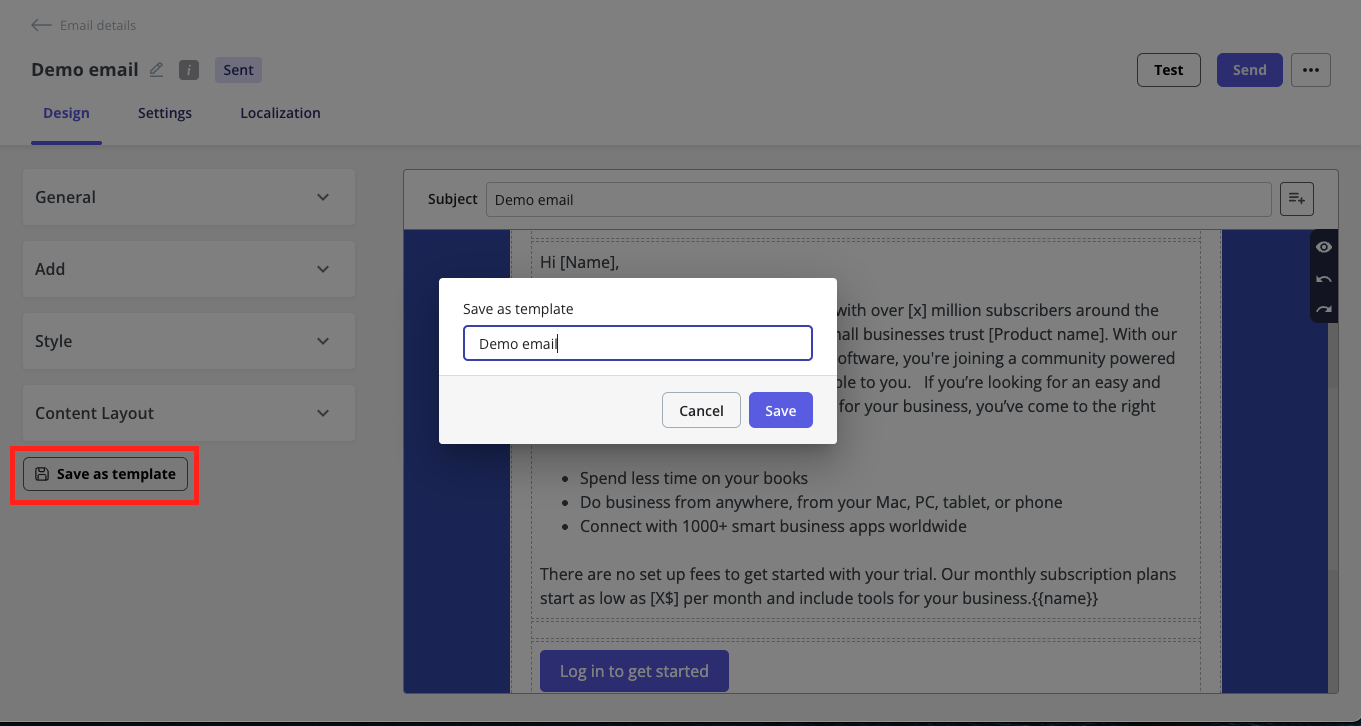
Test the email before sending
Once you’ve created your email, Userpilot allows you to test it before sending it to your audience. You can send a test email to any internal email address you’ve added to review the layout, formatting, and deliverability in a real inbox, or select an identified user to verify how personalization and dynamic content appear using real user data. This helps you preview the email exactly as recipients will see it and make any necessary adjustments before sending it to your target audience.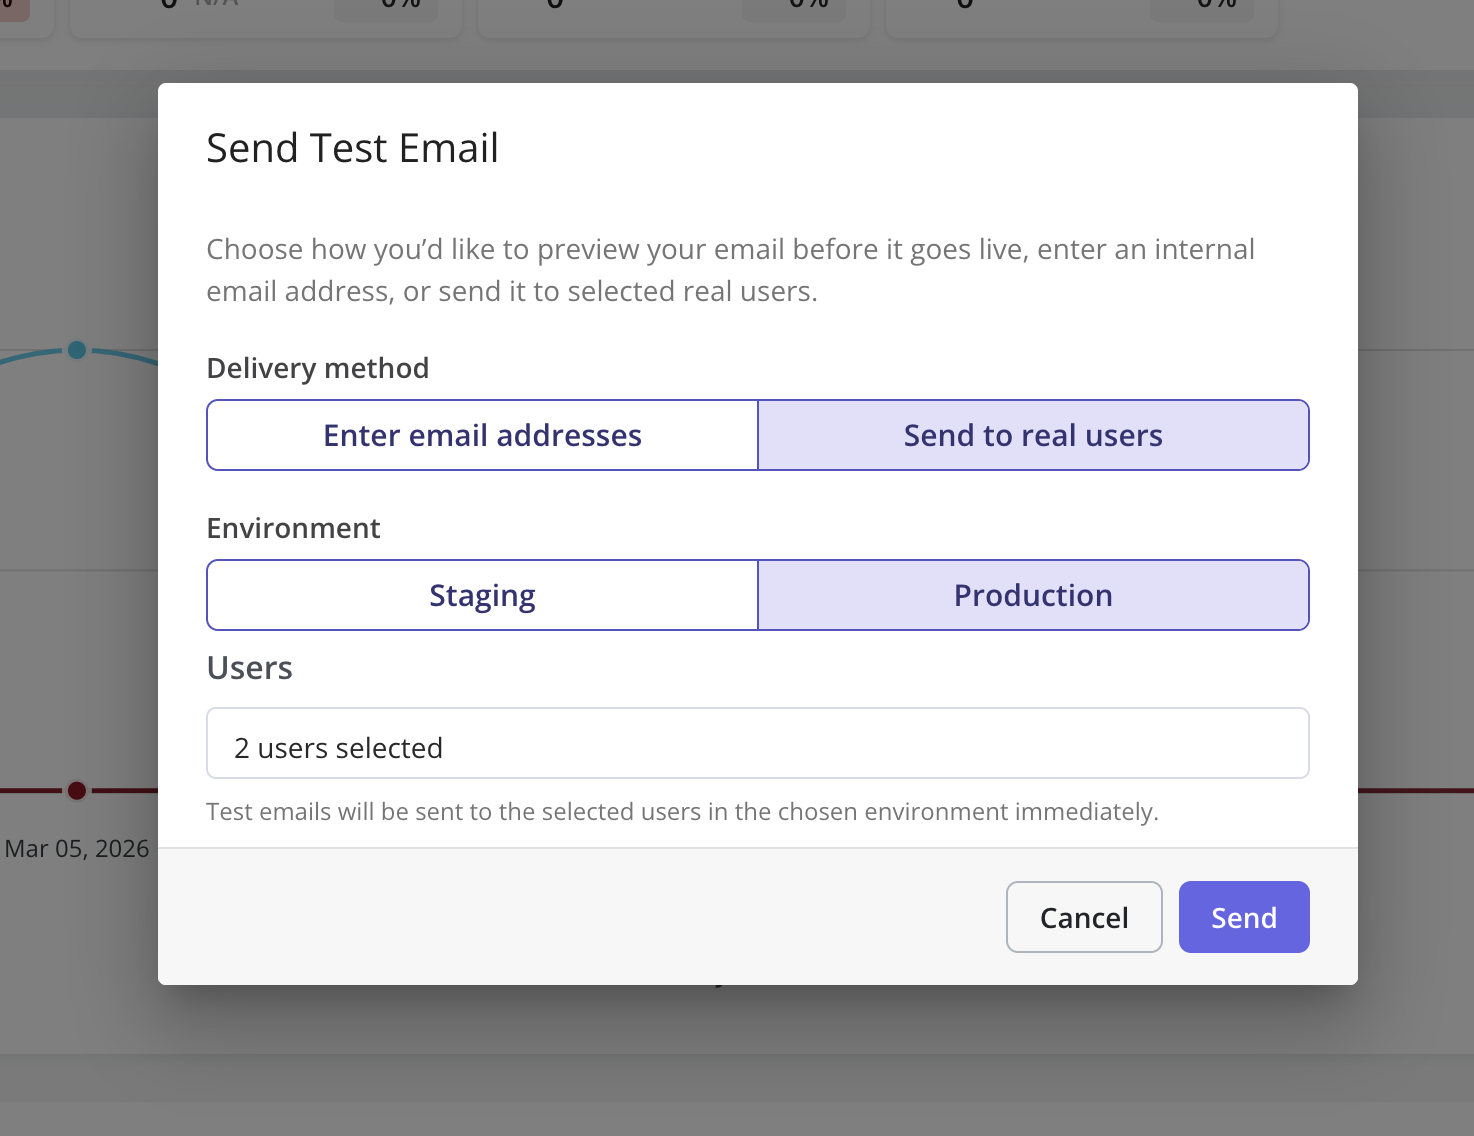
Make sure to verify the domain you plan to use for sending emails through Userpilot before testing or sending your email.If the domain is not verified, Userpilot will prompt you with a message to complete the verification first.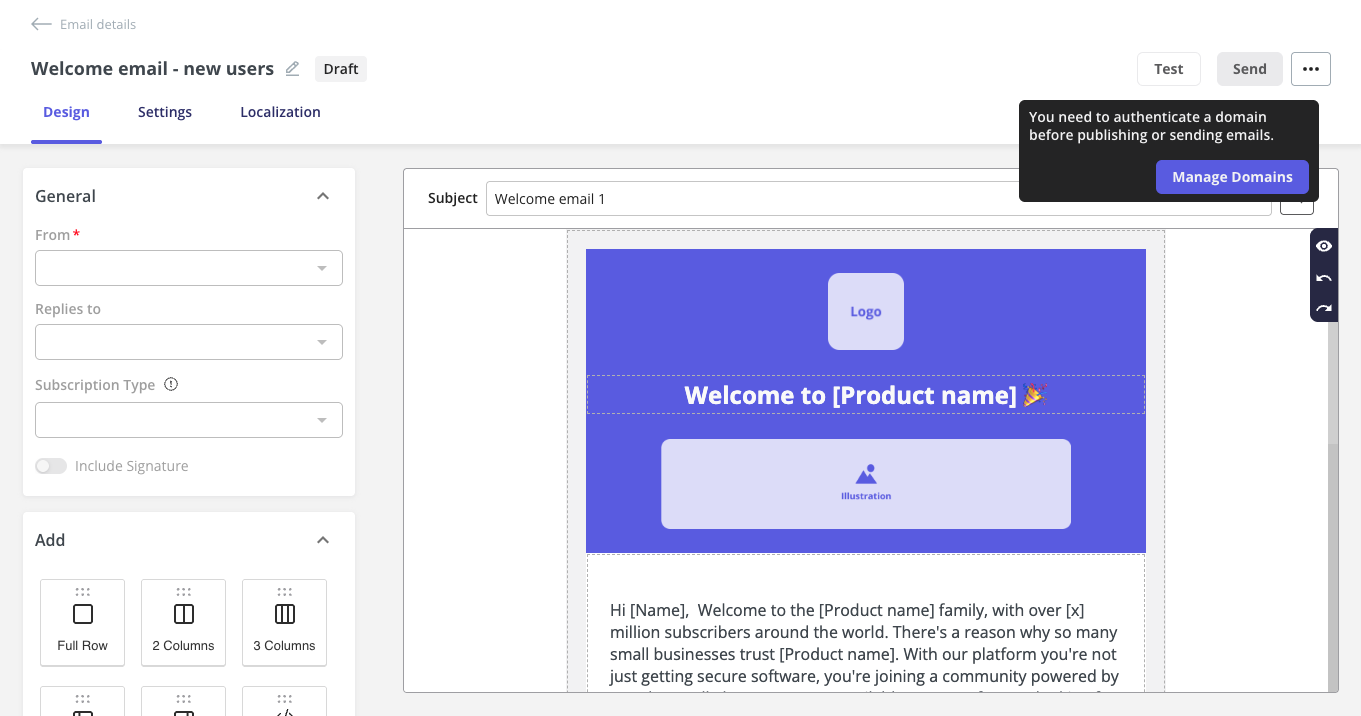
Send your email
The Email feature offers various configuration options to tailor messages based on your specific use case. These settings ensure that emails are sent to the right audience, at the right time, and with the appropriate frequency. The key configuration options include:Trigger
This defines what initiates the email to be sent. You can choose from:- User matches conditions: Emails are sent when a user meets specific audience rules.
- Event occurrence: Triggers the email when a specific user action or event takes place (e.g., clicking a button, completing a goal).
Environment
Specify whether the email should be delivered in a staging or production environment.- Emails can be tested safely in the staging environment.
- In production, emails are sent to real users.
- You can define audience rules per environment to ensure targeting is accurate for each context.
Audience
Choose who receives the email based on the targeting logic:- User matches conditions (Dynamic or Fixed):
- Dynamic: includes current and future users who meet the criteria.
- Best for:
- lifecycle campaigns.
- Behavior- or attribute-driven targeting.
- Long-running campaigns (e.g., weekly tips, reminders).
- Example use case: use this option to send a welcome email to all users who sign up from a specific country or plan, not just today’s signups, but also anyone who signs up later.
- Best for:
- Fixed: includes only the users who match the criteria at that exact moment.
- Best for:
- One-time campaigns or announcements.
- Targeting a snapshot of users.
- Time-sensitive messaging.
- Example use case: you’re launching a new feature and want to email everyone currently using a specific plan, but not new users who join later.
- Best for:
- Dynamic: includes current and future users who meet the criteria.
- All users: every identified user in your web app will receive the email, regardless of their attributes.
- Saved segment: use pre-defined segments you’ve created in Userpilot.
- Custom conditions: define new conditions on the fly using filters like user attributes, actions, or events.
Audience options for Dynamic vs Fixed are only visible when “User matches conditions” is selected as a trigger.
Userpilot checks the email reputation of your selected segment and dynamically limits how far back you can target users with the Last seen condition. Based on this reputation (e.g., engagement levels, bounce rates, and spam signals), the allowed range increases gradually: 90 → 105 → 120 → 150 → 180 → 360 days.Segments with stronger engagement and healthier sending signals can safely reach longer time ranges, while lower-quality segments are kept within shorter windows to protect deliverability.This helps you safely re-engage older users without harming your sender reputation—so your emails are more likely to land in inboxes instead of spam.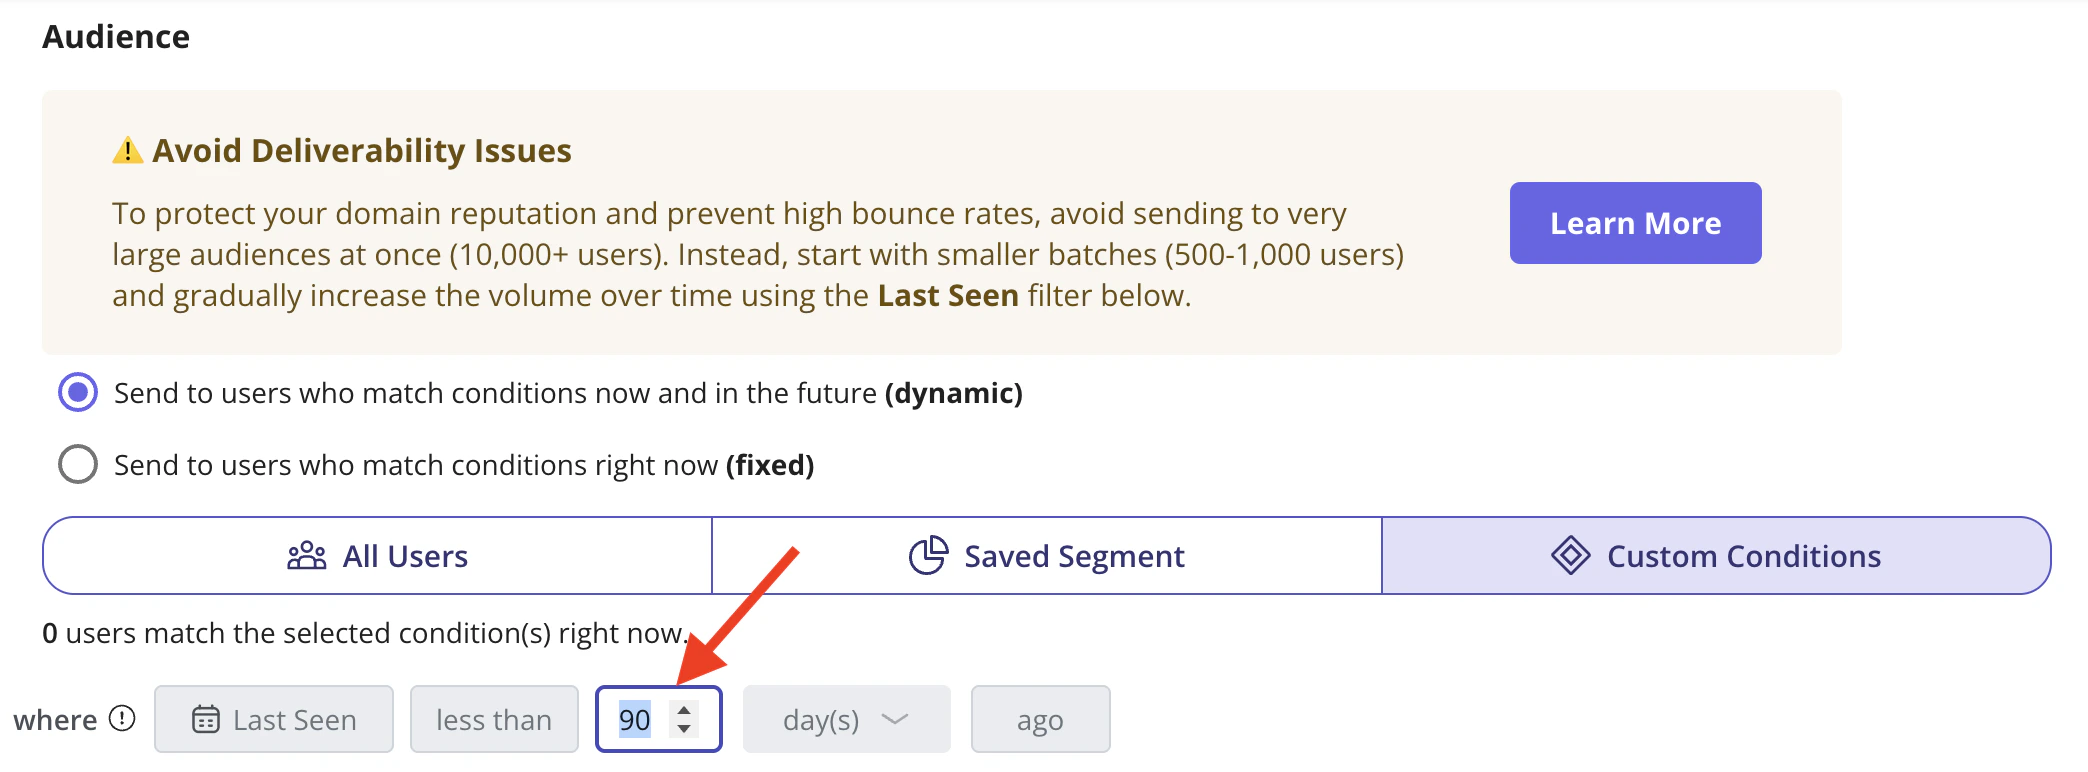
Goal
Define a goal for your email, which can be used to:- Track engagement and conversion.
- Determine if the email achieved its intended purpose (e.g., user completed a flow, clicked a CTA).
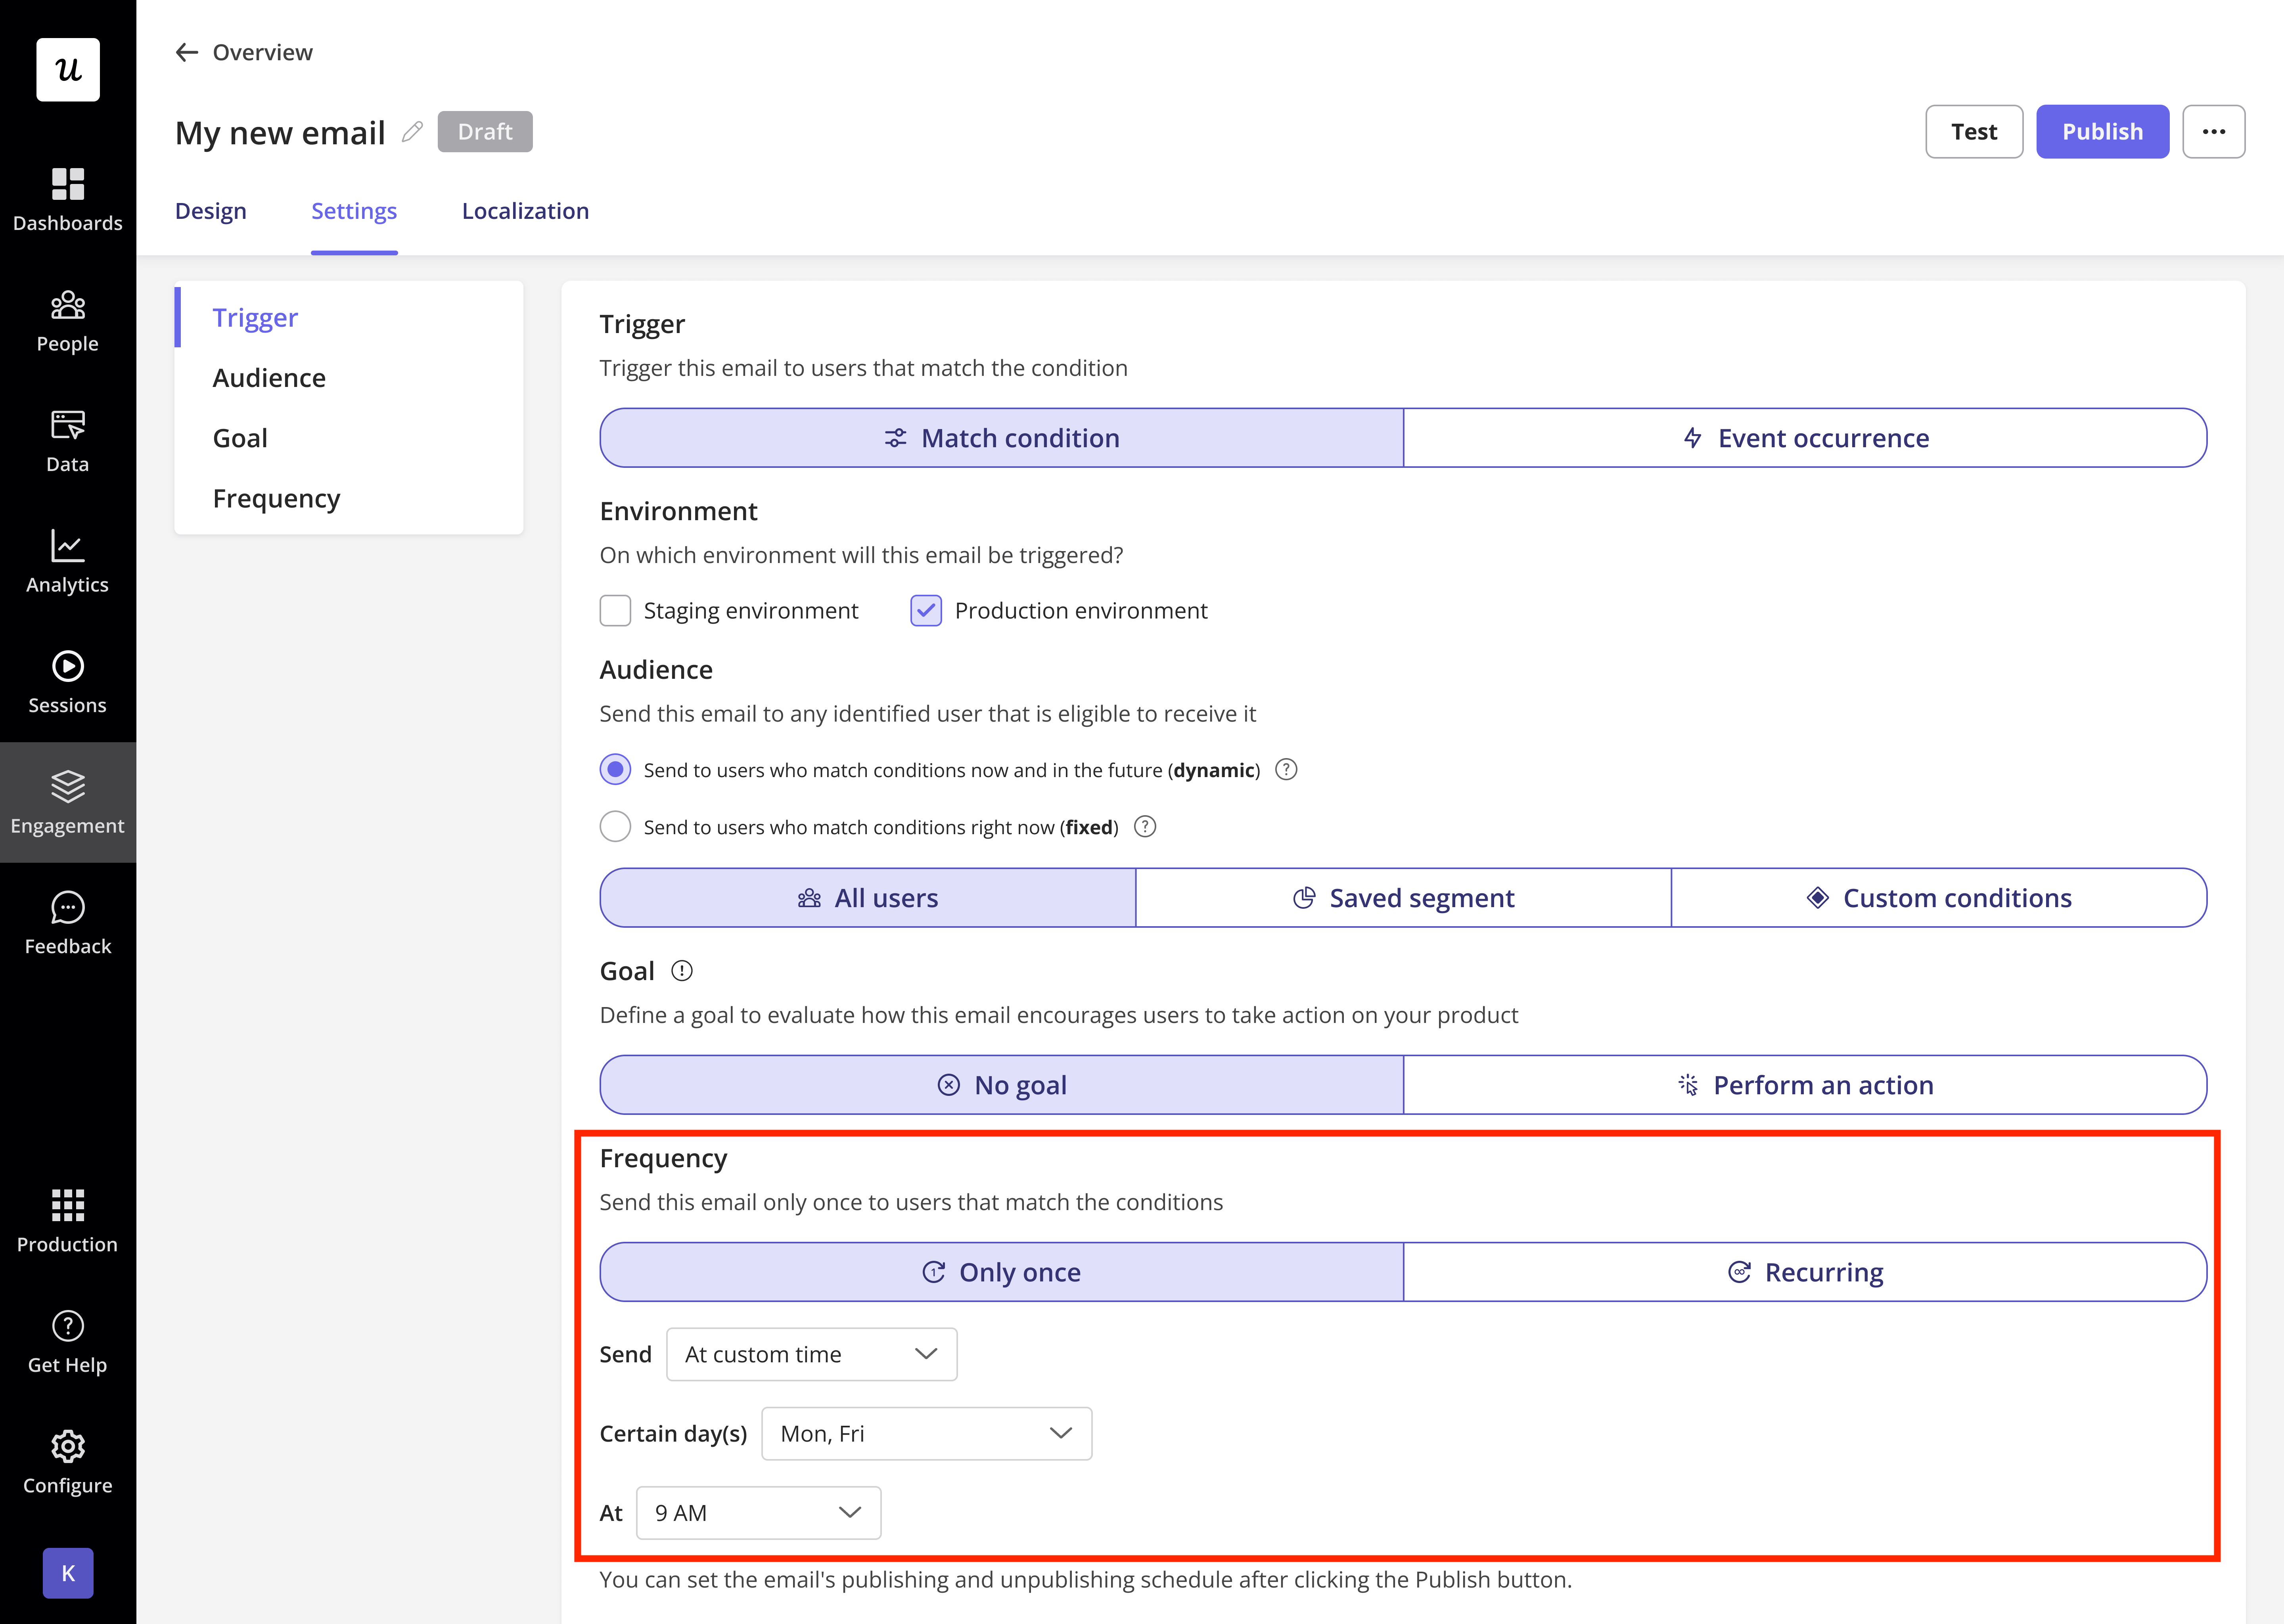
Frequency
Control how often a user receives the email:- Only Once
- Immediately
- Send the email as soon as a user meets the defined trigger conditions (e.g., signs up, completes an action, etc.).
- Example use case: Send a welcome email instantly after a user signs up for your platform.
- At Custom Time
- Schedule the email to be sent on specific days and times, even if the user matches the conditions earlier. You can choose one or more days and set a specific time.
- Send an onboarding tips email every Monday and Friday at 9 AM to users who signed up that week.
- Immediately
Userpilot will send the email based on the time zone specified in the General Settings page.
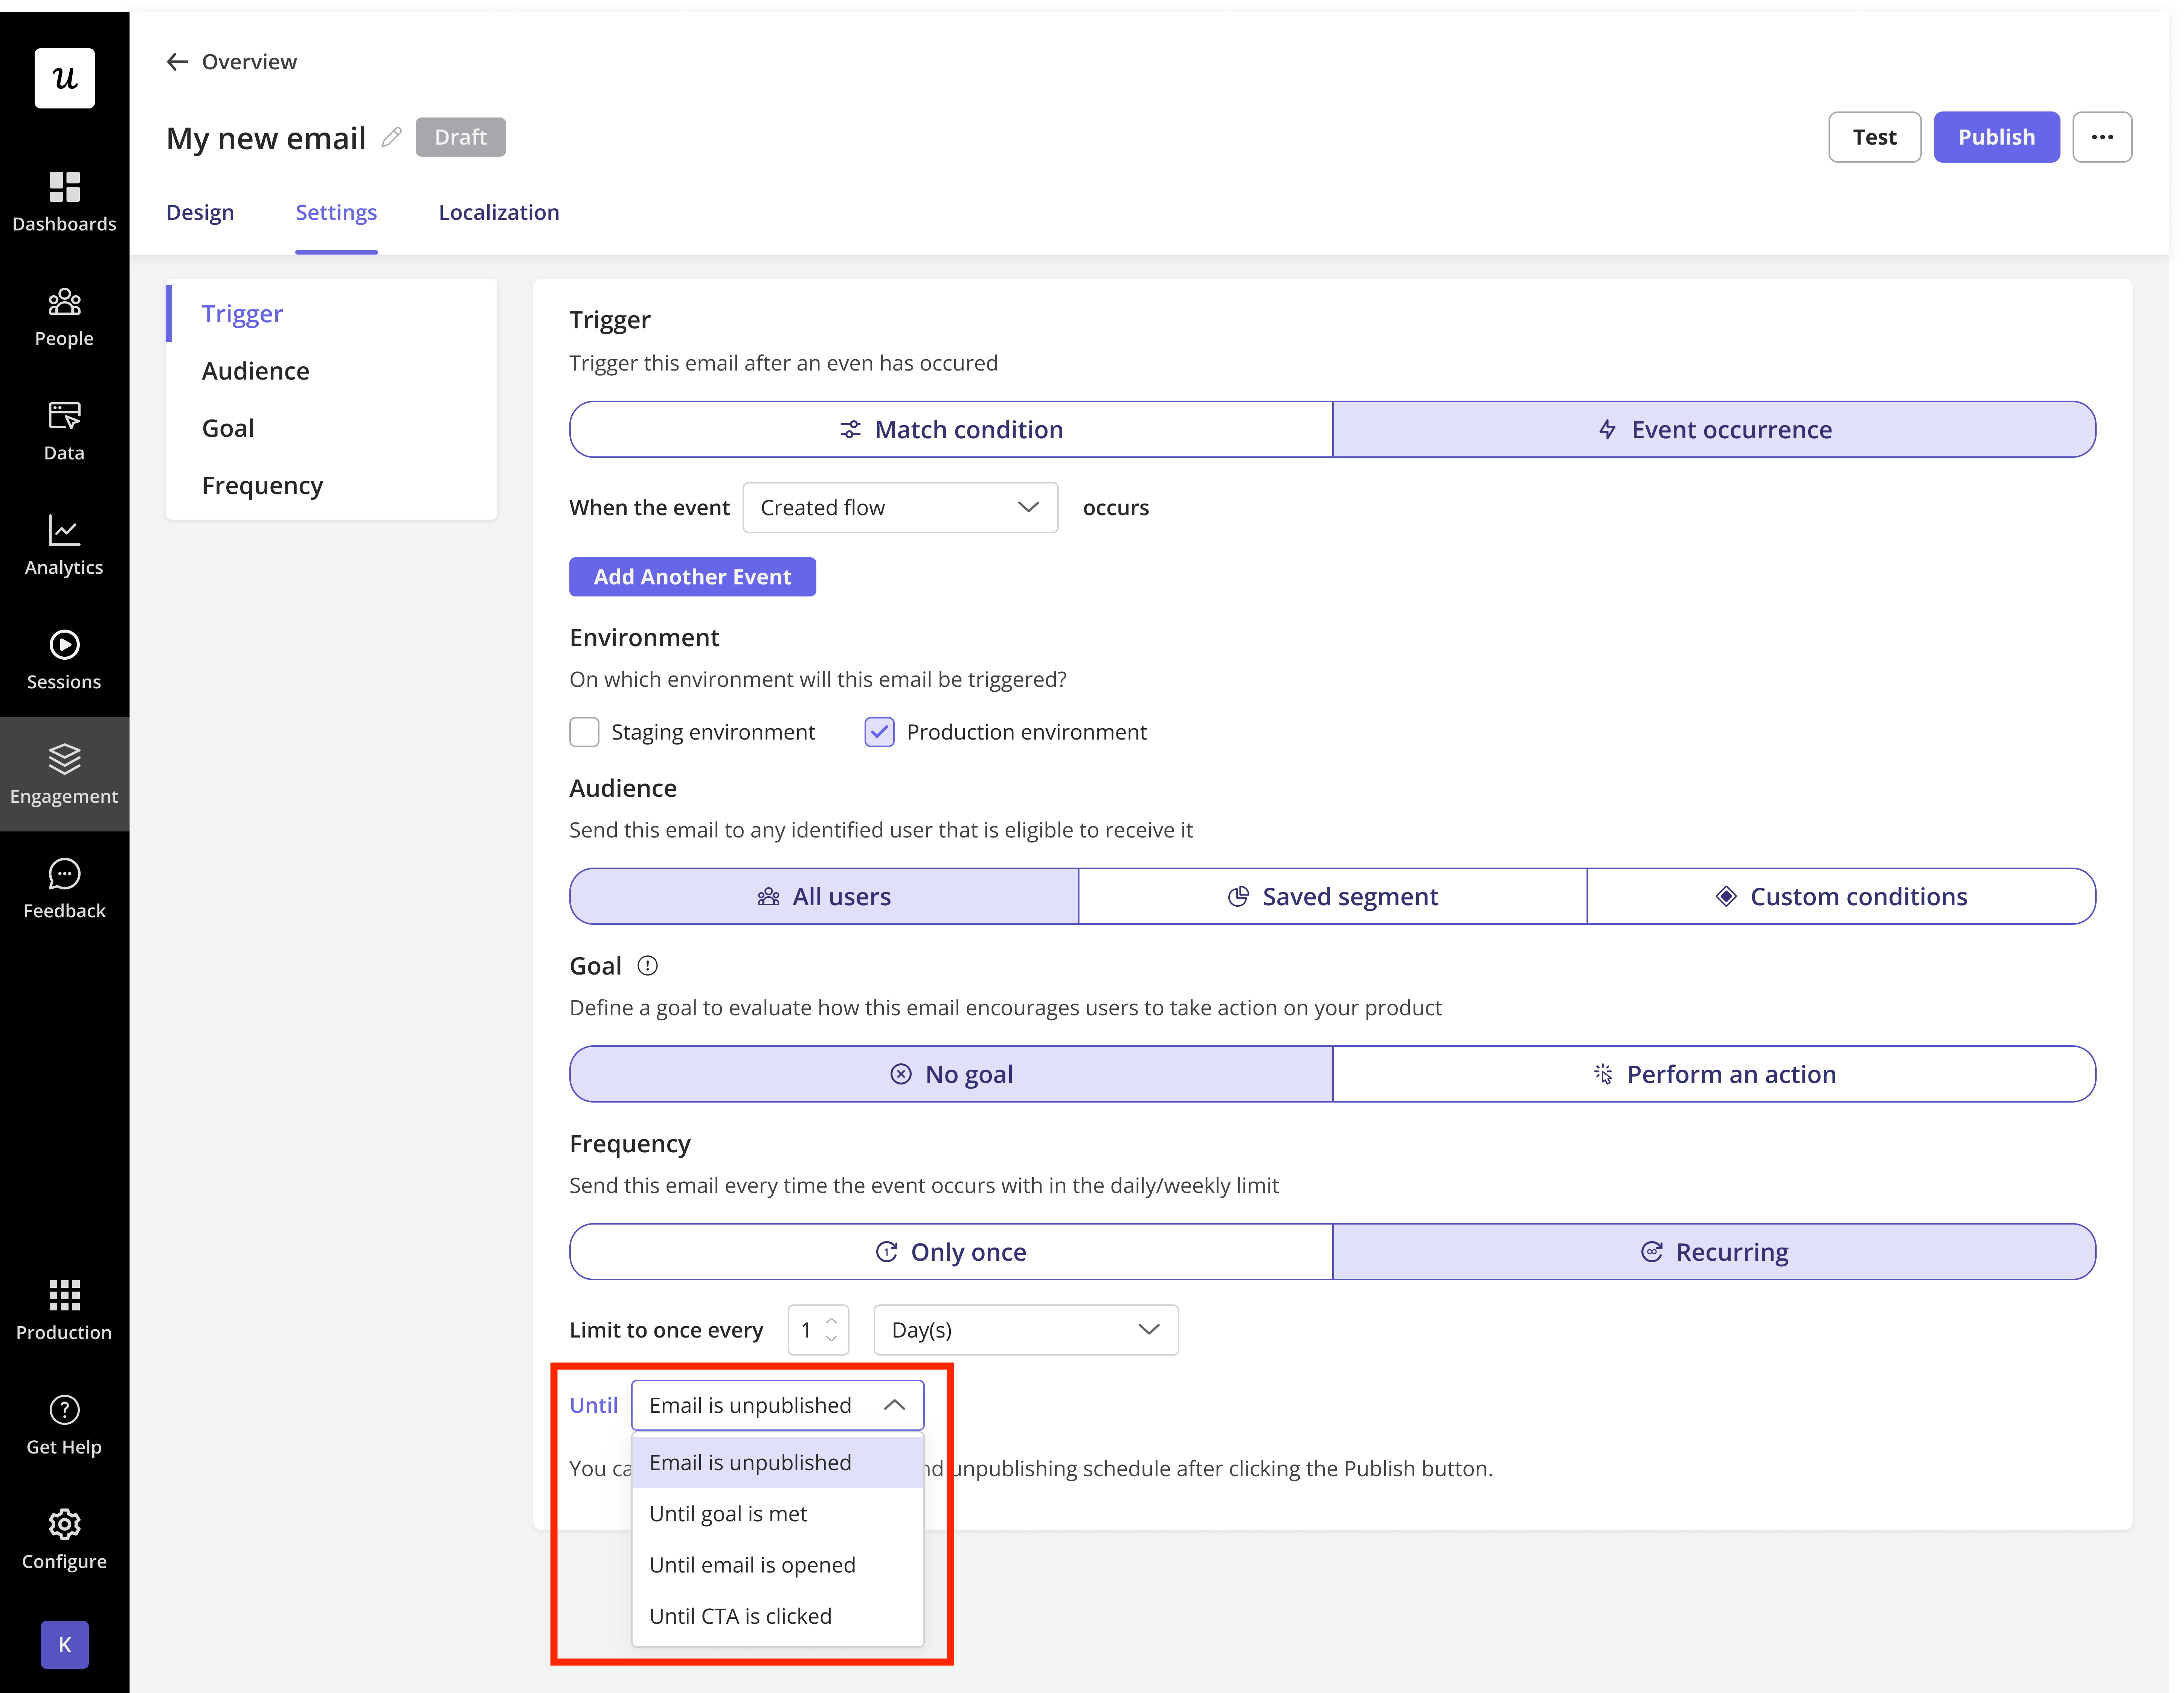
- Recurring
- Based on match condition
- Send the email repeatedly to users who match the dynamic conditions.
- You can choose:
- How often (e.g., once every 7 days)
- When to stop (see “Until” options below)
- Example use case: send a weekly usage reminder to users who have not completed a key action until they do.
- Based on event occurrence
- Send the email every time a selected event occurs (e.g., user creates a flow, completes a checklist).
- You can define:
- Recurrence limit (e.g., once every X days)
- Stop conditions
- Example use case: send an email every time a user publishes a flow, reminding them to share it with their team, but only once per day.
- “Until” Stop Conditions (for Recurring Emails)
- You can define when recurring emails should stop. Options include:
| Option | Description | Example use case |
| :— | :— | :— |
| Until email is unpublished | Userpilot will continue sending the email until you manually unpublish it. | Send a feature promotion email every week until the campaign is ended. |
| Until goal is met | Userpilot will stop sending the email once the user completes the associated goal (e.g., completes a task or flow). | Send a weekly email until the user completes their onboarding checklist. |
| Until email is opened | Userpilot will stop resending the email once the user opens it. | Keep reminding users weekly about a webinar until they open the invite. |
| Until CTA is clicked | Userpilot will stop sending the email once the user clicks on at least one call-to-action (CTA) within it. | Send a discount offer email every few days until the user clicks the “Redeem Now” button. |
Currently, you can’t specify a particular call-to-action (CTA) to stop the email from sending. If your email contains multiple CTAs, Userpilot will stop sending it once the user clicks on any one of them. - Based on match condition
Localization
The email localization feature allows you to customize your message for users in different languages based on their locale. Using the Localization tab, you can create language-specific versions of your email to ensure it resonates with users across regions. This feature works the same way as other localization-supported experiences in Userpilot and relies exclusively on the user’slocale_code.
Only users with a matching locale_code will receive the translated version of the email. If no translation is available for a user’s locale, the default version will be sent instead.
Email sending schedule
Once you’ve finished setting up your audience, you can configure the email’s publishing and unpublishing schedule after clicking the “Send” or “Publish” button. Userpilot will then show you how many recipients will receive the email, helping you ensure the number matches your expectations.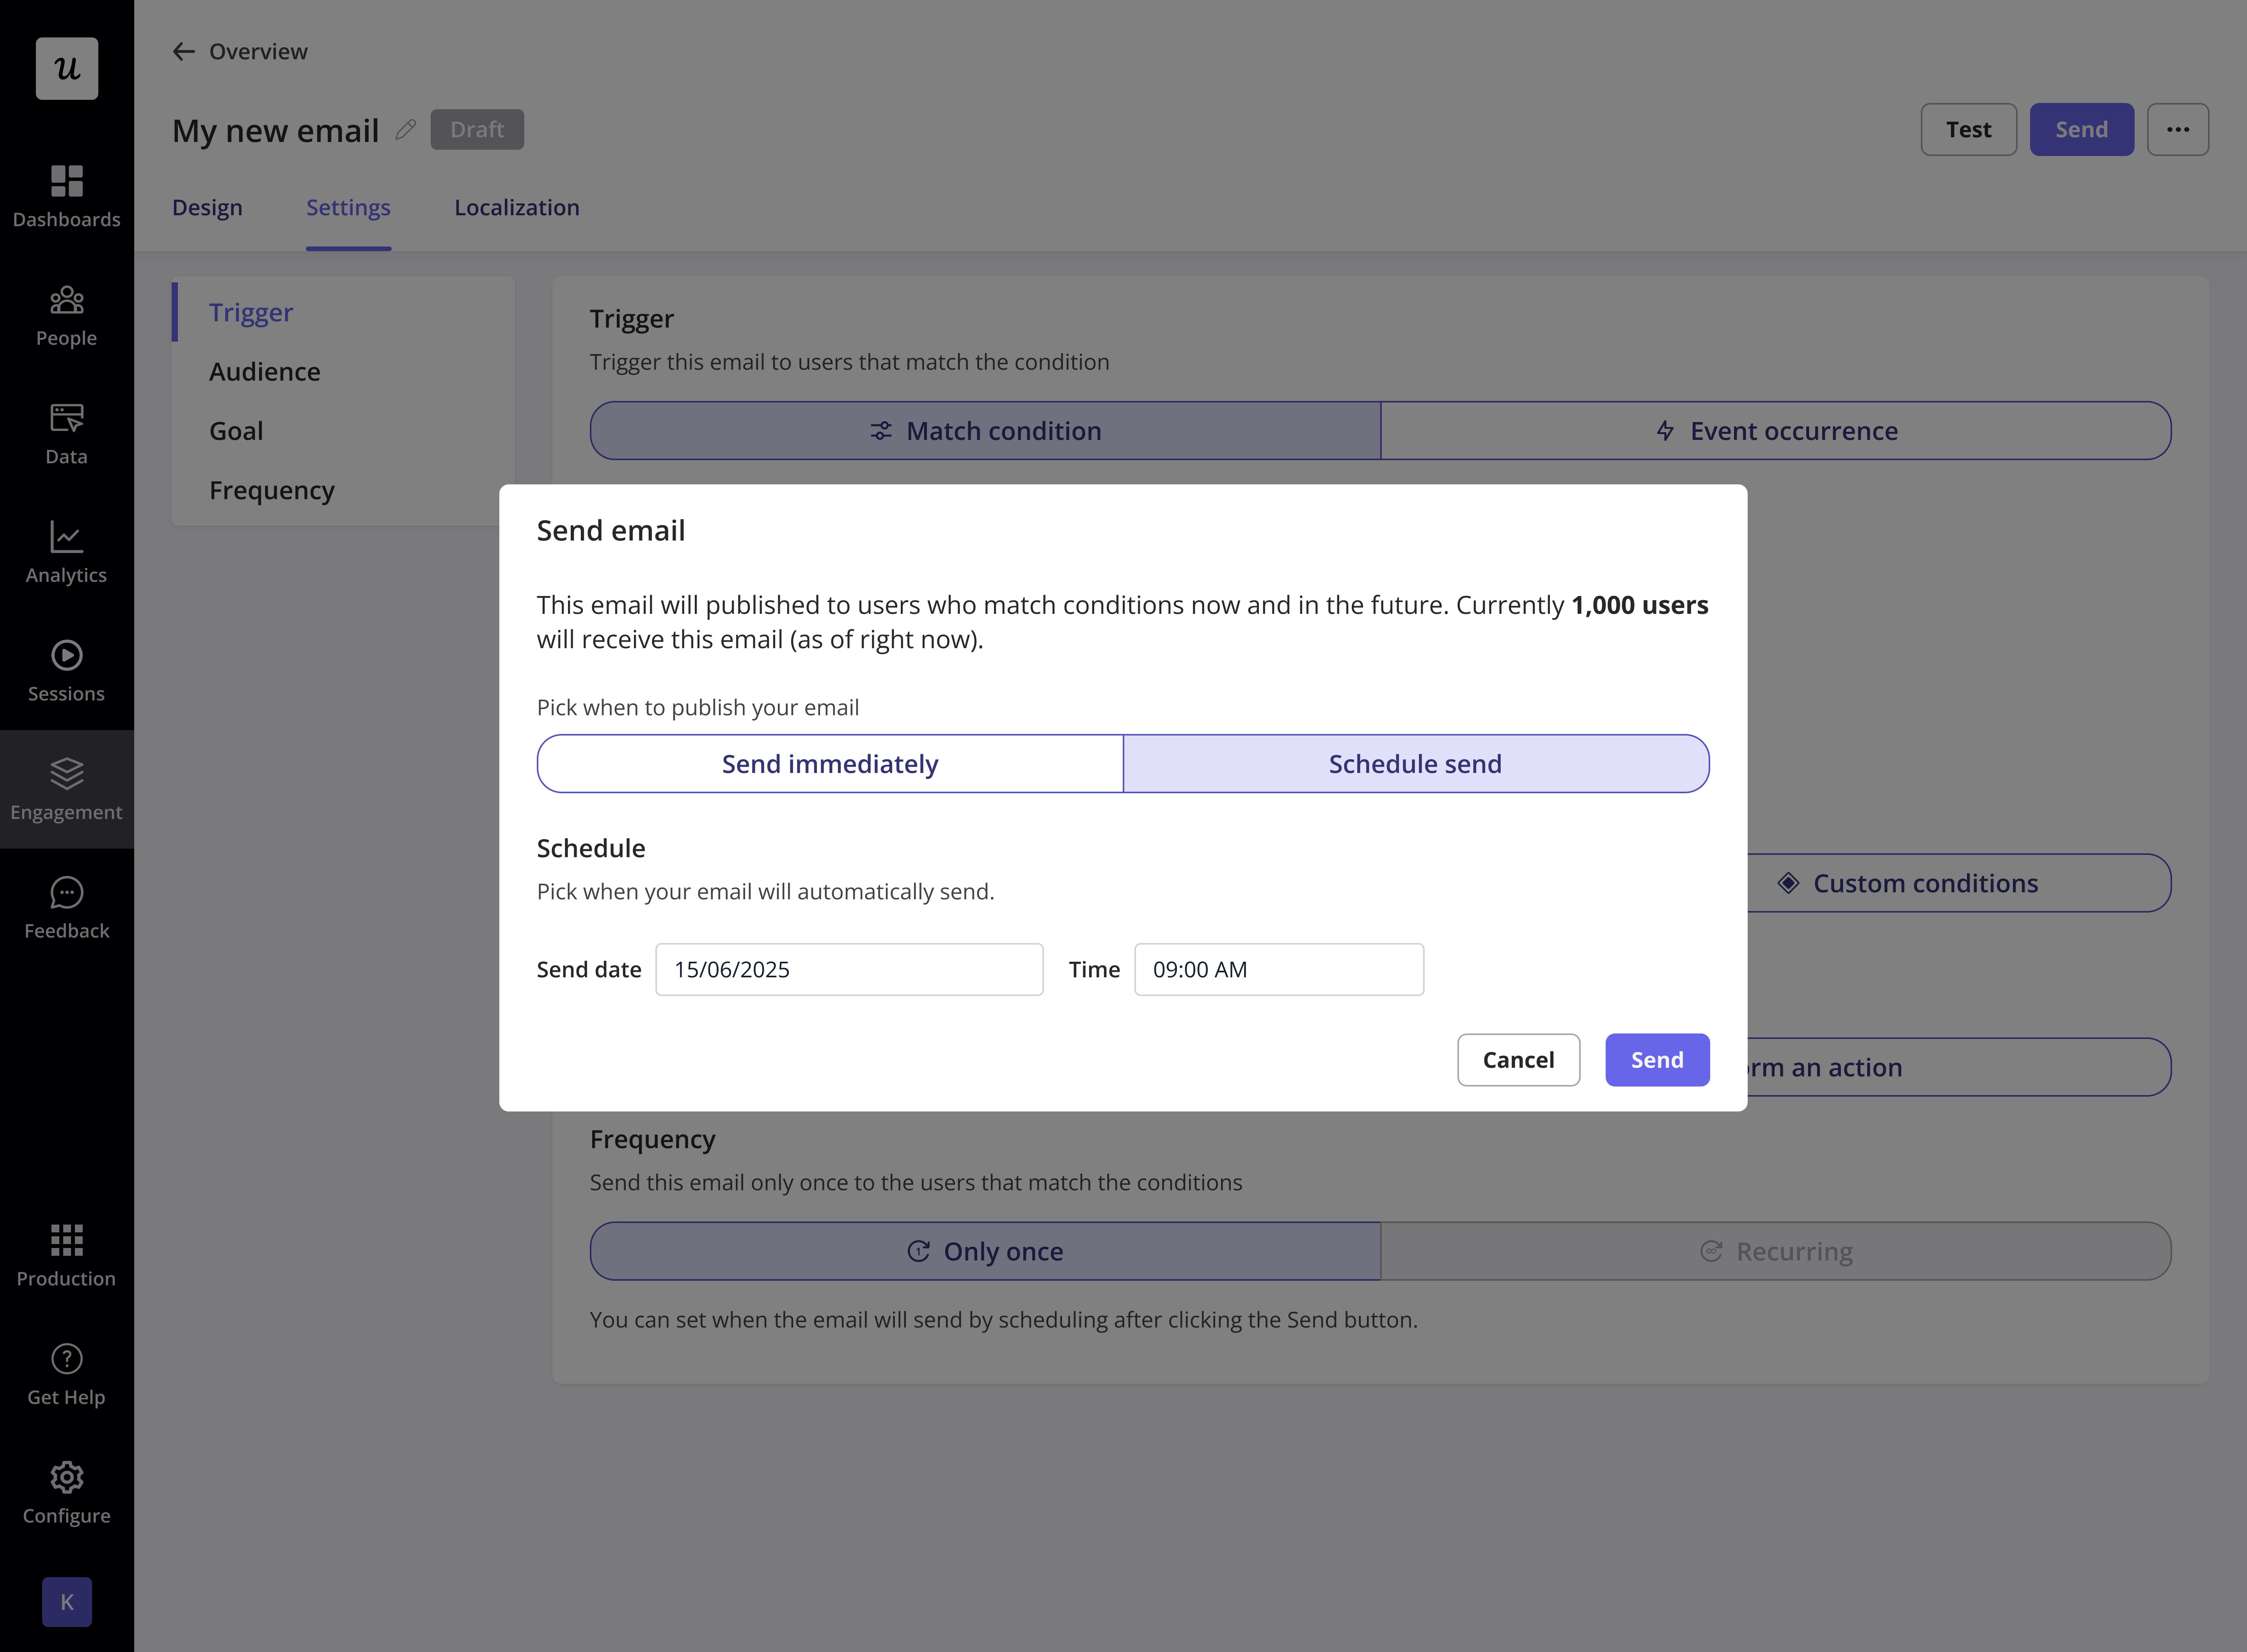
The label on the publish/send button will change based on your audience settings:
- Publish: appears when you select Dynamic audience (users who match conditions now and in the future). After the email is published, the button will change to “Unpublish”.
- Send: appears when you select Fixed audience (users who match conditions right now). Once the email is sent, the button will update to “Sent”.
Email role and permission
Userpilot gives you control over who can manage email communication within your account. By default, Account Owner users and the Admin have full permissions to create, edit, delete, send emails to customers, and email settings. For teams on the Enterprise plan, Userpilot offers advanced role management. You can create custom roles and assign specific permissions to teammates, allowing you to define who can:- Create new emails
- Edit existing emails
- Delete emails
- Send emails to customers
- Manage email settings, including signatures, domains, email addresses, and subscription types
Users on the Growth or Starter plans will need to upgrade to the Enterprise plan to create custom roles and benefit from the flexibility of assigning specific permissions across their organization. Feel free to reach out to our support team at support@userpilot.com.